1. Introduction
The Andonstar AD249S-M Plus is a versatile digital microscope designed for detailed observation and precision work, particularly in electronics repair and scientific applications. Featuring a 10.1-inch display and three specialized lenses, it offers a wide range of magnification capabilities and supports UHD 2160P video recording and HDMI output for enhanced viewing and documentation.
2. Package Contents
Upon unboxing, please ensure all the following components are present:
- 10.1 inch Microscope Monitor
- Metal Stand and Base
- Remote Control
- Plastic Extension Base
- Tool Holder
- Soldering Helping Hands
- Slides Kit
- 32GB SD Card
- Adapter
- Switch Cable
- USB Cable
- HDMI Cable
- Users Manual

Figure 1: All components included in the Andonstar AD249S-M Plus package.
3. Product Overview
The AD249S-M Plus features a robust design with a large display and multiple accessories to enhance its functionality.
3.1. Main Unit and Display
The core of the microscope is its 10.1-inch IPS LCD monitor, providing a wide 178-degree viewing angle and UHD 2160P resolution for clear, detailed images. The monitor includes on-board controls for power, mode selection, digital zoom, and photo/video capture.

Figure 2: The 10.1-inch 2160P IPS LCD monitor, showing its wide viewing angle and clear display.

Figure 3: Detailed view of the monitor's front buttons and rear ports, including SD card slot, USB, and HDMI.
3.2. Interchangeable Lenses
The microscope comes with three distinct lenses, each optimized for different magnification ranges and applications:
- Lens A (18-720x): Ideal for observing coins, plants, stones, and general circuit board inspection.
- Lens L (60-240x): Specifically designed for soldering and repairing tasks, offering a suitable working distance.
- Lens D (1560-2040x): For high-magnification observation of biological slides and microscopic specimens.
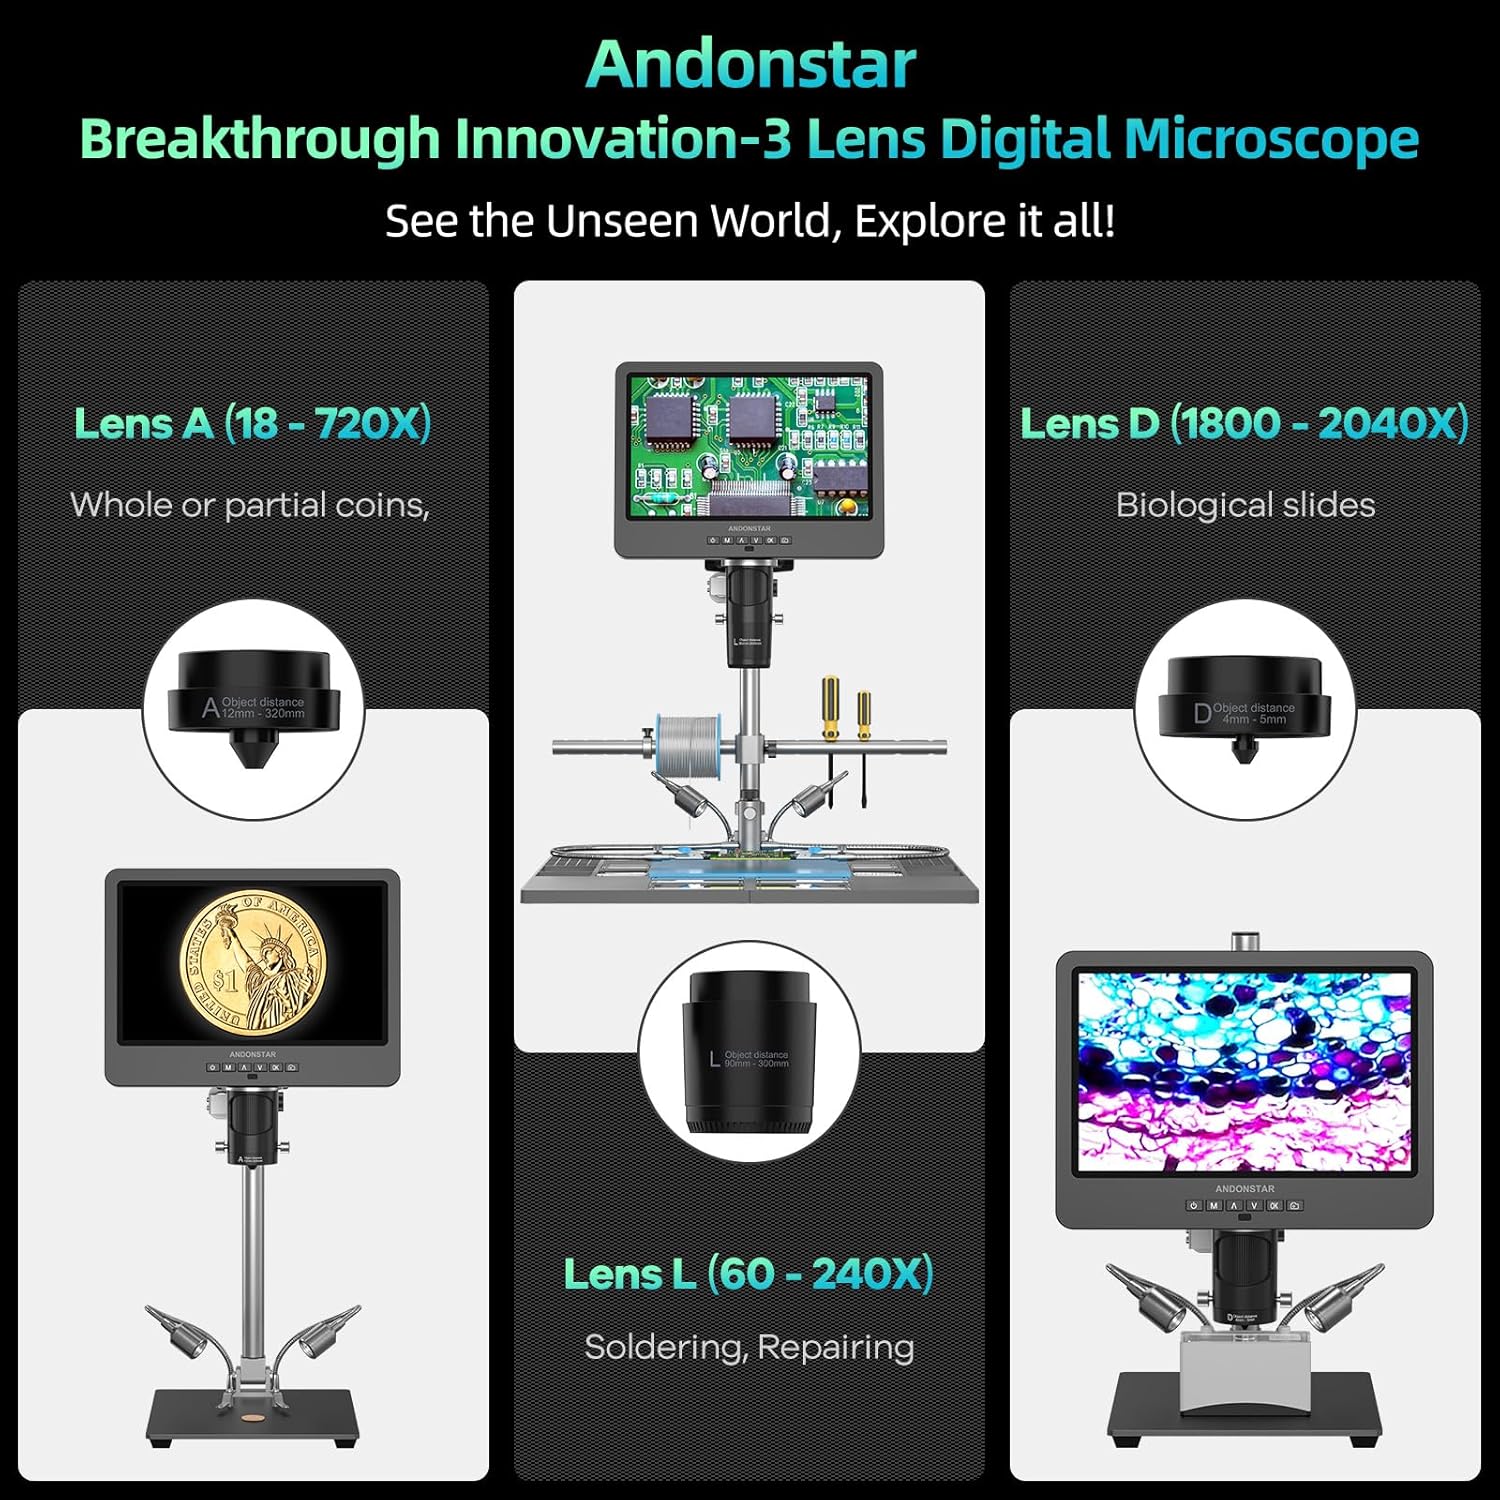
Figure 4: Visual representation of the three interchangeable lenses (A, L, D) and their primary uses.
3.3. Soldering Station Features
The AD249S-M Plus is upgraded to a versatile soldering station, featuring:
- Extension Base: Increases the soldering station area by 230%, providing ample workspace.
- Component Storage Boxes: Integrated into the extension base for organized storage of small parts.
- Tool Holder: Keeps essential tools within easy reach.
- Soldering Helping Hands: Rotatable clamps for stable positioning of components during soldering and repair.
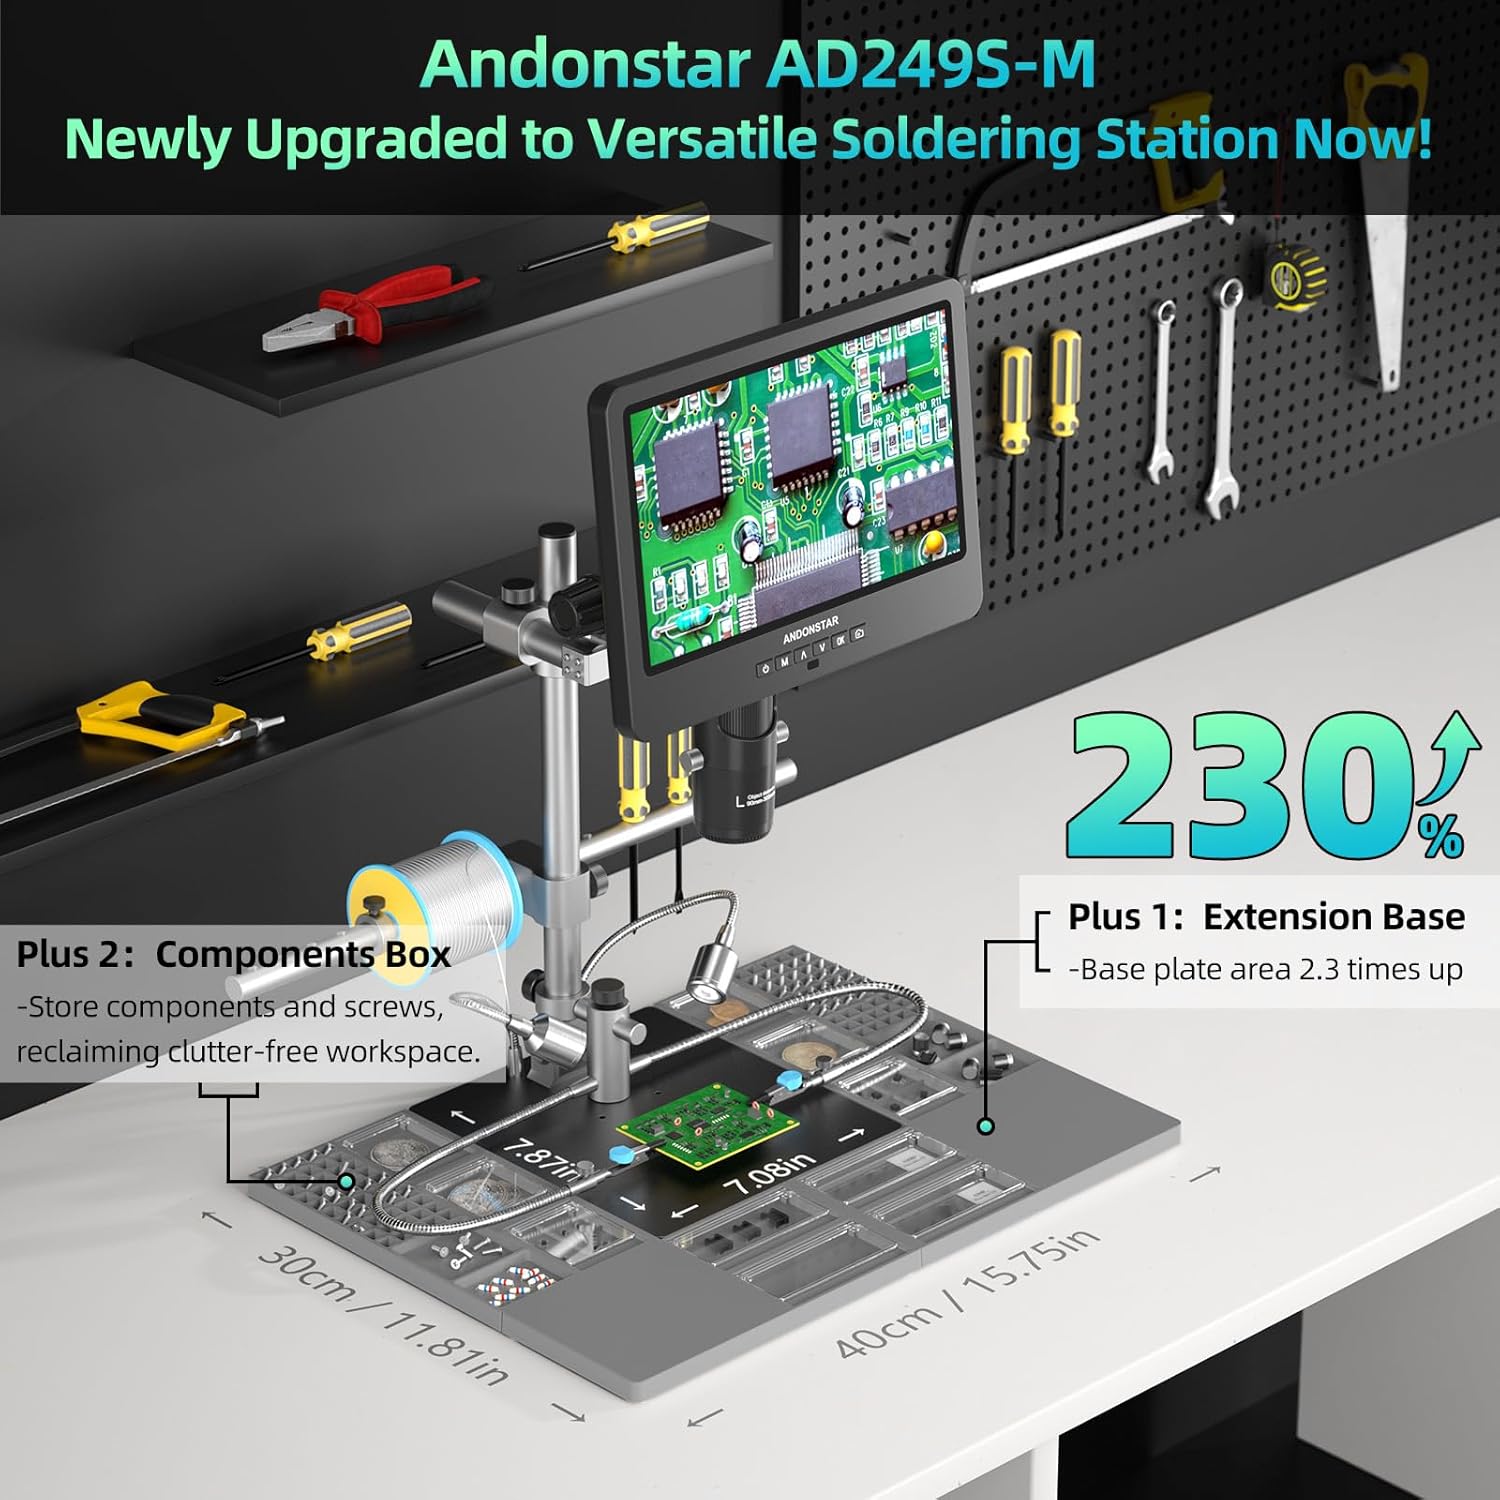
Figure 5: The newly upgraded soldering station with its extended base and integrated component storage.

Figure 6: Close-up of the tool holder and soldering helping hands, designed for convenient access and stability.
3.4. Adjustable Stand and Lighting
The microscope features an innovative Pro Boom Arm stand that allows for flexible adjustment of height and angle. Eight adjustable LED lights provide optimal illumination for various brightness requirements.

Figure 7: The Pro Boom Arm stand, highlighting its 360-degree rotation and adjustable features for precise positioning.
4. Setup
Follow these steps to assemble your Andonstar AD249S-M Plus digital microscope:
- Attach the column to the metal base using the provided screws.
- Mount the monitor with the attached lens assembly onto the column. Secure it with the bracket knob.
- Connect the LED lights to the base and position them to illuminate the working area.
- Slide the tool holder and soldering helping hands onto the beam, adjusting their positions as needed.
- Place the plastic extension base onto the metal base, ensuring it is stable.
- Insert the 32GB Micro SD card into the designated slot on the monitor.
- Connect the power adapter to the monitor and plug it into a power outlet.

Figure 8: All components laid out, illustrating the various parts involved in the assembly process.
5. Operating Instructions
5.1. Basic Operation
- Power On/Off: Press the power button on the monitor or remote control.
- Focus Adjustment: Rotate the focusing wheel on the microscope body to achieve a clear image.
- Object Distance: Rotate the bracket knob to adjust the distance between the lens and the object.
- Digital Zoom: Use the 'Up' and 'Down' buttons on the monitor or remote for digital magnification.
- Image Discoloration: The remote control offers functions like image discoloration for specific observation needs.
5.2. Lens Usage
Each lens is designed for specific magnification ranges. To change lenses, carefully remove the current lens by unscrewing it and attach the desired lens by screwing it into place.

Figure 9: The three lenses (A, L, D) and their respective magnification capabilities, allowing for diverse applications from coin inspection to biological slides.
5.3. Photo and Video Capture
Capture and store images and videos of your observations directly onto the provided 32GB Micro SD card. Use the dedicated buttons on the monitor or remote control for these functions.
5.4. External Display and PC Connection
The microscope supports HDMI output for seamless viewing on larger screens (UHD 1920x1080 24FPS). For advanced measurement, photo, and video capture, connect the microscope to a Windows PC using the USB cable and the professional measurement software.

Figure 10: The microscope connected to an external HDMI monitor and a PC via USB for extended functionality.

Figure 11: Step-by-step guide for connecting the microscope to a Windows PC and using the measurement software.
5.5. Official Product Video
Video 1: A detailed guide to the Andonstar AD249S-M microscope, demonstrating its features and capabilities for microsoldering and other applications. This video provides practical insights into setting up and utilizing the device effectively.
6. Maintenance
- Cleaning Lenses: Use a soft, lint-free cloth and lens cleaning solution to gently wipe the lenses. Avoid abrasive materials that could scratch the lens surface.
- General Cleaning: Wipe the monitor and stand with a dry or slightly damp cloth. Do not use harsh chemicals.
- Storage: Store the microscope in a dry, dust-free environment when not in use.
7. Troubleshooting
- No Power: Ensure the power adapter is securely connected to both the microscope and the power outlet. Check the switch cable for any damage.
- Blurry Image: Adjust the focusing wheel and the object distance. Ensure the correct lens is installed for the desired magnification. Clean the lens if necessary.
- No Image on External Monitor: Verify the HDMI cable connection. Ensure the external monitor is set to the correct input source.
- PC Connection Issues: Ensure the USB cable is properly connected. Download and install the latest version of the Microscope Measure software from the official Andonstar website. Select 'PC Camera' mode on the microscope screen.
- SD Card Not Recognized: Ensure the SD card is inserted correctly. Try reformatting the SD card (this will erase all data). Use a compatible Micro SD card (up to 32GB).
8. Specifications
| Feature | Detail |
|---|---|
| Product Dimensions | 15.75 x 11.81 x 12.99 inches |
| Item Weight | 1.13 ounces |
| Light Source Type | LED |
| Material | Metal |
| Real Angle of View | 178 Degrees |
| Magnification Maximum | 2040 x |
| Voltage | 240 Volts |
| Compatible Devices | Laptop, Personal Computer (Windows), Television |
| Power Source | Corded Electric |
9. Warranty & Support
Andonstar provides 24-hour professional after-sales service for this product. For any inquiries or support needs, please refer to the contact information provided in your product packaging or visit the official Andonstar website.