LUCKWIND LW-22
LUCKWIND 30" Bathroom Vanity with Sink Combo Instruction Manual
Model: LW-22 | Brand: LUCKWIND
Introduction
This manual provides detailed instructions for the assembly, operation, and maintenance of your LUCKWIND 30-inch Bathroom Vanity with Sink Combo (Model LW-22). Please read this manual thoroughly before beginning installation or use to ensure proper function and safety. Keep this manual for future reference.
Important Safety Information
WARNING: Always follow the assembly instructions carefully to avoid injury. Be aware of pinch points when closing the doors. Never attempt to repair or modify the electrical components yourself; always consult a licensed electrician. Keep the area around the cabinet clear of flammable materials.
- Ensure all parts are present and undamaged before assembly.
- Use appropriate tools and follow all local plumbing and electrical codes.
- Do not overtighten fasteners to prevent damage to components.
- Seek professional assistance for any complex plumbing or electrical work.
Package Contents
Your LUCKWIND Bathroom Vanity with Sink Combo is shipped in two separate packages, which may arrive on different dates. Please verify all components are received before starting assembly.

Figure 1: Illustration of the two packages containing the vanity components.
Package 1: Cabinet
- Vanity Cabinet (1)
- Assembly Manual (1)
- Hardware for Cabinet Assembly
Package 2: Sink & Accessories
- Ceramic Sink Basin (1)
- Matte Black Faucet (1)
- Drain Assembly (1)
- Hardware for Sink/Faucet Installation
Setup and Assembly
Full assembly is required for this product. It is recommended to have two people for assembly. Refer to the included assembly manual for step-by-step instructions and diagrams. Ensure you have adequate space and the necessary tools before beginning.
Key Assembly Considerations:
- Cabinet Frame Assembly: Assemble the metal frame and attach the engineered wood cabinet panels securely.
- Sink Installation: Carefully place the ceramic sink onto the cabinet. Ensure it is properly aligned and sealed according to plumbing best practices.
- Faucet and Drain Connection: Install the matte black faucet and drain assembly. Connect hot and cold water supply lines. Ensure all connections are watertight to prevent leaks.
- Door Installation: Attach the soft-closing doors using the provided hinges. Adjust hinges as needed for proper alignment and smooth operation.
- Plumbing Adjustments: Depending on your existing plumbing, some modifications to the cabinet or wall may be necessary to accommodate drainpipes and water valves. Plan these adjustments carefully before cutting.

Figure 2: Key dimensions of the vanity components for planning installation.
Product Features and Components
The LUCKWIND Bathroom Vanity is designed with functionality and durability in mind. Below are its primary features:
- Ceramic Sink: Features a high-temperature calcined ceramic vessel sink, designed for easy cleaning and stain removal. Includes a matte black faucet and hot/cold water pipes.
- Sturdy and Durable Structure: Constructed from high-quality thickened medium density fiberboard with a black wood grain finish, paired with a robust square tube structure base for long-lasting use. Resistant to moisture and humidity.
- Spacious Storage Solution: Equipped with two soft-closing doors and a 1-tier open shelf, providing ample space for bathroom and laundry essentials.
- High Quality Hardware: Doors feature adjustable soft-close hinges to prevent slamming and ensure gentle closure. Exquisite handles enhance the vanity's elegant appearance.

Figure 3: Detail of the ceramic sink and matte black faucet.
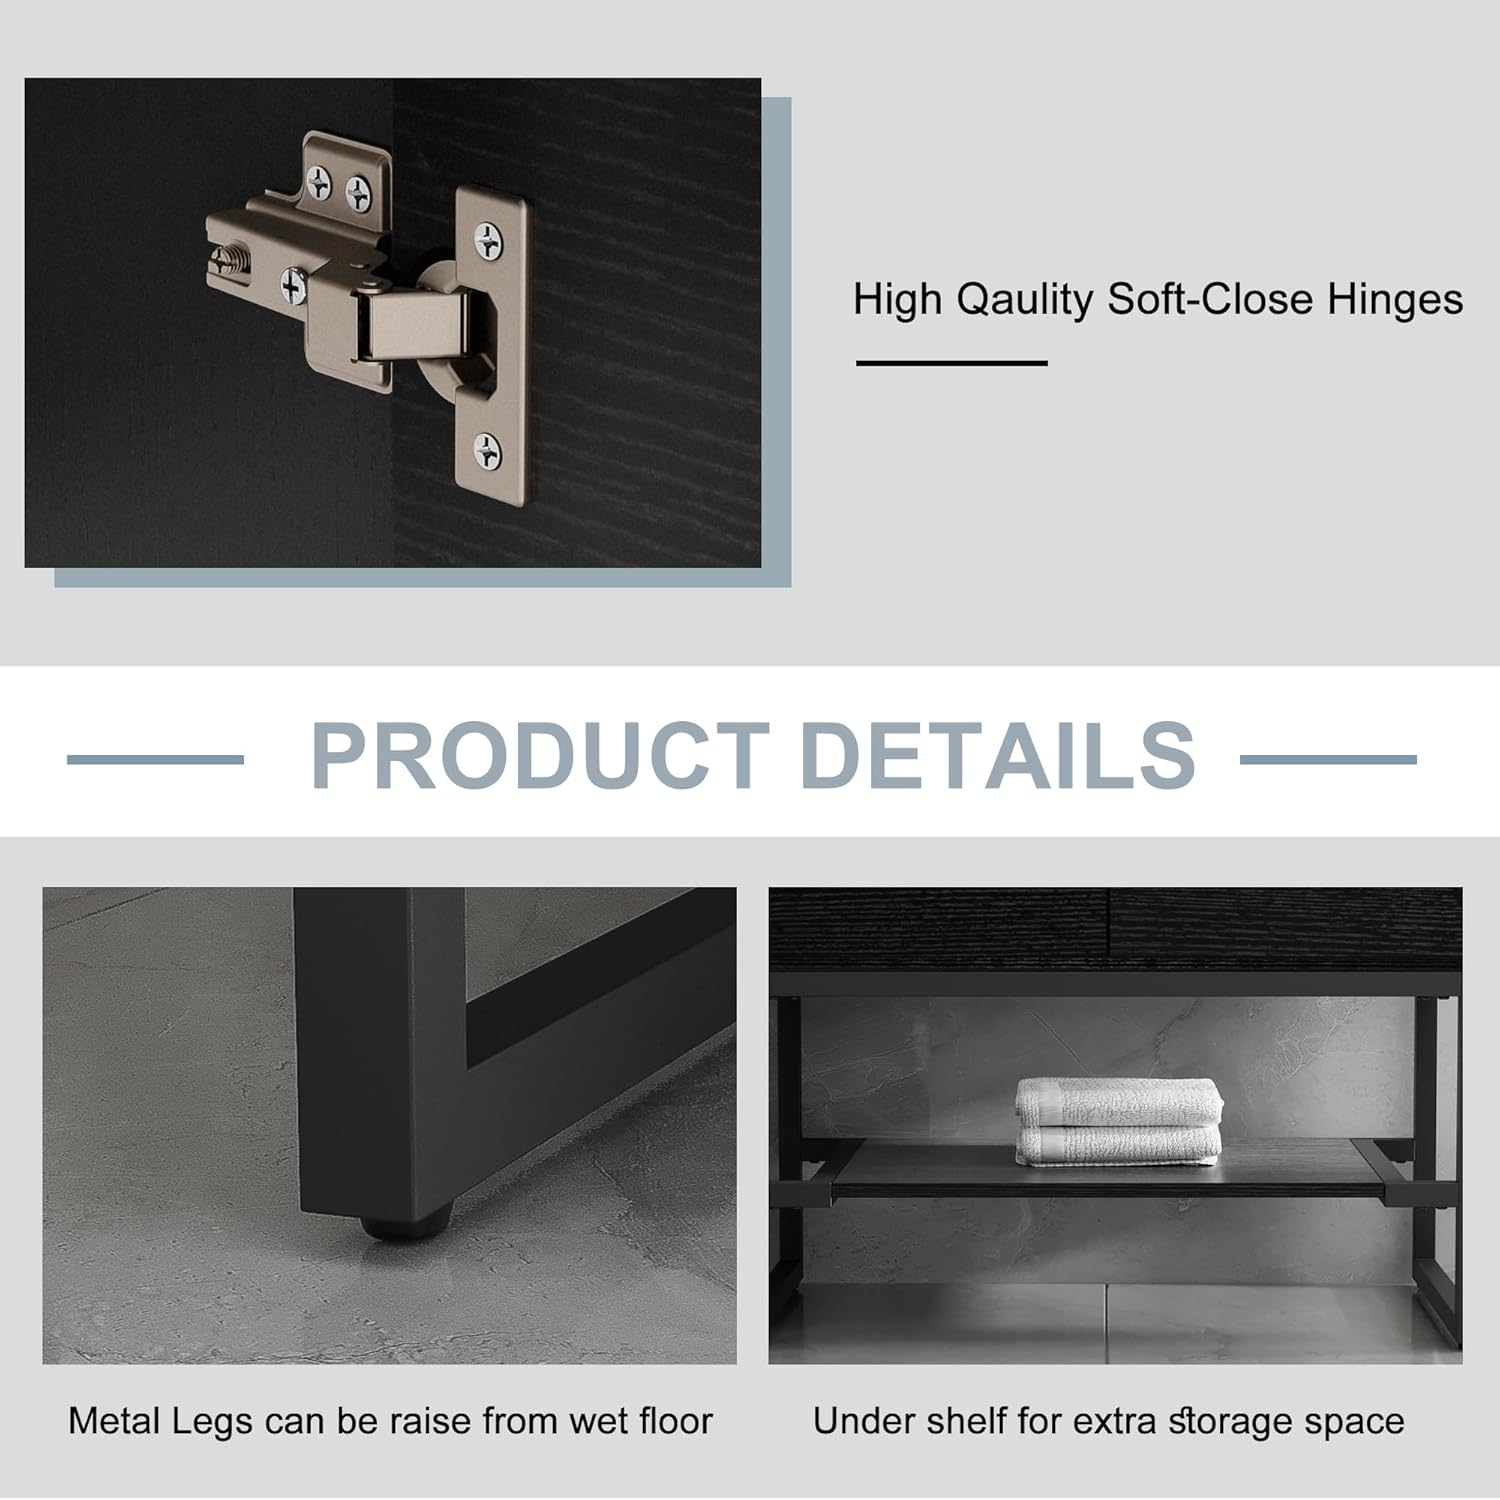
Figure 4: Details of the high-quality soft-close hinges and metal legs.
Operation
Once fully assembled and connected to plumbing, the LUCKWIND Bathroom Vanity operates like a standard bathroom sink. The matte black faucet controls water flow and temperature. The soft-closing doors provide access to the enclosed storage, while the open shelf offers convenient access to frequently used items.
- Water Flow: Turn the faucet handle to control water flow.
- Temperature Control: Adjust the faucet handle left or right for hot or cold water, respectively.
- Storage Access: Gently open and close the cabinet doors. The soft-close hinges will prevent abrupt slamming.
Maintenance
Regular maintenance will help preserve the appearance and functionality of your vanity.
- Cleaning the Vanity: Wipe the cabinet surfaces with a damp cloth. Avoid abrasive cleaners or harsh chemicals that could damage the finish.
- Cleaning the Ceramic Sink: The ceramic sink is designed for easy cleaning. Use mild soap and water for routine cleaning. For tougher stains, non-abrasive bathroom cleaners can be used. Rinse thoroughly after cleaning.
- Faucet Care: Clean the matte black faucet with a soft cloth and mild soap. Do not use abrasive cleaners or pads, as they can scratch the finish.
- Hinge Maintenance: Periodically check the soft-close hinges for smooth operation. If needed, gently wipe away any dust or debris.
- Moisture Control: While the cabinet is designed to resist moisture, it is good practice to wipe up any standing water on surfaces promptly to prevent long-term damage.
Troubleshooting
This section addresses common issues you might encounter with your vanity.
| Problem | Possible Cause | Solution |
|---|---|---|
| Water Leakage from Faucet/Pipes | Loose connections; damaged seals; improper installation of faucet supply tubes. | Check all plumbing connections and tighten if loose. Ensure Teflon tape or plumber's putty is used where appropriate. Inspect seals and replace if damaged. If issues persist, consult a qualified plumber. |
| Cabinet Doors Do Not Close Properly | Misaligned hinges; obstruction; loose hinge screws. | Adjust the soft-close hinges using a screwdriver. Ensure no items inside the cabinet are blocking the door path. Tighten any loose hinge screws. |
| Difficulty with Plumbing Connections (Drain/Water Valves) | Existing plumbing does not align with cabinet cutouts. | Carefully measure and make necessary modifications (e.g., cutting) to the cabinet back panel or shelf to accommodate existing plumbing. Ensure cuts are precise and do not compromise structural integrity. Professional installation may be required. |
| Vanity Appears Unstable | Loose assembly screws; uneven flooring. | Verify all assembly screws are tightened securely. If the floor is uneven, use shims under the metal legs to level the vanity. |
Specifications
| Model Number | LW-22 |
| Brand | LUCKWIND |
| Color | Black |
| Size | 30 Inch |
| Material | Engineered Wood |
| Product Dimensions (L x W x H) | 17.6 x 30 x 32.5 inches |
| Item Weight | 88.5 pounds |
| Number of Shelves | 1 |
| Special Feature | Stain Resistant |
| Country of Origin | China |
Warranty and Support
For specific warranty information regarding your LUCKWIND 30" Bathroom Vanity with Sink Combo, please refer to the documentation included with your purchase or contact LUCKWIND customer service directly. Keep your proof of purchase for warranty claims.
If you require further assistance, have questions about assembly, or need to report missing/damaged parts, please contact LUCKWIND customer support. Contact details are typically available on the product packaging or the official LUCKWIND website.
Ask a question about this manual
Ask about setup, troubleshooting, compatibility, parts, safety, or missing instructions. Manuals+ will review the question and use this page’s manual context to help answer it.