1. Introduction
Thank you for choosing the GAOMON Gaming Desk. This L-shaped desk is designed to provide a versatile and efficient workspace for gaming, studying, or home office activities. It features a built-in charging station, ample storage, and a durable construction. This manual provides detailed instructions for assembly, operation, maintenance, and troubleshooting to ensure you get the most out of your new desk.
Please read this manual carefully before assembly and retain it for future reference.
2. Safety Information
- Always assemble the desk on a soft, clean surface to prevent scratches.
- Ensure all screws and fasteners are securely tightened before use. Periodically check and retighten if necessary.
- Do not overload the desk or shelves beyond their weight capacity.
- Keep children away from small parts during assembly to avoid choking hazards.
- For electrical components (charging station), ensure proper grounding and avoid contact with water. Do not use if the power cord is damaged.
- It is recommended that two people assemble this desk for safety and ease.
3. Package Contents
Please verify that all components listed below are present before beginning assembly. If any parts are missing or damaged, contact GAOMON customer support.
| Part | Description | Quantity |
|---|---|---|
| A | Main Desktop Panel | 1 |
| B | Side Desktop Panel | 1 |
| C | L-shaped Frame Legs | Various |
| D | Crossbars/Support Beams | Various |
| E | Charging Station Unit (4 AC Outlets, 1 USB Port) | 1 |
| F | Fabric Storage Bag | 1 |
| G | Removable Monitor Stands | 2 |
| H | Wire Mesh Shelves | 2 |
| I | Assembly Hardware (Screws, Allen Wrench, etc.) | 1 Set |
| J | Adjustable Foot Pads | Various |
4. Setup and Assembly Instructions
Follow these steps carefully to assemble your GAOMON Gaming Desk. All parts are numbered for easy identification.
Step 1: Assemble the Frame
- Attach the main frame legs (C) to the crossbars (D) using the provided screws (I). Do not fully tighten screws until all parts are aligned.
- Connect the L-shaped section of the frame. Ensure the orientation matches your desired left or right configuration.
- Once all frame parts are loosely connected, gently tighten all screws.
Step 2: Attach Desktop Panels
- Carefully place the Main Desktop Panel (A) and Side Desktop Panel (B) onto the assembled frame.
- Align the pre-drilled holes on the desktop panels with the holes on the frame.
- Secure the desktop panels to the frame using the appropriate screws (I).
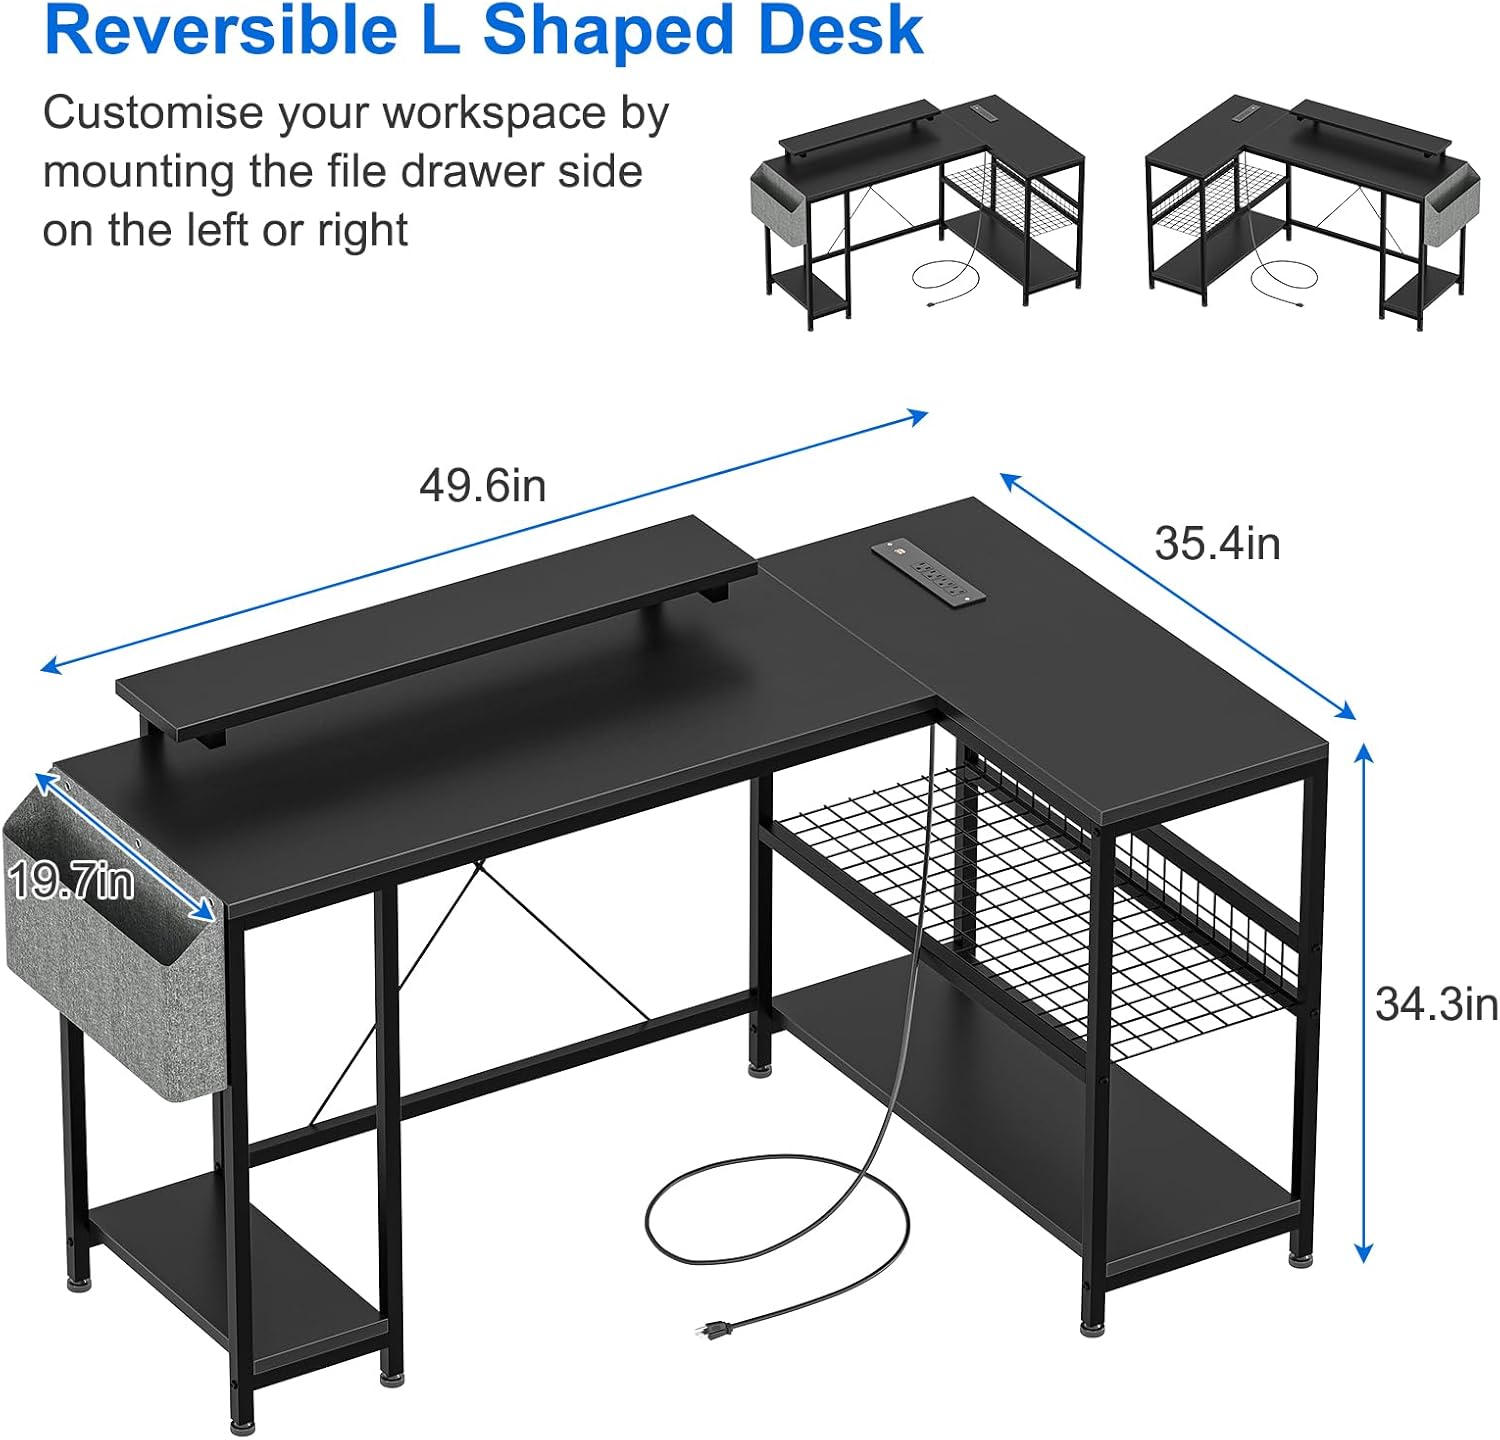
Figure 1: Desk dimensions and reversible L-shaped setup. The desk measures approximately 49.6 inches on the long side, 35.4 inches on the short side, and 34.3 inches in height. The main desktop depth is 19.7 inches.
Step 3: Install Shelves and Charging Station
- Insert the Wire Mesh Shelves (H) into the designated slots on the L-shaped section of the frame.
- Mount the Charging Station Unit (E) to the underside of the desktop or in the designated area, ensuring the power cord can reach an outlet.

Figure 2: Detail of the integrated charging station, featuring 4 AC outlets (125V 12A) and 1 USB port (5V-2A), with a 6.6-ft power cord.
Step 4: Attach Fabric Storage Bag and Monitor Stands
- Hook the Fabric Storage Bag (F) onto the side of the desk frame as desired.
- Place the Removable Monitor Stands (G) on the desktop in your preferred positions.

Figure 3: Features including the upgraded fabric bag for storage, two removable monitor stands, and double-layer shelves for organization.
Step 5: Final Adjustments
- Adjust the Adjustable Foot Pads (J) on the bottom of the desk legs to ensure stability and level the desk on uneven floors.
- Double-check all screws to ensure they are fully tightened.
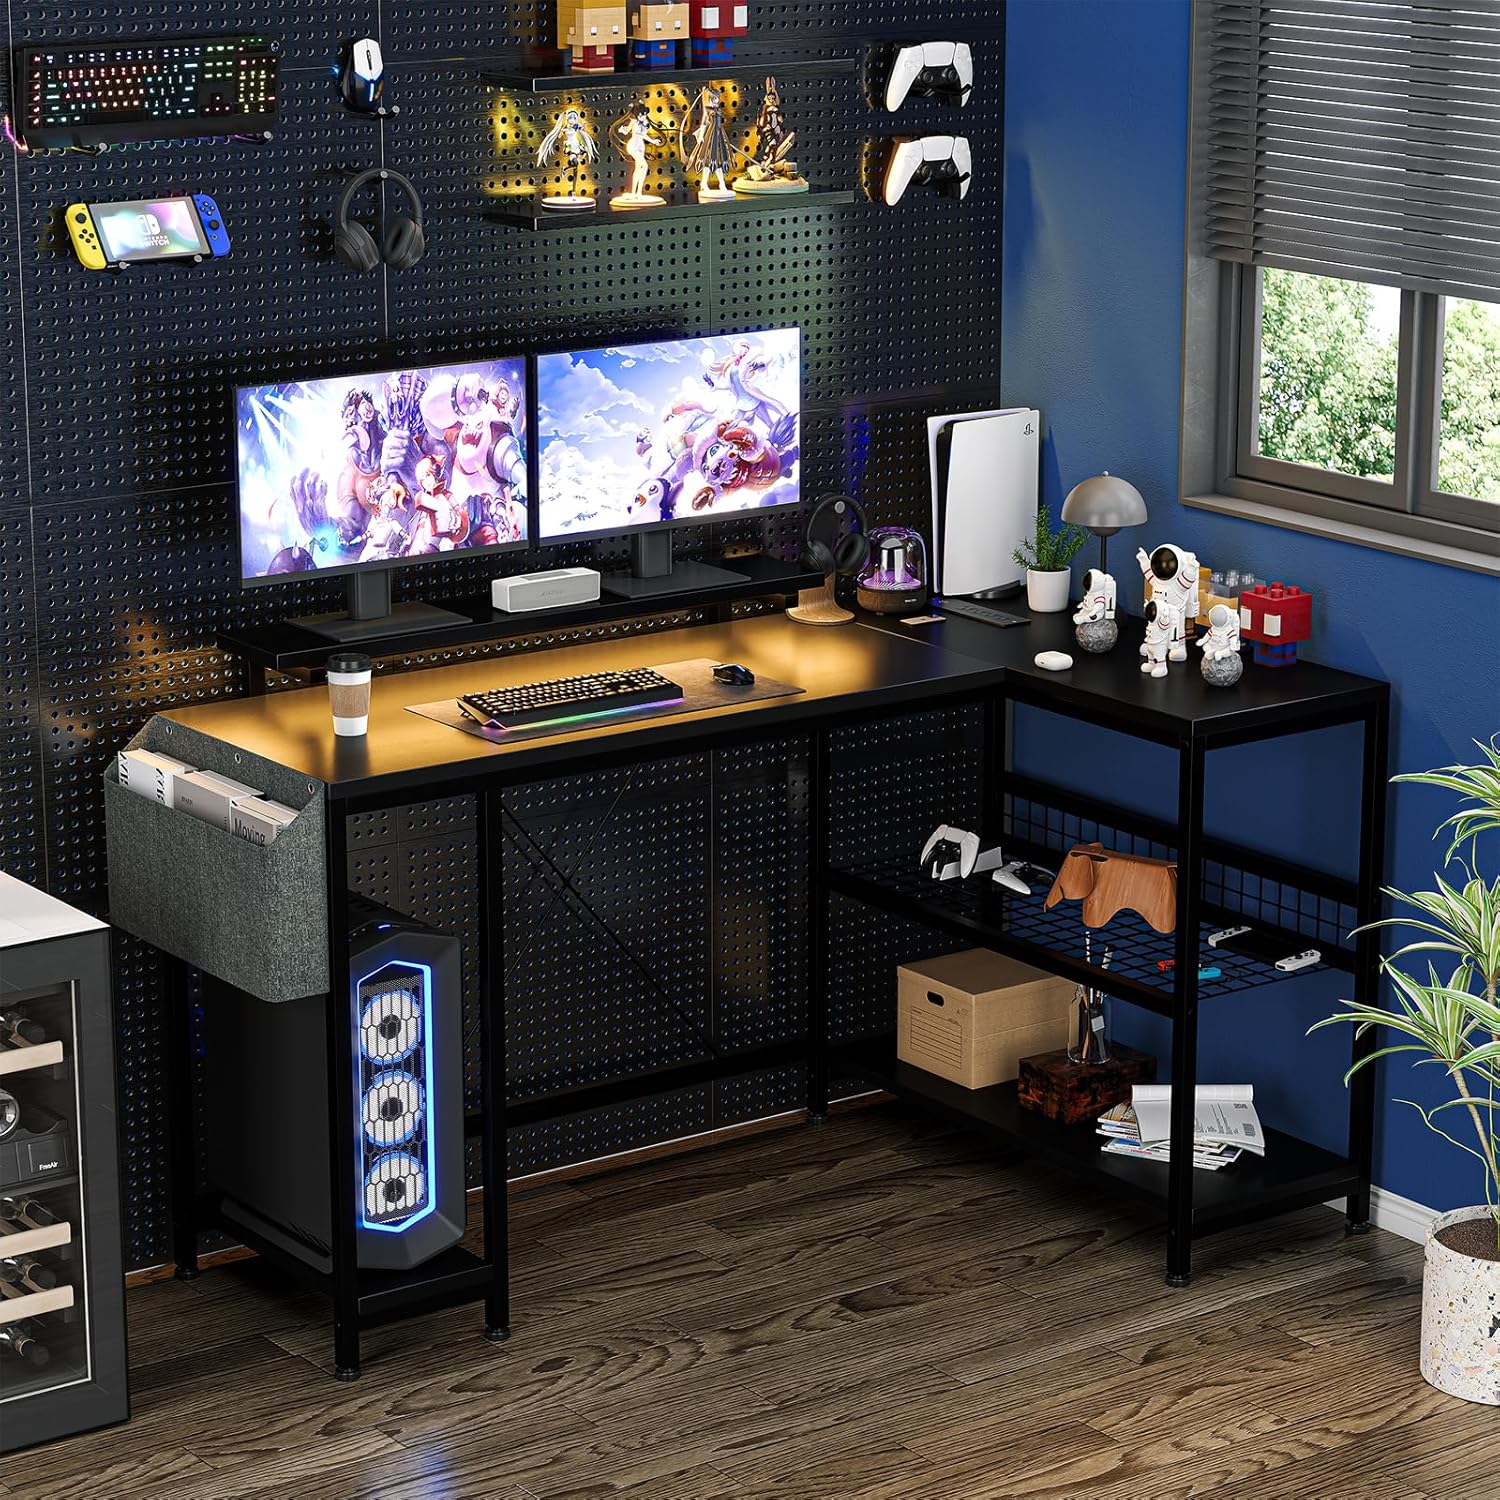
Figure 4: The GAOMON Gaming Desk fully assembled and set up in a modern gaming environment, demonstrating its functional design.
5. Operating Instructions
5.1 Using the Charging Station
- Plug the desk's power cord into a standard wall outlet.
- The integrated charging station provides 4 AC outlets and 1 USB charging port.
- Connect your electronic devices (smartphones, gaming devices, Bluetooth devices, etc.) to the appropriate outlets for charging.
- Ensure devices are compatible with the provided voltage (125V for AC, 5V-2A for USB).
5.2 Reversible L-Shaped Configuration
The desk is designed to be reversible, allowing you to configure the L-shape to either the left or right side to best suit your space. This configuration is determined during the initial assembly of the frame (Step 1). If you wish to change the orientation after assembly, you will need to partially disassemble the frame and reassemble it in the desired direction.
5.3 Utilizing Monitor Stands and Storage
- The two removable monitor stands can be placed anywhere on the main desktop to elevate your monitors to an ergonomic viewing height.
- Use the fabric storage bag for documents, magazines, or other small items to keep your desktop clutter-free.
- The wire mesh shelves provide additional space for books, files, gaming consoles, or other accessories.

Figure 5: Overhead view highlighting the two removable monitor stands, which help promote ergonomic posture by elevating screens.
6. Maintenance
- Cleaning: Wipe the desktop and metal frame with a soft, damp cloth. Avoid harsh chemicals or abrasive cleaners that could damage the finish.
- Spills: The desktop is waterproof. Wipe up spills immediately to prevent potential damage or stains.
- Fasteners: Periodically check all screws and bolts to ensure they remain tight. Retighten as needed to maintain desk stability.
- Electrical Components: Keep the charging station dry and free from dust. Do not attempt to repair the electrical components yourself.
7. Troubleshooting
| Problem | Possible Cause | Solution |
|---|---|---|
| Desk is wobbly | Uneven floor; loose screws | Adjust the foot pads on the bottom of the legs. Check and tighten all assembly screws. |
| Charging station not working | Power cord not plugged in; outlet issue; device not compatible | Ensure the power cord is securely plugged into a working wall outlet. Test the outlet with another device. Verify your device's power requirements. |
| Parts do not align during assembly | Screws overtightened prematurely; incorrect orientation | Loosen all screws, realign parts, then gradually tighten. Refer to the assembly diagrams for correct orientation. |
| Missing parts | Packaging error | Contact GAOMON customer support with your purchase details. |
8. Specifications
| Feature | Detail |
|---|---|
| Model Number | PHO_11GBD491-DF |
| Dimensions (Overall) | 44.9"D x 19.7"W x 34.3"H (L-shape configuration) |
| Main Desktop Size | 46.7"L x 19.7"D |
| Color | Black |
| Material | MDF Board (Desktop), Heavy-duty Powder Coated Steel (Frame) |
| Special Features | Reversible L-shape, Built-in Charging Station, 2 Removable Monitor Stands, Fabric Storage Bag, Wire Mesh Shelves |
| Charging Station | 4 AC Outlets (125V 12A), 1 USB Port (5V-2A), 6.6-ft Power Cord |
| Assembly Required | Yes |
| Item Weight | 44.09 Pounds |
9. Warranty and Support
GAOMON products are manufactured to high-quality standards. For warranty information, technical support, or to report missing/damaged parts, please contact GAOMON customer service through the retailer where the product was purchased or visit the official GAOMON website.
Please have your model number (PHO_11GBD491-DF) and proof of purchase ready when contacting support.