1. Product Overview
The Mitlvge 1.6 Cu Ft Home Safe is designed to provide robust security for your valuable possessions. With an exterior size of 14.56"D x 12.2"W x 11.81"H and an interior capacity of 1.6 cubic feet, it is suitable for storing sensitive documents, electronic drives, spare credit cards, medicines, firearms, and other valuables away from unauthorized access.
Key features include a 50mm extra-thick explosion-proof steel door, three 20mm high-strength solid locking bolts, and pry-proof concealed hinges, ensuring long-lasting protection against forced entry. The safe also comes equipped with a fireproof and water-resistant document bag for enhanced protection of critical items.

Figure 1: Mitlvge 1.6 Cu Ft Home Safe with door open, revealing organized interior and included fireproof document bag.
2. What's Included
Upon unboxing your Mitlvge Home Safe, please verify that all the following components are present:
- 1 x Large Safe Box (1.6 Cu Ft)
- 2 x Emergency Keys
- 1 x User Manual
- 4 x Expansion Bolts (for mounting)
- 1 x External Battery Box
- 1 x Fireproof Document Bag (A5 letter size, 5.3"x8")
Important: Do not store the emergency keys or the external battery box inside the safe.

Figure 2: All components included with the Mitlvge 1.6 Cu Ft Home Safe.
3. Setup
3.1 Battery Installation
The digital keypad requires 4 AA batteries (not included) for operation. Install them into the battery compartment located on the inside of the safe door.

Figure 3: External battery box, which can be used for temporary power if internal batteries are depleted.
3.2 Initial Opening (Using Emergency Key)
For the first use, or if you forget your passcode or the batteries are dead, you can open the safe using the emergency key:
- Locate the hidden keyhole on the keypad. It is usually covered by a small rubber cap or a discreet panel.
- Insert one of the emergency keys into the keyhole.
- Turn the emergency key counter-clockwise.
- Simultaneously, turn the main knob on the safe door clockwise to open the door.


Figure 4: Steps for using the emergency key to open the safe.
3.3 Setting Your Passcode
After opening the safe, you can set your personal passcode:
- With the safe door open, locate the red reset button on the inside of the door (usually near the hinge).
- Press the red reset button. The keypad will beep, and the "READY" light will illuminate.
- Enter your desired 3-8 digit passcode on the keypad.
- Press the '#' key to confirm. The "PROCEED" light will flash, indicating successful programming.
- Test your new passcode with the door open before closing it.

Figure 5: Location of the red reset button for passcode programming.
4. Operating Instructions
4.1 Unlocking the Safe
There are three primary methods to unlock your Mitlvge Home Safe:
- Digital Keypad: Enter your programmed passcode (3-8 digits) followed by the '#' key. The "PROCEED" light will illuminate, and you can then turn the knob clockwise to open the door.
- Emergency Key: As detailed in Section 3.2, use one of the provided emergency keys in conjunction with the main knob.
- External Battery Box: If the internal batteries are depleted, connect the external battery box (with 4 AA batteries installed) to the port on the keypad. This will power the keypad, allowing you to enter your passcode and open the safe.

Figure 6: Overview of unlocking methods including digital keypad, emergency key, and external battery box.
4.2 Alarm System
The safe is equipped with an anti-theft alarm system:
- If an incorrect passcode is entered 3 times consecutively, the system will lock for 20 seconds and sound an alarm.
- If an incorrect passcode is entered 6 times consecutively, the system will lock for 5 minutes and sound an alarm.

Figure 7: The smart alarm system activates upon multiple incorrect passcode entries.
4.3 Silent Mode
You can activate silent mode to disable keypad sounds if desired. Refer to the detailed user manual (included in the package) for specific instructions on enabling/disabling silent mode.
5. Installation
To enhance security and prevent unauthorized removal, the safe can be securely mounted to a wall or floor. The safe features two pre-drilled mounting holes on the back and two on the bottom.
5.1 Mounting Steps
- Choose a suitable location for installation (e.g., inside a closet, under a desk).
- Mark the drilling points on the wall or floor using the safe's pre-drilled holes as a template.
- Drill holes at the marked points using an appropriate drill bit for your wall/floor material.
- Insert the included expansion bolts into the drilled holes.
- Align the safe with the bolts and secure it tightly using a wrench or appropriate tool.
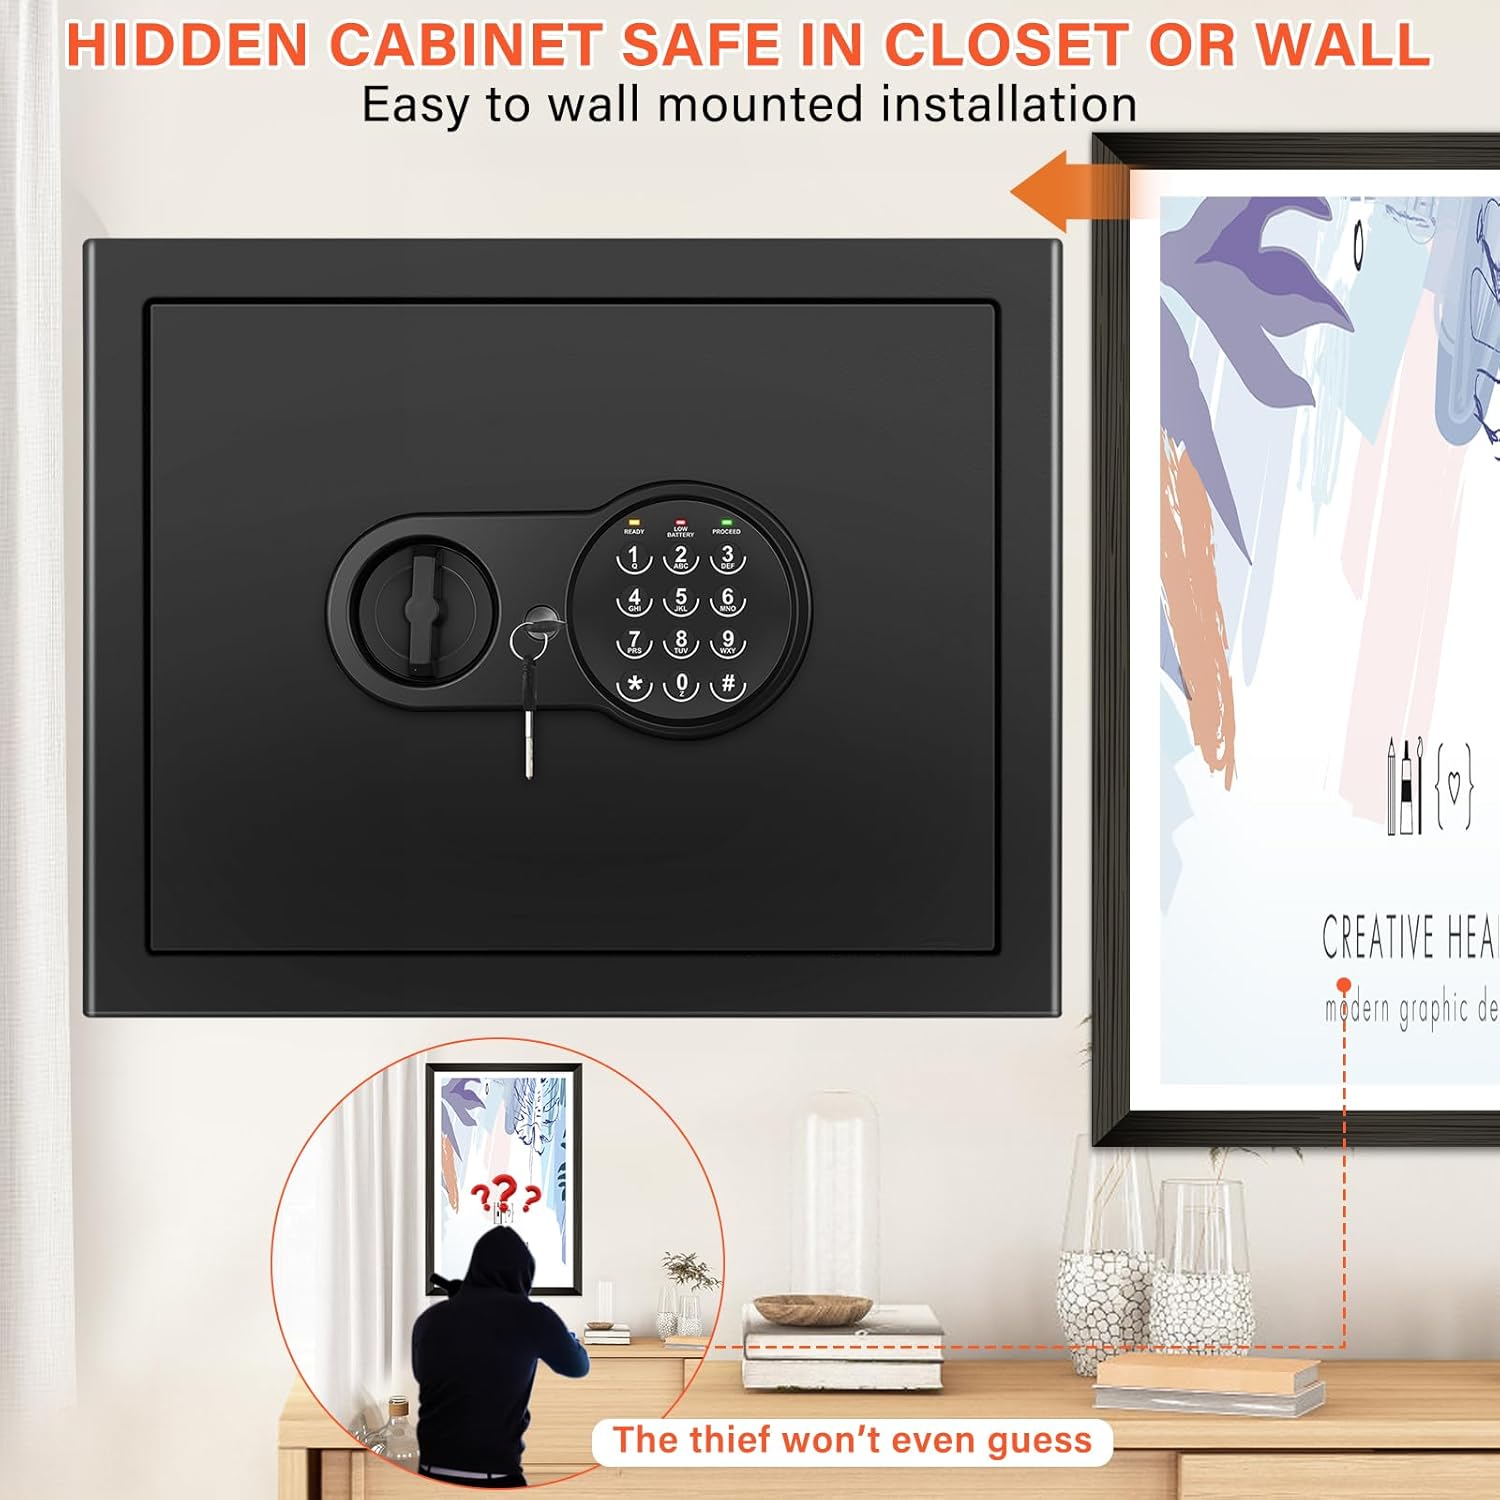
Figure 8: The safe can be discreetly installed in various locations, such as a closet, for added security.
6. Maintenance
- Battery Replacement: Replace the AA batteries in the keypad when the "LOW BATTERY" indicator light illuminates to ensure continuous operation.
- Cleaning: Clean the exterior of the safe with a soft, damp cloth. Avoid using abrasive cleaners or solvents that could damage the finish.
- Internal Shelf: The removable shelf can be taken out or reinserted as needed to accommodate items of various sizes.
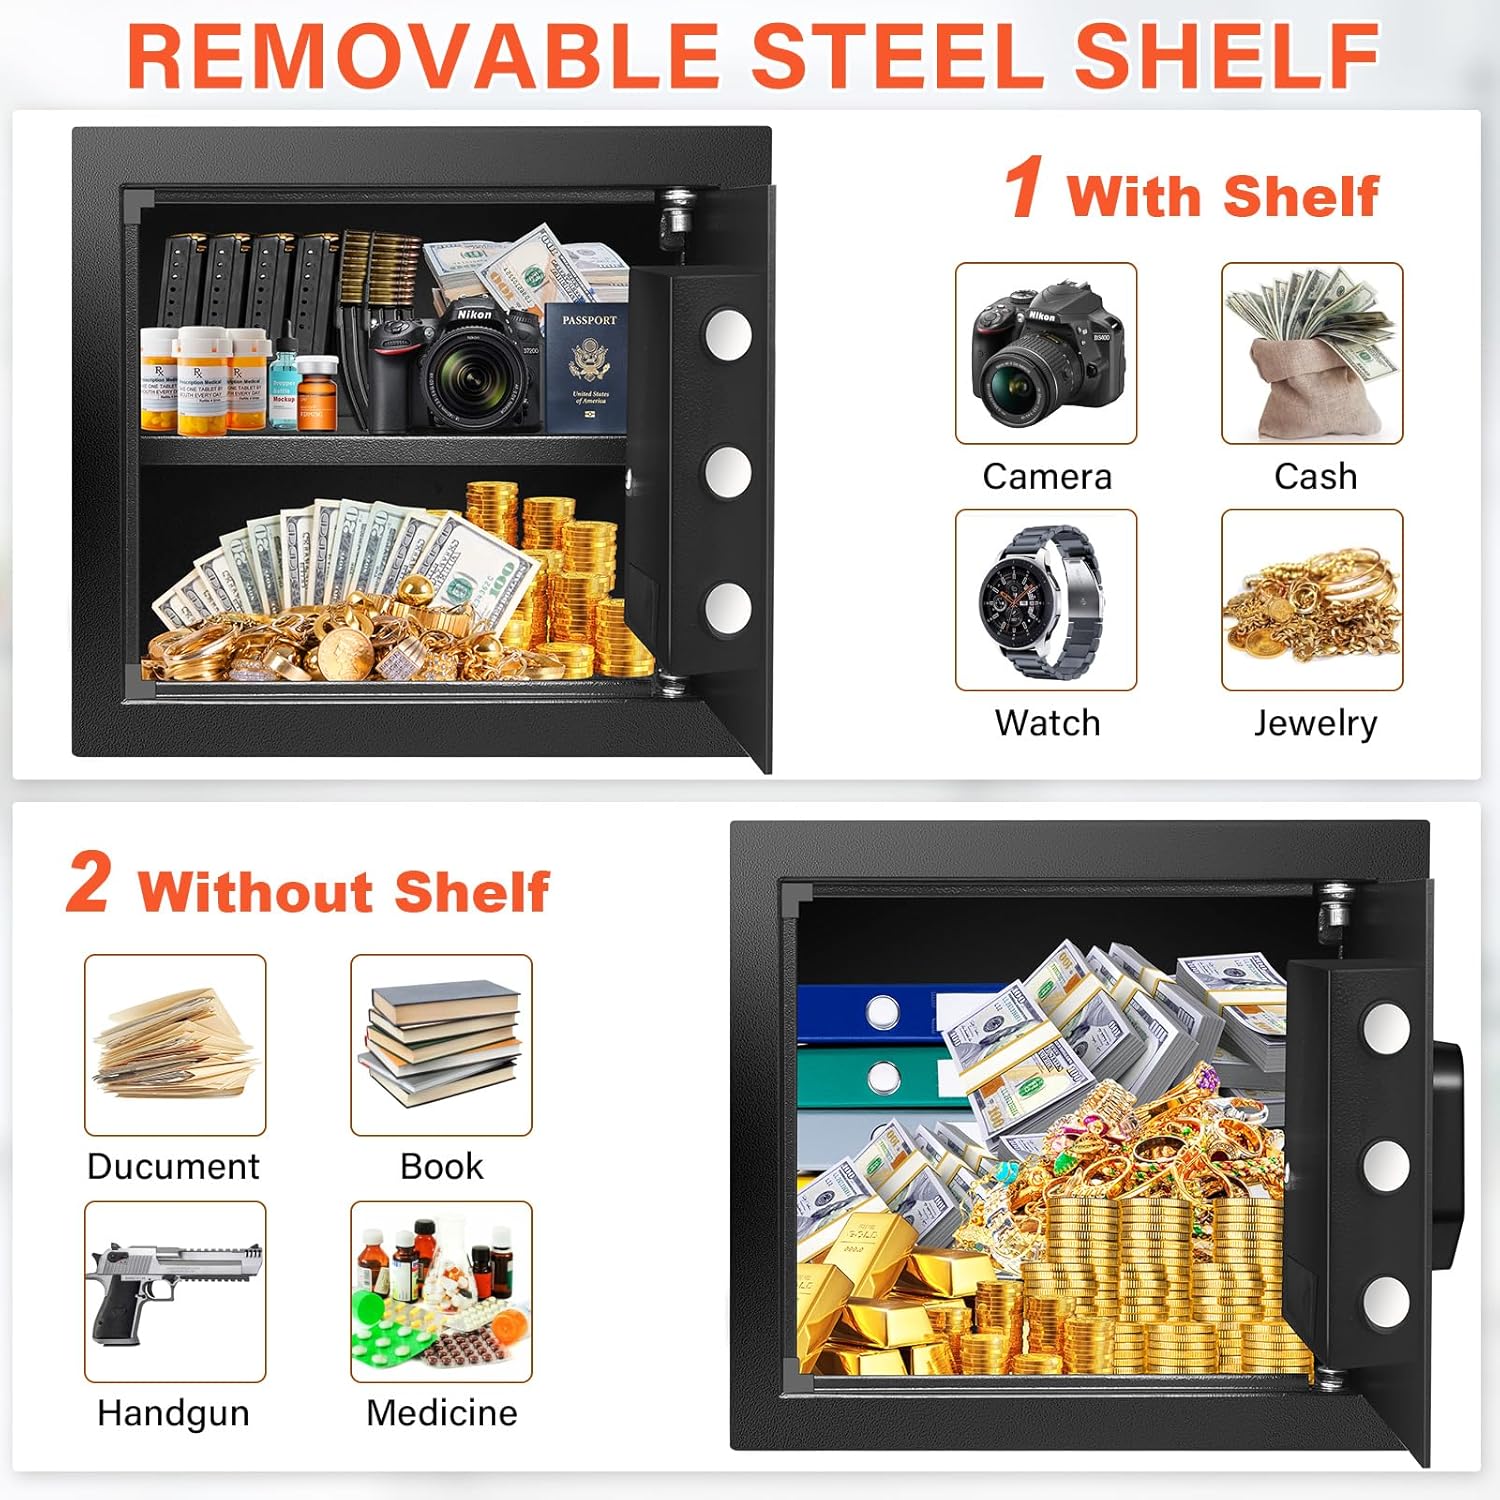
Figure 9: The removable steel shelf allows for flexible organization of the safe's interior.
7. Troubleshooting
| Problem | Possible Cause | Solution |
|---|---|---|
| Safe does not open with passcode. | Incorrect passcode entered; Low or dead batteries. | Re-enter correct passcode. Replace internal batteries or use external battery box. |
| Keypad is unresponsive. | Dead batteries. | Replace internal batteries or use external battery box to power the keypad. |
| Alarm sounds frequently. | Multiple incorrect passcode entries. | Ensure correct passcode is used. Wait for the lockout period to end. |
| Cannot set new passcode. | Red reset button not pressed correctly; Incorrect sequence. | Ensure the red reset button is pressed firmly until the "READY" light illuminates, then follow the steps in Section 3.3. |
8. Specifications
| Feature | Detail |
|---|---|
| Brand | Mitlvge |
| Model Number | ET |
| Product Dimensions (Exterior) | 14.56"D x 12.2"W x 11.81"H |
| Capacity | 1.6 Cubic Feet |
| Lock Type | Electronic Combination Lock, Key |
| Material | Alloy Steel |
| Special Features | Alarm System, Anti-Theft, Removable Shelf, Fireproof, Sensor Light |
| Mounting Type | Wall or Floor Mount |
| Item Weight | 22 pounds (approx. 10 kg) |
| Water Resistance Level | Waterproof (for included bag) |
| Batteries Required | Yes (4 x AA, not included) |
9. Warranty and Support
Mitlvge is committed to providing excellent customer service and product reliability. We offer lifetime technical support for your safe, and all parts can be replaced free of charge if needed.
If you encounter any questions or issues after receiving your product, please do not hesitate to contact us online immediately. Our dedicated support team will do their best to resolve your problem within 24 hours.
For more information and products, visit the official Mitlvge Store.