Introduction
This manual provides essential information for the safe and effective use of your AENBUSLM 40W Laser Module. This module is designed for integration with laser cutting and engraving machines, offering a 5.5W optical output power for precision work. It features an integrated air assist system and advanced FAC (Fast Axis Collimation) technology to enhance performance and material processing quality.
Please read this manual thoroughly before installation and operation to ensure proper usage and to prevent damage to the device or injury.
Key Features
- Powerful Laser Output: 40W machine power with 5.5W optical output, capable of direct engraving on mirror stainless steel without prior blackening.
- Efficient Cutting & Engraving: Achieves engraving speeds up to 800mm/s on 304 stainless steel and cuts 5mm plywood in a single pass at 60-100mm/s (with 45mm focus length).
- Professional Air Assist: Includes an air assist kit to ensure cleaner cuts and engravings by dispersing smoke and debris, improving edge quality and efficiency.
- Advanced Heat Dissipation: Features a built-in fan cooling system (12000 rpm) to maintain stable performance and extend diode lifespan up to 20,000 hours.
- Easy Integration: Designed with multiple mounting holes for compatibility with various laser cutting and engraving machines, CNC routers, and 3D printers. Plug-and-play control line installation.
- Original Diode with FAC: Incorporates an original diode with Fast Axis Collimation (FAC) for a smaller beam size at focus, resulting in superior cutting penetration, precision, and increased power density.
- Wide Compatibility: Universally applicable to 12V and 24V DIY machines.

Figure 1: AENBUSLM 40W Laser Module highlighting 5.5W optical output power and key features like eye protection, laser cutting, and air assist.
Setup Instructions
Follow these steps to properly set up your AENBUSLM 40W Laser Module:
- Unpacking: Carefully unpack all components from the packaging. Verify that all parts listed in the package contents are present.
- Mounting the Laser Module: The laser module features multiple mounting holes on its back for easy attachment to various laser machine stands. Securely fasten the module using the provided mounting board and screws.
- Connecting Control Lines: Connect the control line (3P line) to your laser engraving machine's control board. This is a plug-and-play connection.
- Power Connection: Connect the external power cord to the laser module. Ensure your power supply is compatible (12V or 24V). Important: If your controller uses a 24V power supply, the laser module's power must be connected to a separate 12V power supply to prevent damage.
- Air Assist Setup:
- Connect the air pump tube to the air assist port on the laser module.
- Connect the air pump power cord to the air pump and a suitable power source.
- Ensure the air pump is positioned to provide optimal airflow to the laser nozzle.
- Focus Adjustment: Use the focus fixing plate to set the correct focal length for your material. Typically, a 45mm focus length is recommended for optimal cutting and engraving performance.

Figure 2: Overview of the AENBUSLM 40W Laser Module and its included accessories, such as mounting board, power cords, air pump, and tools.

Figure 3: Detailed dimensions of the AENBUSLM 40W Laser Module (142mm height, 45x45mm base) and the external air pump (86x35x35mm).
Operating Instructions
Once the laser module is properly installed, follow these guidelines for operation:
- Safety First: Always wear appropriate laser safety glasses when operating the laser module. Ensure the work area is well-ventilated.
- Material Preparation: Place your material securely on the engraving/cutting bed. Ensure it is flat and properly aligned.
- Software Configuration: Use your laser control software to set the desired parameters for engraving or cutting.
- For 304 stainless steel engraving, speeds up to 800mm/s with a 45mm focus length are achievable.
- For cutting 5mm plywood, a single pass at 60-100mm/s with a 45mm focus length is effective.
- Adjust power and speed settings based on the specific material and desired outcome.
- Engraving Mirror Stainless Steel: The module can directly engrave mirror stainless steel without needing to paint it black beforehand.
- Activating Air Assist: Turn on the air pump before starting any cutting or engraving operation. The air assist helps to clear smoke and debris, resulting in cleaner edges and improved laser efficiency.
- Monitoring Operation: Supervise the laser operation at all times. Be prepared to stop the machine immediately if any issues arise.
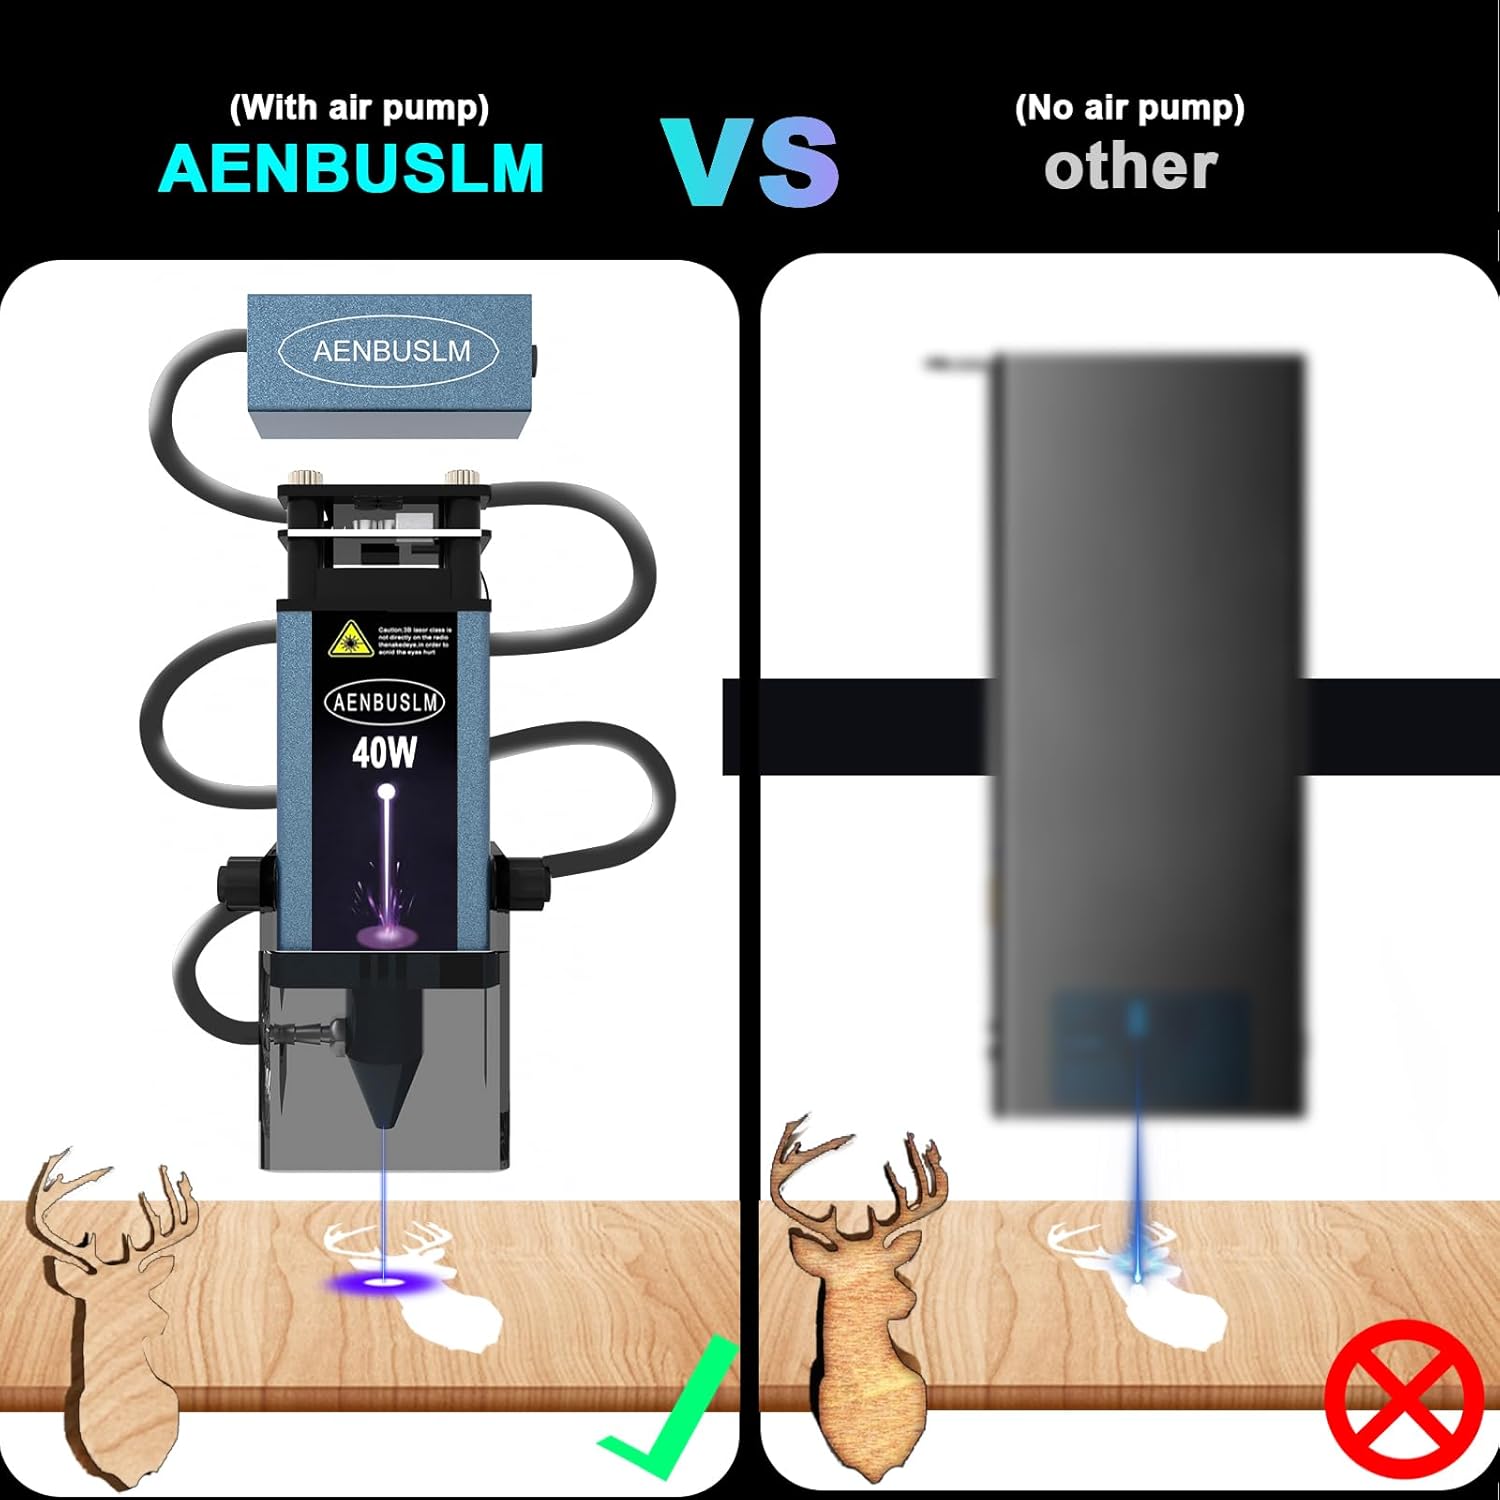
Figure 4: Visual comparison demonstrating the improved cleanliness and precision of laser cutting when the air assist system is utilized.

Figure 5: The laser module's capability to perform a one-time cut on acrylic, illustrating its superior cutting power.

Figure 6: The air assist system in action, effectively dispersing smoke and maintaining a clear, smoke-free work environment during laser operation.
Maintenance
Regular maintenance ensures the longevity and optimal performance of your laser module:
- Lens Cleaning: Periodically inspect and clean the laser lens. Use a soft, lint-free cloth and appropriate lens cleaning solution to remove any dust or debris. The kit includes a replaceable protective lens and tools for replacement.
- Cooling Fan: Ensure the built-in cooling fan (12000 rpm) is free from obstructions to allow for efficient heat dissipation. Clean any dust accumulation from the fan vents.
- Air Pump Maintenance: Check the air pump and tubing for any blockages or damage. Ensure consistent airflow for effective air assist.
- General Cleaning: Keep the exterior of the laser module clean and free from dust and material residue.
- Storage: When not in use, store the laser module in a clean, dry environment away from direct sunlight and extreme temperatures.
Troubleshooting
If you encounter issues with your laser module, refer to the following common problems and solutions:
| Problem | Possible Cause | Solution |
|---|---|---|
| Laser not powering on or weak output. | Incorrect power supply connection; loose cables; insufficient power. |
|
| Poor cutting/engraving quality (e.g., burnt edges, incomplete cuts). | Incorrect focus; insufficient air assist; incorrect power/speed settings; dirty lens. |
|
| Excessive smoke during operation. | Air assist not active or insufficient; poor ventilation. |
|
Specifications
| Feature | Detail |
|---|---|
| Model Number | JGT-WZB-2.0 |
| Machine Power | 40W |
| Optical Output Power | 5.5W |
| Beam Size | 0.06 x 0.06 mm |
| Product Dimensions | 5.7 x 2.1 x 1.8 inches (142mm height, 45x45mm base) |
| Item Weight | 1.1 pounds |
| Cooling System | Built-in fan (12000 rpm) |
| Diode Lifespan | Up to 20,000 hours |
| Compatibility | 12V and 24V DIY machines, laser engravers, CNC routers, 3D printers |
| Manufacturer | AENBUSLM |
After-Sales Support
AENBUSLM is committed to providing high-quality after-sales service. If you encounter any problems when using our products, please do not hesitate to contact our customer service team. Our professional technicians are available to provide solutions and assistance in a timely manner.
For support, please refer to the contact information provided with your purchase or visit the official AENBUSLM store page on Amazon: AENBUSLM Store.