
1. Introduction and Overview
This manual provides detailed instructions for the installation, operation, and maintenance of your YZONA Front Bumper. Please read all instructions carefully before beginning installation to ensure proper fitment and safe operation. This bumper is designed for 2nd generation Chevy Silverado 1500 models from 2007 to 2013.

Image 1.1: The YZONA Front Bumper, featuring integrated LED lights, D-ring shackle mounts, and a winch plate, shown installed on a red Chevy Silverado 1500.
2. Product Features
- Compatibility: Designed for 2nd generation Chevy Silverado 1500 models (2007, 2008, 2009, 2010, 2011, 2012, 2013).
- Durable Construction: Manufactured from high-strength carbon steel with a two-stage textured black powder coating for enhanced durability and rust resistance.
- Integrated Winch Plate: Equipped with a winch plate capable of supporting up to 12,000 lbs.
- Recovery Points: Includes two 4.75-ton D-rings for vehicle recovery.
- Lighting System: Features a 120W LED spotlight and four 18W LED spotlights for improved visibility.
- Sensor Compatibility: Pre-drilled holes for backup sensors (original sensors and extension harnesses sold separately).
- License Plate Bracket: Includes a license plate bracket for convenient mounting.

Image 2.1: Visual confirmation of bumper compatibility with 2007-2013 Chevy Silverado 1500 models.
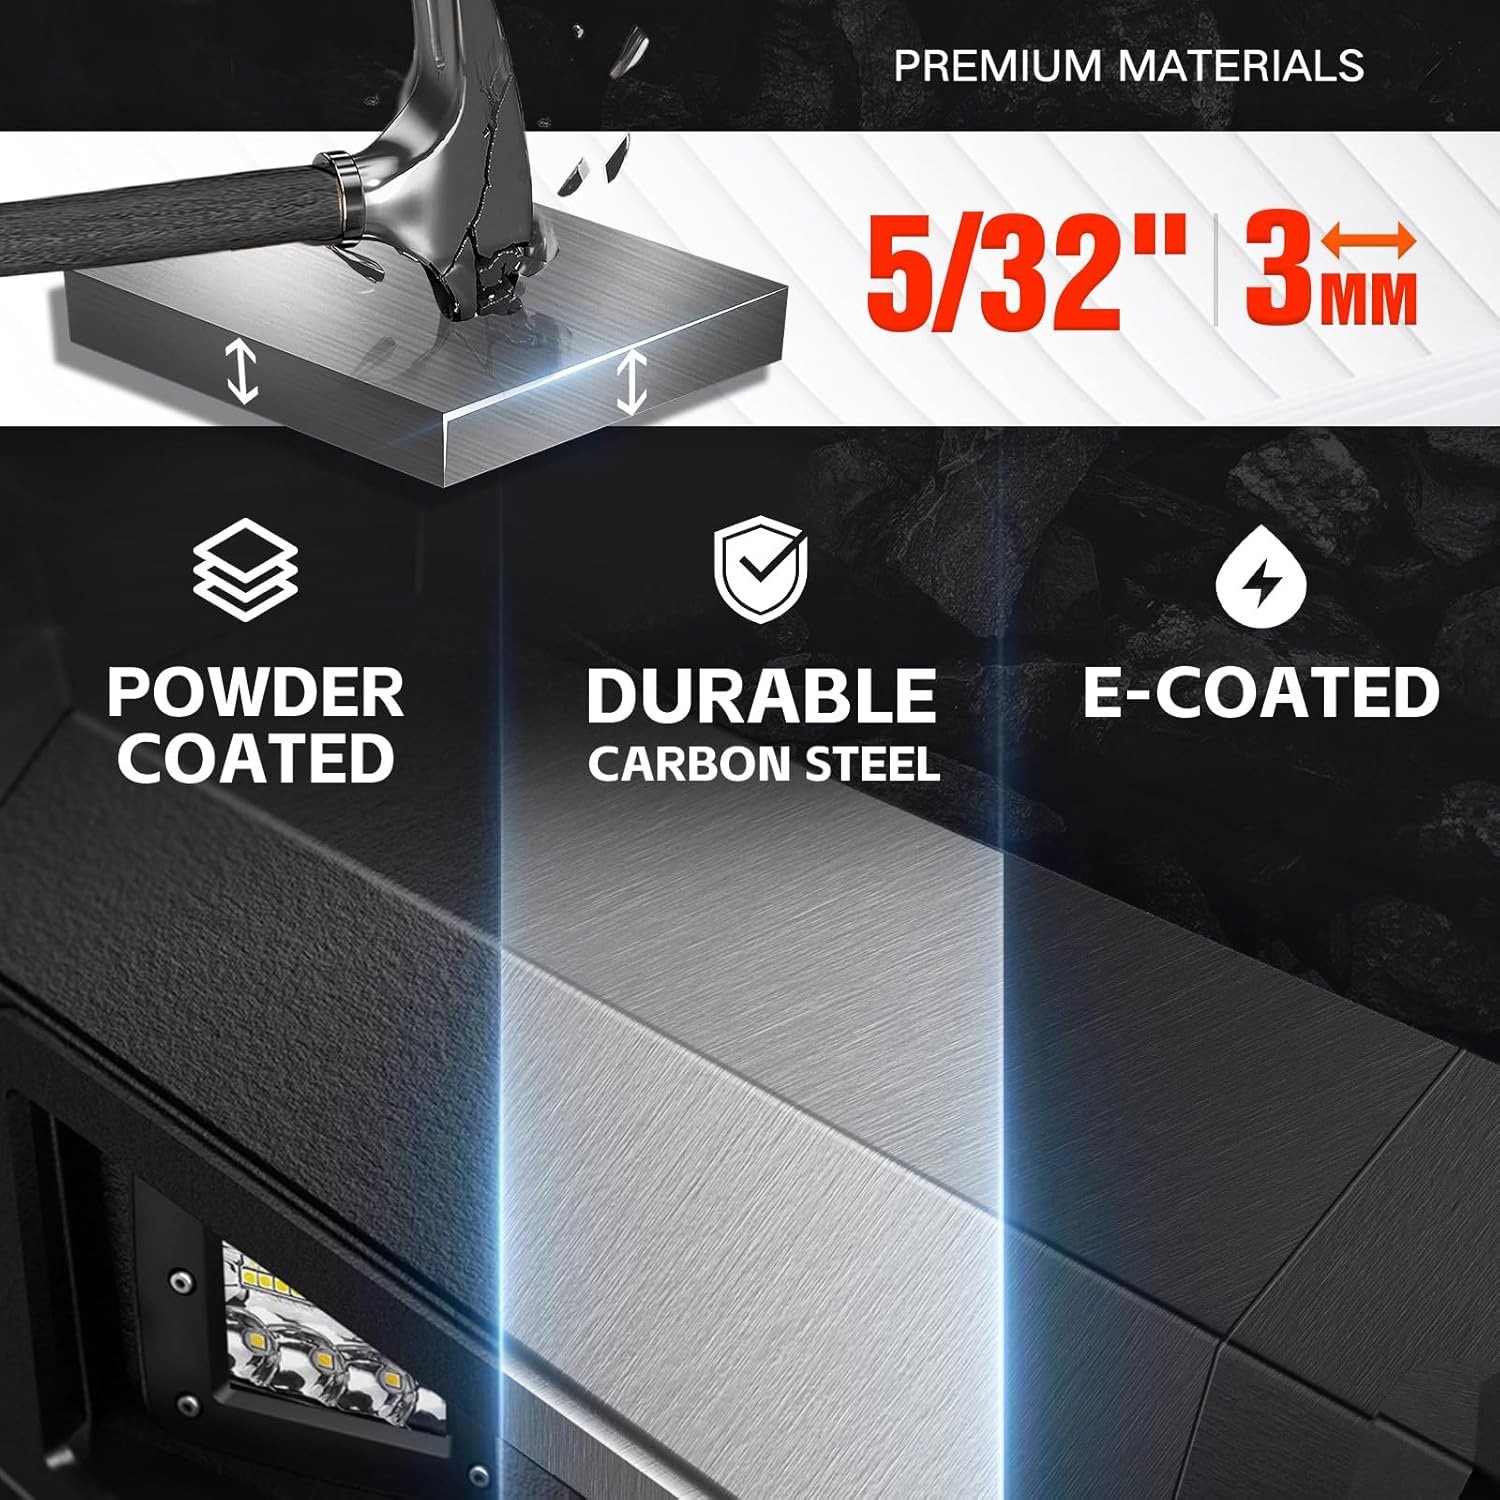
Image 2.2: A cross-section diagram highlighting the premium materials and construction, including powder coating, carbon steel, and electro-galvanized E-coating for enhanced durability and rust resistance.
3. Package Contents
Verify that all components are present and undamaged before proceeding with installation.
- 1 x Front Bumper Assembly
- 2 x D-ring Shackles (4.75-ton)
- 1 x 120W LED Spotlight
- 4 x 18W LED Spotlights
- 1 x License Plate Bracket
- Mounting Hardware (bolts, nuts, washers)
- Installation Instructions
4. Safety Information
Always prioritize safety during installation and operation. Failure to follow these guidelines may result in injury or damage to property.
- Wear appropriate personal protective equipment (PPE), including safety glasses and gloves.
- Ensure the vehicle is parked on a level surface, the parking brake is engaged, and the engine is off.
- Disconnect the vehicle's battery before performing any electrical work.
- Use proper lifting equipment to support the bumper during installation.
- Do not overtighten fasteners; refer to torque specifications if available.
- Professional installation is recommended for optimal safety and performance.
5. Installation Instructions
This bumper is designed for a straightforward bolt-on installation without the need for drilling. However, professional installation is strongly advised for safety and precision.
5.1. Preparation
- Park your vehicle on a flat, stable surface.
- Engage the parking brake and turn off the engine.
- Disconnect the negative terminal of the vehicle's battery.
- Remove the factory front bumper according to your vehicle's service manual.
5.2. Bumper Assembly (if required)
Some components may require assembly before mounting to the vehicle. Refer to the included assembly diagrams.
Video 5.1: An official YZONA video demonstrating the assembly process for the Front Bumper compatible with 2007-2013 Chevy Silverado 1500. This video provides a visual guide to connecting the main bumper sections and preparing it for vehicle mounting.
5.3. Installing LED Lights and D-rings
- Install the 120W LED spotlight and four 18W LED spotlights into their designated openings on the bumper using the provided hardware.
- Secure the D-ring shackle mounts to the bumper.
- Attach the license plate bracket to the designated area.

Image 5.3.1: The YZONA Front Bumper showcasing the integrated 120W LED light bar and four 18W LED spotlights, designed to enhance visibility.

Image 5.3.2: A detailed view of the integrated LED lights, showing their placement and secure mounting within the bumper structure.

Image 5.3.3: A close-up of the robust D-ring shackle mounts, securely welded to the bumper for reliable recovery operations.
5.4. Mounting the Bumper to the Vehicle
- Carefully lift the assembled bumper and align it with the vehicle's frame mounting points.
- Insert the provided bolts through the bumper and frame, securing them with washers and nuts. Hand-tighten all fasteners initially.
- Adjust the bumper for proper alignment and clearance.
- Once aligned, fully tighten all fasteners to the manufacturer's recommended torque specifications (if available, otherwise ensure they are securely tightened).
- Connect the wiring for the LED lights to your vehicle's electrical system. (Note: Extension harnesses for lights are not included and must be purchased separately).
- If applicable, install your backup sensors into the pre-drilled holes. (Note: Original sensors and extension harnesses are not supported and must be purchased separately).
Video 5.4.1: An official YZONA video showcasing the installation process of automotive parts, including the front bumper. This video provides a general overview of mounting procedures and component integration.
6. Operating Instructions
6.1. LED Lights
The integrated LED lights are designed to provide additional illumination. They should be wired to an appropriate power source and switch in your vehicle. Consult a professional for proper electrical connections.
6.2. Winch Plate
The bumper features a built-in winch plate for mounting a winch up to 12,000 lbs. Ensure your winch is securely mounted and properly wired according to the winch manufacturer's instructions. Always follow safe winching procedures.
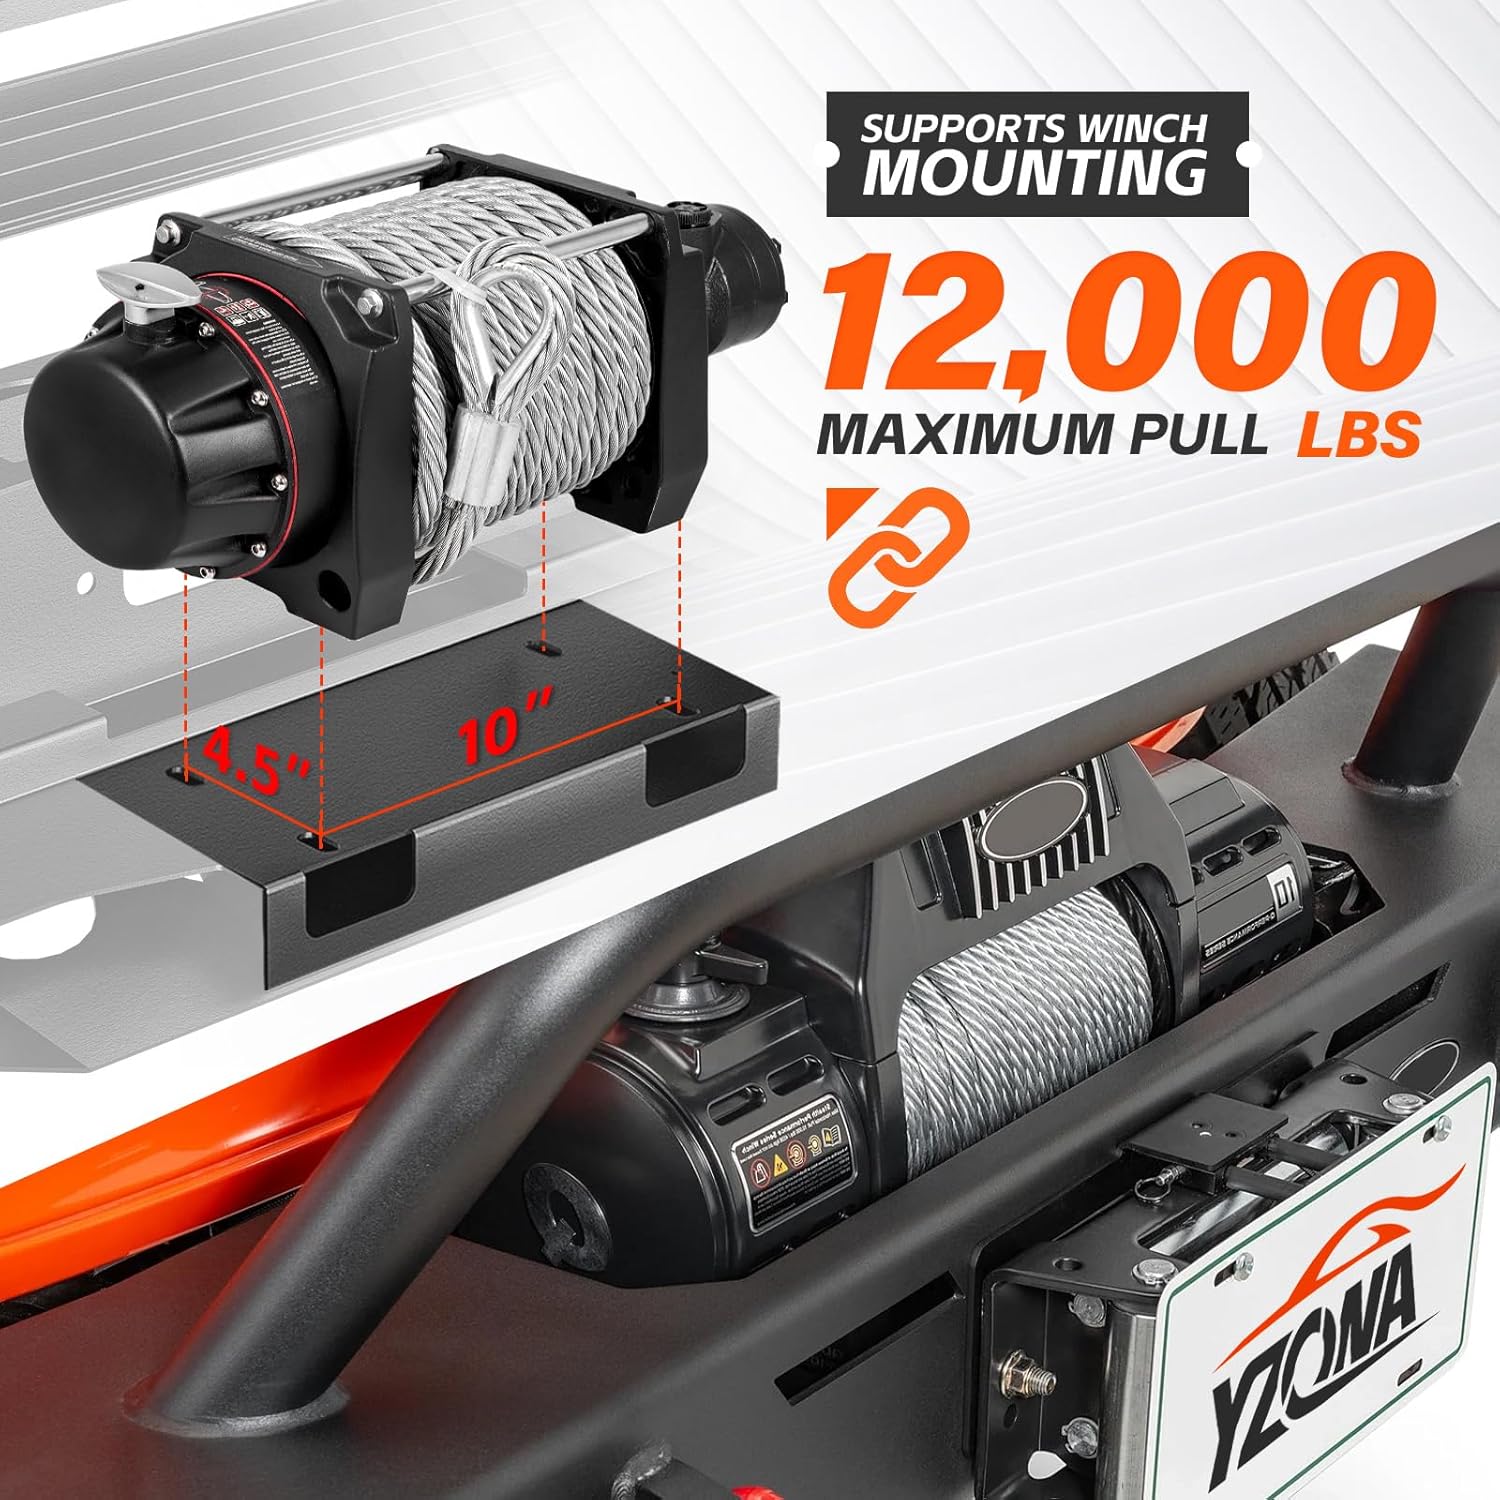
Image 6.2.1: A visual representation of the winch plate, detailing its dimensions and highlighting its maximum pull capacity of 12,000 lbs.
6.3. D-rings
The D-ring shackle mounts are designed for vehicle recovery. Use only appropriate shackles and recovery straps. Always ensure shackles are fully tightened before use and follow safe recovery practices.
7. Maintenance
- Regularly inspect all mounting hardware for tightness and signs of wear. Tighten as necessary.
- Clean the bumper periodically with mild soap and water to remove dirt, salt, and debris. Avoid abrasive cleaners that could damage the powder coating.
- Inspect the powder coating for chips or scratches. Touch up any damaged areas to prevent rust.
- Check LED lights for proper function and clean lenses as needed.
8. Troubleshooting
If you encounter issues with your YZONA Front Bumper, consider the following common troubleshooting steps:
- Loose Bumper: Check all mounting bolts and ensure they are securely tightened.
- LED Lights Not Working: Verify electrical connections, check fuses, and ensure the switch is functioning correctly.
- Sensor Malfunction: Ensure sensors are correctly installed in the pre-drilled holes and that any necessary extension harnesses are properly connected. Note that original sensors may not be compatible.
- Unusual Noises: Inspect for loose components or contact points between the bumper and vehicle.
For persistent issues, contact YZONA customer support or consult a qualified automotive technician.
9. Specifications
| Feature | Specification |
|---|---|
| Brand | YZONA |
| Auto Part Position | Front |
| Material | Carbon Steel |
| Exterior Finish | Powder Coated |
| Product Dimensions | 42.52"D x 14.17"W x 12.6"H |
| Item Weight | 126.7 pounds |
| Winch Plate Capacity | Up to 12,000 lbs |
| D-ring Load Capacity | Up to 9,500 lbs |
| LED Spotlight Wattage | 120W (1 unit) |
| Small LED Light Wattage | 18W (4 units) |
| Sensor Hole Diameter | 1.1" |
| Number of Sensor Holes | 4 |
10. Warranty and Support
Your YZONA Front Bumper comes with a 2-year factory warranty. We are committed to providing ongoing customer service support. If you have any questions, concerns, or require assistance, please do not hesitate to contact us. Our dedicated team is ready to help you.
For further information or to reach customer support, please visit the YZONA Store on Amazon.