1. Introduction
Thank you for choosing the Bonsaii A3 Laminator L318-A. This device is designed to protect your documents and photos with a durable, clear laminated finish. This 5-in-1 kit includes the laminator, a paper trimmer, a corner rounder, and laminating pouches. Please read this manual thoroughly before operation to ensure safe and efficient use.
2. Safety Instructions
- Always connect the laminator to a grounded power outlet.
- Do not operate the laminator with wet hands or near water.
- Keep children and pets away from the laminator during operation.
- Do not insert objects other than laminating pouches into the feed opening.
- Ensure proper ventilation around the machine to prevent overheating.
- Unplug the laminator when not in use or before cleaning.
- In case of a jam, turn off the machine and follow the jam release instructions.
- The laminator surface can become hot during use. Avoid direct contact.
3. Package Contents
Verify that all items are present in the package:
- Bonsaii A3 Laminator (Model L318-A)
- Paper Trimmer
- Corner Rounder
- 5 x A5 Laminating Pouches
- 5 x A6 Laminating Pouches
- User Manual
4. Product Overview
Familiarize yourself with the main components of your laminator.
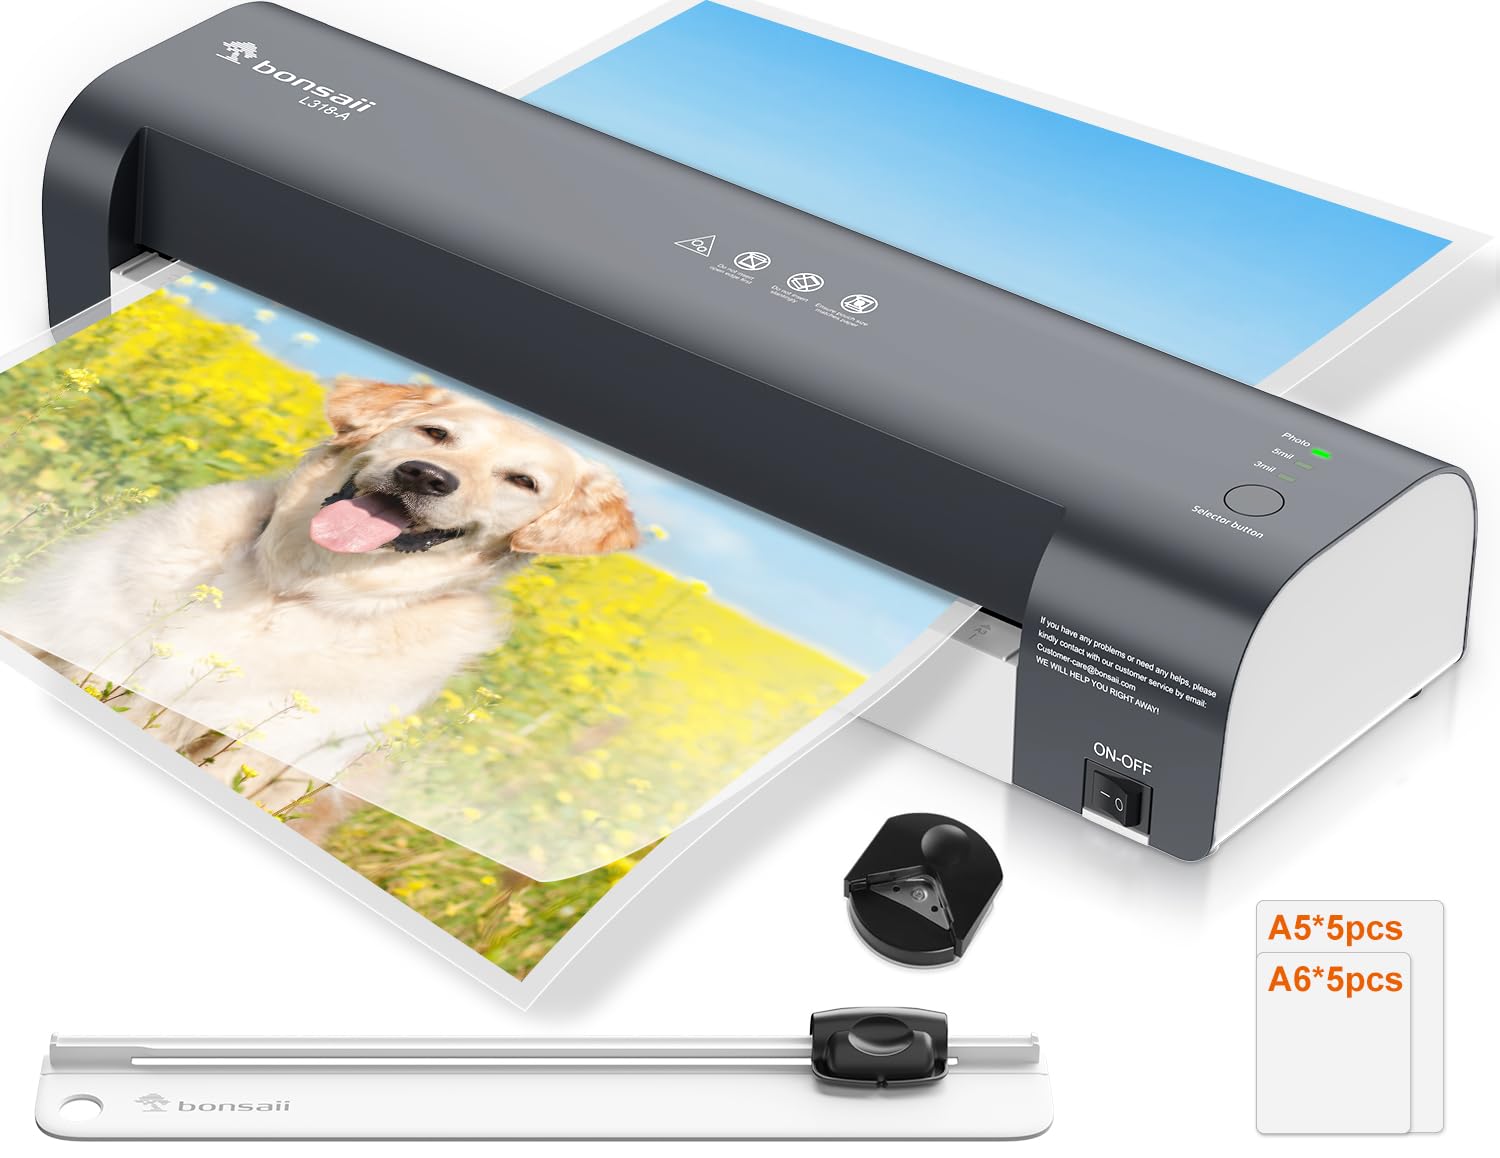
Image 4.1: Bonsaii A3 Laminator with examples of A3, A4, and A5 document sizes it can handle. The laminator has a maximum width of 330mm (13 inches).
- Power Switch: Turns the laminator ON/OFF.
- Mode Selector Button: Cycles through 80 mic, 125 mic, and Photo modes.
- Status Indicators: Lights indicating Power (green) and Ready (green).
- Feed Opening: Where laminating pouches are inserted.
- Exit Slot: Where laminated documents emerge.
- Jam Release Lever: Used to clear jammed pouches.
5. Setup
- Unpack: Carefully remove the laminator and all accessories from the packaging.
- Placement: Place the laminator on a stable, flat surface with adequate space around it for ventilation and for documents to pass through. Ensure the power cord can reach a grounded outlet.
- Power Connection: Plug the power cord into a standard electrical outlet.
- Power On: Flip the power switch to the "ON" position. The green "Power" indicator light will illuminate.
- Warm-up: The laminator will begin to warm up. This typically takes approximately 3 minutes. The green "Ready" indicator light will illuminate when the machine has reached the optimal operating temperature.
6. Operating Instructions
6.1. Lamination Process
- Prepare Document: Place your document or photo neatly inside a laminating pouch, ensuring it is centered and there is an even border around the edges.
- Select Mode: Once the "Ready" light is green, press the Mode Selector Button to choose the appropriate setting for your laminating pouch:
- 80 mic: For standard 80-micron laminating pouches.
- 125 mic: For thicker 125-micron laminating pouches.
- Photo: For laminating photos, which often require a specific temperature for optimal results.

Image 6.1: The laminator's control panel showing the three selectable modes: 80 mic, 125 mic, and Photo. Select the appropriate mode after powering on.
- Insert Pouch: Insert the sealed edge of the laminating pouch into the feed opening, ensuring it is straight and centered. The laminator will automatically feed the pouch through.
- Retrieve Document: Once the laminated document exits the machine, place it on a flat surface to cool and harden. Avoid touching the hot surface immediately.
6.2. Jam Release Function
If a laminating pouch becomes jammed or misfed:
- Immediately turn off the laminator.
- Locate the Jam Release Lever (usually at the back or side of the machine).
- Press and hold the lever. This will disengage the rollers, allowing you to gently pull the jammed pouch out of the feed opening.
- Release the lever and ensure the pouch is completely removed.
- Turn the laminator back on and allow it to re-warm up before attempting to laminate again.
6.3. Using the Paper Trimmer
The included paper trimmer is designed for precise cutting of paper and laminated documents.
- Place the paper or laminated document under the cutting guide.
- Align the edge of the document with the desired cutting line.
- Press down firmly on the cutting blade and slide it along the guide to cut.
- Always keep fingers clear of the cutting blade.
6.4. Using the Corner Rounder
The corner rounder helps create smooth, professional-looking rounded corners on your documents.
- Insert a corner of your document or laminated item into the corner rounder slot.
- Press down firmly to cut and round the corner.
- Repeat for all desired corners.
7. Maintenance
- Cleaning: Ensure the laminator is unplugged and completely cool before cleaning. Wipe the exterior with a soft, dry cloth. Do not use abrasive cleaners or solvents.
- Roller Cleaning: Periodically run a cleaning sheet (available separately) through the laminator to remove adhesive residue from the rollers.
- Storage: Store the laminator in a dry, dust-free environment when not in use.
8. Troubleshooting
| Problem | Possible Cause | Solution |
|---|---|---|
| Laminator does not turn on. | No power supply. | Check if the power cord is securely plugged into the laminator and the wall outlet. Ensure the power switch is ON. |
| Laminating pouch jams. | Pouch inserted incorrectly, wrinkled, or too thick. | Turn off the machine, use the jam release lever to remove the pouch. Ensure the pouch is inserted straight and sealed edge first. Use correct pouch thickness for selected mode. |
| Laminated document is cloudy or bubbly. | Incorrect temperature setting or insufficient warm-up time. | Ensure the "Ready" light is green before laminating. Select the correct mode (80 mic, 125 mic, or Photo) for your pouch thickness. Allow the machine to fully warm up. |
| Laminated document is not sealed properly. | Temperature too low or pouch too thick for setting. | Verify the correct mode is selected for the pouch thickness. Allow the machine to fully warm up. |
9. Specifications

Image 9.1: Illustration of the NTC Temperature Control System, ensuring continuous and stable temperature output for efficient and stable lamination quality, compared to less stable systems.
- Model: L318-A
- Brand: Bonsaii
- Max Laminating Width: 330 mm (13 inches), supports A3, A4, A5, A6 sizes.
- Warm-up Time: Approximately 3 minutes
- Laminating Speed: Up to 300 mm/min
- Number of Rollers: 2
- Laminating Modes: 80 micron, 125 micron, Photo
- Temperature Control: NTC Precision Temperature Control System
- Dimensions (L x W x H): 42.5 x 13.4 x 8 cm (16.7 x 5.3 x 3.1 inches)
- Product Weight: 1.89 kg (4.17 lbs)
- Color: Black
10. Warranty and Support
Bonsaii products are manufactured to high-quality standards. For warranty information, technical support, or service inquiries, please refer to the contact information provided on the Bonsaii official website or your purchase documentation.
Please retain your proof of purchase for warranty claims.
Manufacturer: bonsaii