Introduction
This manual provides detailed instructions for the installation, operation, and maintenance of your BAISHUN HDMI KVM USB Extender, Model CJX-066-US. This device allows you to extend high-definition HDMI video and USB signals (for keyboard, mouse, and other USB devices) up to 492 feet (150 meters) over a single Cat5e/6/7 Ethernet cable with zero latency. It is an ideal solution for various applications requiring remote control of a computer system.
Package Contents
Please verify that all items listed below are included in your package:
- 1 x HDMI KVM Transmitter Unit (TX)
- 1 x HDMI KVM Receiver Unit (RX)
- 1 x User Manual
- 2 x 5V Power Adapters

Figure 1: Included Components in the Package
Product Features
- Extended Range: Extends HDMI and USB signals up to 492 feet (150 meters) over a single Cat5e/6/7 Ethernet cable.
- High-Definition Video: Supports resolutions up to 1080p@60Hz and 3D video.
- Zero Latency: Ensures real-time transmission of video and USB signals without noticeable delay.
- USB 2.0 Connectivity: Features dual USB 2.0 ports on the Receiver unit for connecting a keyboard, mouse, U disk, or other compatible USB devices.
- Plug & Play: Requires no software installation for setup and operation.
- Power Over Cable (POC): Only one power adapter is needed for the Transmitter unit, which powers both the Transmitter and Receiver units via the Ethernet cable.
- Wide Compatibility: Compatible with various HDMI source devices (PC, Laptop, Roku, TV, Xbox, Apple TV, Blu-ray player) and displays.

Figure 2: Key Features of the KVM Extender
Product Overview
The BAISHUN HDMI KVM USB Extender consists of a Transmitter (TX) unit and a Receiver (RX) unit. Familiarize yourself with the ports on each unit:
Transmitter (TX) Unit:
- HDTV IN: HDMI input port for connecting to the source device.
- HDTV OUT: HDMI loop-out port for connecting a local display (optional).
- LANRX: RJ45 port for connecting to the Receiver unit via Ethernet cable.
- DC 5V: Power input port for the 5V power adapter.
- USB IN: USB-B port for connecting to the source device to extend USB signals.
Receiver (RX) Unit:
- HDTV OUT: HDMI output port for connecting to the remote display.
- LANRX: RJ45 port for connecting to the Transmitter unit via Ethernet cable.
- USB 2.0 Ports (x2): USB-A ports for connecting keyboard, mouse, or other USB devices.
- Reset Button: For resetting the unit if needed.
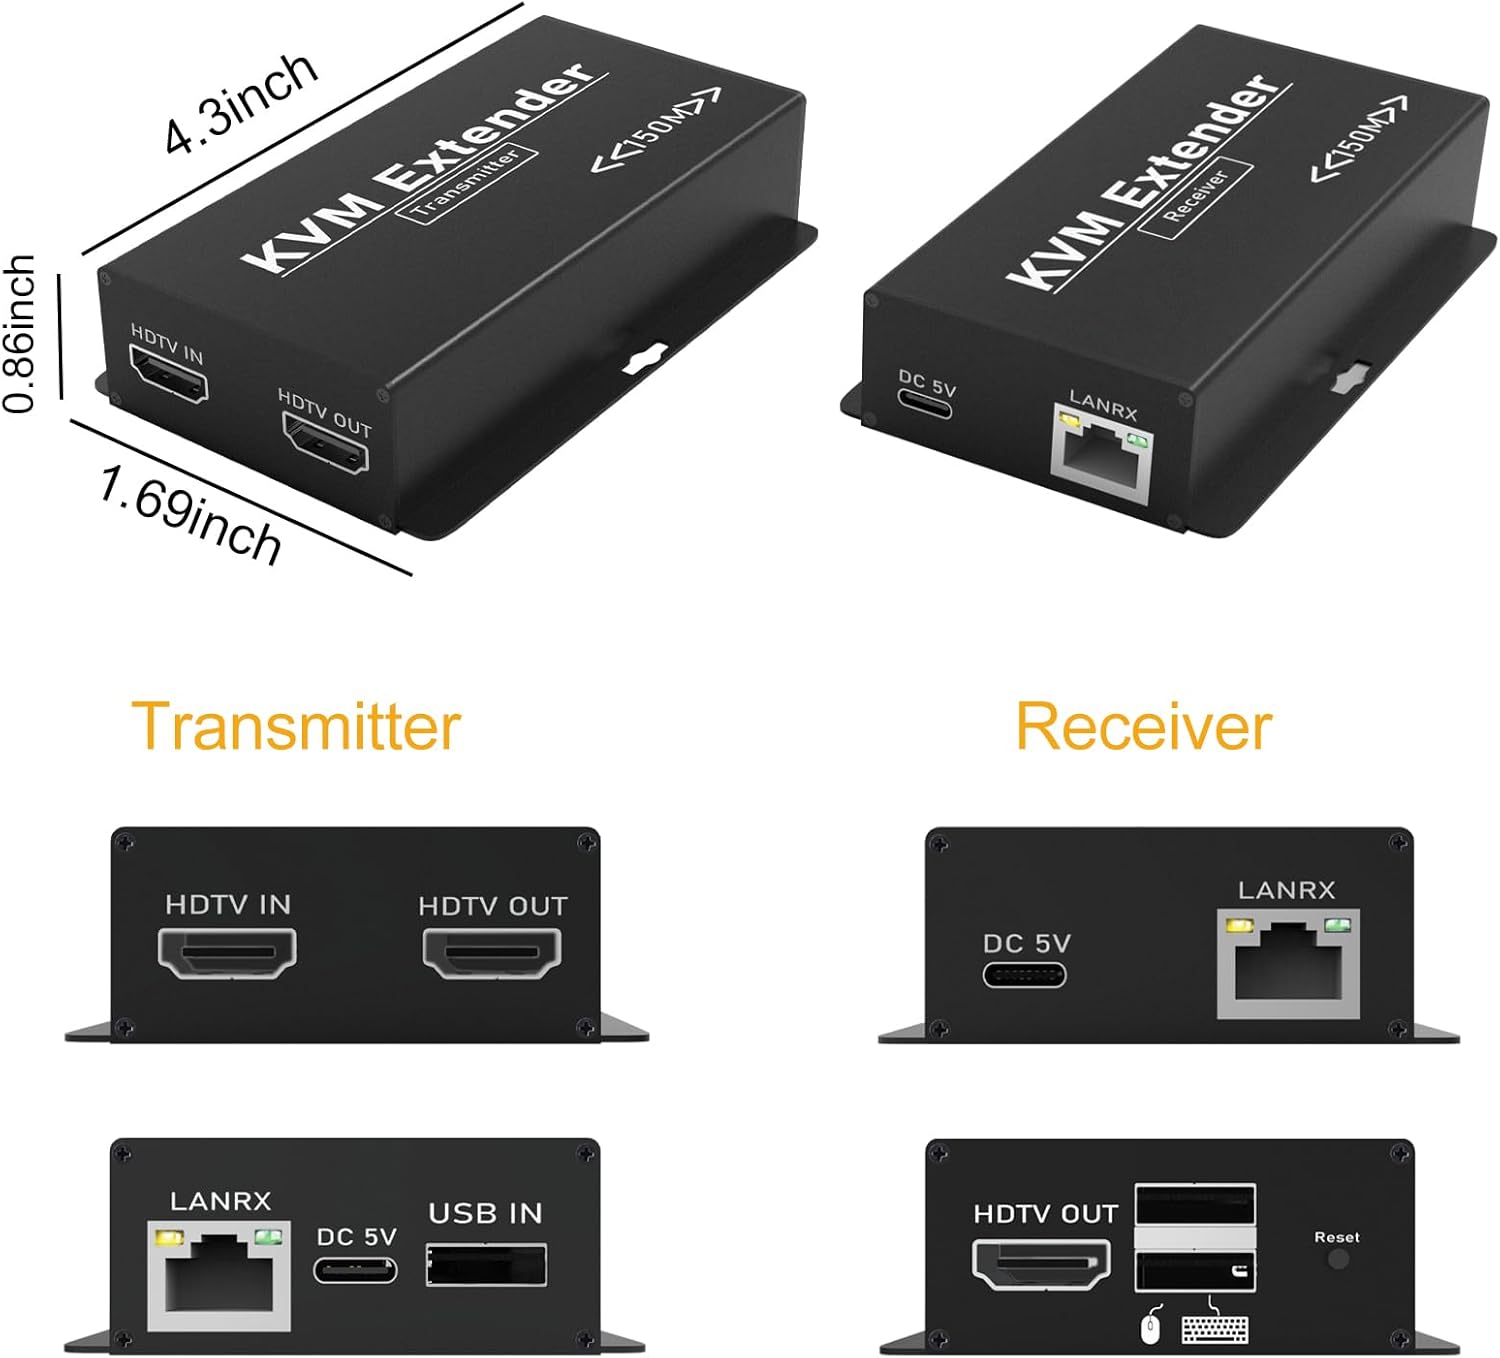
Figure 3: Detailed View of Transmitter and Receiver Ports
Setup Instructions
Follow these steps to set up your HDMI KVM USB Extender:
- Connect HDMI Source to Transmitter (TX): Use an HDMI cable to connect your source device (PC, laptop, TV box) to the HDTV IN port on the Transmitter unit.
- Connect USB Source to Transmitter (TX): Use a USB-A to USB-B cable to connect your source device (PC) to the USB IN port on the Transmitter unit. This enables the extension of USB signals.
- Connect Transmitter (TX) to Receiver (RX) via Ethernet: Connect a single Cat5e/6/7 Ethernet cable between the LANRX port of the Transmitter unit and the LANRX port of the Receiver unit. Ensure the cable is properly terminated and does not exceed 492 feet (150 meters) in length. Cat6 or Cat7 cables are recommended for optimal performance over longer distances.
- Connect Display to Receiver (RX): Use an HDMI cable to connect your remote display (monitor, TV, projector) to the HDTV OUT port on the Receiver unit.
- Connect USB Peripherals to Receiver (RX): Connect your USB keyboard and mouse to the USB 2.0 ports on the Receiver unit. Other compatible USB devices can also be connected here.
- Power the Transmitter (TX): Connect one of the provided 5V power adapters to the DC 5V port on the Transmitter unit and plug it into a power outlet. The Receiver unit will receive power automatically through the Ethernet cable (POC function).
- Power On Devices: Power on your source device, display, and the KVM extender system.

Figure 4: Typical Connection Diagram for the KVM Extender

Figure 5: Keyboard and Mouse Synchronization over Extended Distance

Figure 6: Power Over Cable (POC) Functionality
Operating Instructions
Once all connections are made and devices are powered on, the BAISHUN HDMI KVM USB Extender operates automatically:
- The HDMI video signal from your source device will be displayed on the remote monitor.
- The keyboard and mouse connected to the Receiver unit will control your source device as if they were directly connected.
- Ensure your remote display is set to the correct HDMI input channel.

Figure 7: Zero Latency Video and Audio Transmission
Maintenance
To ensure the longevity and optimal performance of your KVM extender, follow these maintenance guidelines:
- Environment: Keep the units in a dry, well-ventilated area, away from direct sunlight, extreme temperatures, and high humidity.
- Cleaning: Clean the units with a soft, dry cloth. Do not use liquid or aerosol cleaners, as they may damage the device.
- Cable Management: Ensure all cables are properly routed and secured to prevent strain or damage to the ports.
- Power: Always use the provided 5V power adapters. Using incompatible power adapters may damage the device.
Troubleshooting
If you encounter issues with your BAISHUN HDMI KVM USB Extender, refer to the following troubleshooting steps:
- No Video Output:
- Verify all HDMI and Ethernet cables are securely connected.
- Ensure the Transmitter (TX) unit is powered on and its power adapter is connected to a working outlet.
- Check that your display is set to the correct HDMI input source.
- Try using different HDMI cables or a different Ethernet cable.
- Test with a shorter Ethernet cable to rule out cable length issues.
- Confirm the source device is outputting a resolution compatible with the extender (up to 1080p@60Hz).
- USB Devices (Keyboard/Mouse) Not Working:
- Ensure the USB-A to USB-B cable is connected from your source device to the USB IN port on the Transmitter (TX) unit.
- Check that the keyboard and mouse are properly connected to the USB 2.0 ports on the Receiver (RX) unit.
- Try connecting the USB devices to different USB ports on the Receiver (RX) unit.
- Test with different USB devices to confirm functionality.
- Intermittent Signal or Poor Video Quality:
- Inspect the quality of your Cat5e/6/7 Ethernet cable. A higher quality Cat6 or Cat7 cable is recommended, especially for longer distances.
- Ensure the Ethernet cable is not running parallel to power cables or other sources of strong electromagnetic interference.
- Verify the cable length is within the specified 492 feet (150 meters) limit.
- Receiver (RX) Unit Has No Power:
- Confirm that the 5V power adapter is securely connected to the DC 5V port on the Transmitter (TX) unit and plugged into a functional power outlet.
- The Receiver (RX) unit is powered via Power Over Cable (POC) from the Transmitter (TX). If the TX is powered, check the integrity and connection of the Ethernet cable between the TX and RX units.
Specifications
Below are the technical specifications for the BAISHUN HDMI KVM USB Extender (Model CJX-066-US):
| Feature | Specification |
|---|---|
| Model | CJX-066-US |
| Brand | BAISHUN |
| Max Resolution | 1080p@60Hz |
| Transmission Distance | Up to 492ft (150m) over Cat5e/6/7 cable |
| USB Standard | USB 2.0 |
| Power Supply | DC 5V (2 adapters included) |
| Power Over Cable (POC) | Supported (TX powers RX) |
| Material | Plastic |
| Color | Black |
| Item Dimensions (L x W x H) | 4.3 x 1.69 x 0.86 inches (approximate) |
| Included Components | Transmitter, Receiver, User Manual, 2 Power Supplies |
Warranty and Support
For warranty information and technical support, please refer to the warranty card included with your product or visit the official BAISHUN website. You may also contact customer service through your purchase platform for assistance.