Introduction
This manual provides detailed instructions for the safe and effective use of your KKMOL Cordless Soldering Iron Kit. Please read this manual thoroughly before operating the device and retain it for future reference.
The KKMOL Cordless Soldering Iron is designed for convenience, eliminating the need for tangled wires. It features a built-in 800mAh battery and a USB Type-C charging port, allowing for charging via a power bank, computer, or mobile phone adapter. A full charge typically takes approximately 2 hours and provides around 30 minutes of continuous use.
Key Features:
- Cordless and portable design for enhanced flexibility.
- Built-in 800mAh battery for extended use.
- USB Type-C charging for universal compatibility.
- Three adjustable temperature settings for various soldering tasks.
- Includes three interchangeable soldering tips.
Package Contents
Verify that all items listed below are present in your package:
- 1 x Cordless Soldering Iron
- 1 x Solder Wire
- 1 x Soldering Iron Holder with Cleaning Sponge
- 3 x Soldering Tips (various shapes)
- 1 x USB Type-C Charging Cable
- 1 x User Manual

Image: All components included in the KKMOL Cordless Soldering Iron Kit, laid out on a white surface.
Safety Information
- Always work in a well-ventilated area to avoid inhaling solder fumes.
- Soldering irons reach high temperatures. Avoid direct contact with the tip to prevent burns.
- Use the provided stand to rest the soldering iron when not in use.
- Keep out of reach of children.
- Do not disassemble or modify the product.
- Ensure the soldering iron is turned off and cooled down before storing or changing tips.
Setup & Charging
1. Installing Soldering Tips:
- Ensure the soldering iron is off and cool.
- Unscrew the retaining nut at the end of the iron.
- Insert the desired soldering tip into the heating element.
- Securely tighten the retaining nut.

Image: Illustration showing how to easily remove and replace the soldering iron tips by unscrewing the retaining nut.
2. Charging the Soldering Iron:
Connect the provided USB Type-C charging cable to the soldering iron's charging port and to a compatible USB power source (e.g., power bank, computer, or mobile phone adapter). The indicator light will show charging status. A full charge takes approximately 2 hours.

Image: Depicts the USB Type-C charging port and various charging options including a power bank, wall adapter, and laptop.
Operating Instructions
1. Power On/Off:
- To turn ON: Long press the power button for 3 seconds. The indicator light will illuminate.
- To turn OFF: Long press the power button for approximately 3 seconds. The indicator light will turn off.
2. Temperature Adjustment:
Once powered on, short press the power button to cycle through the three temperature settings:
- Green Light: 330°C ~ 350°C (626°F ~ 662°F)
- Blue Light: 370°C ~ 400°C (698°F ~ 752°F)
- Red Light: 430°C ~ 450°C (806°F ~ 842°F)
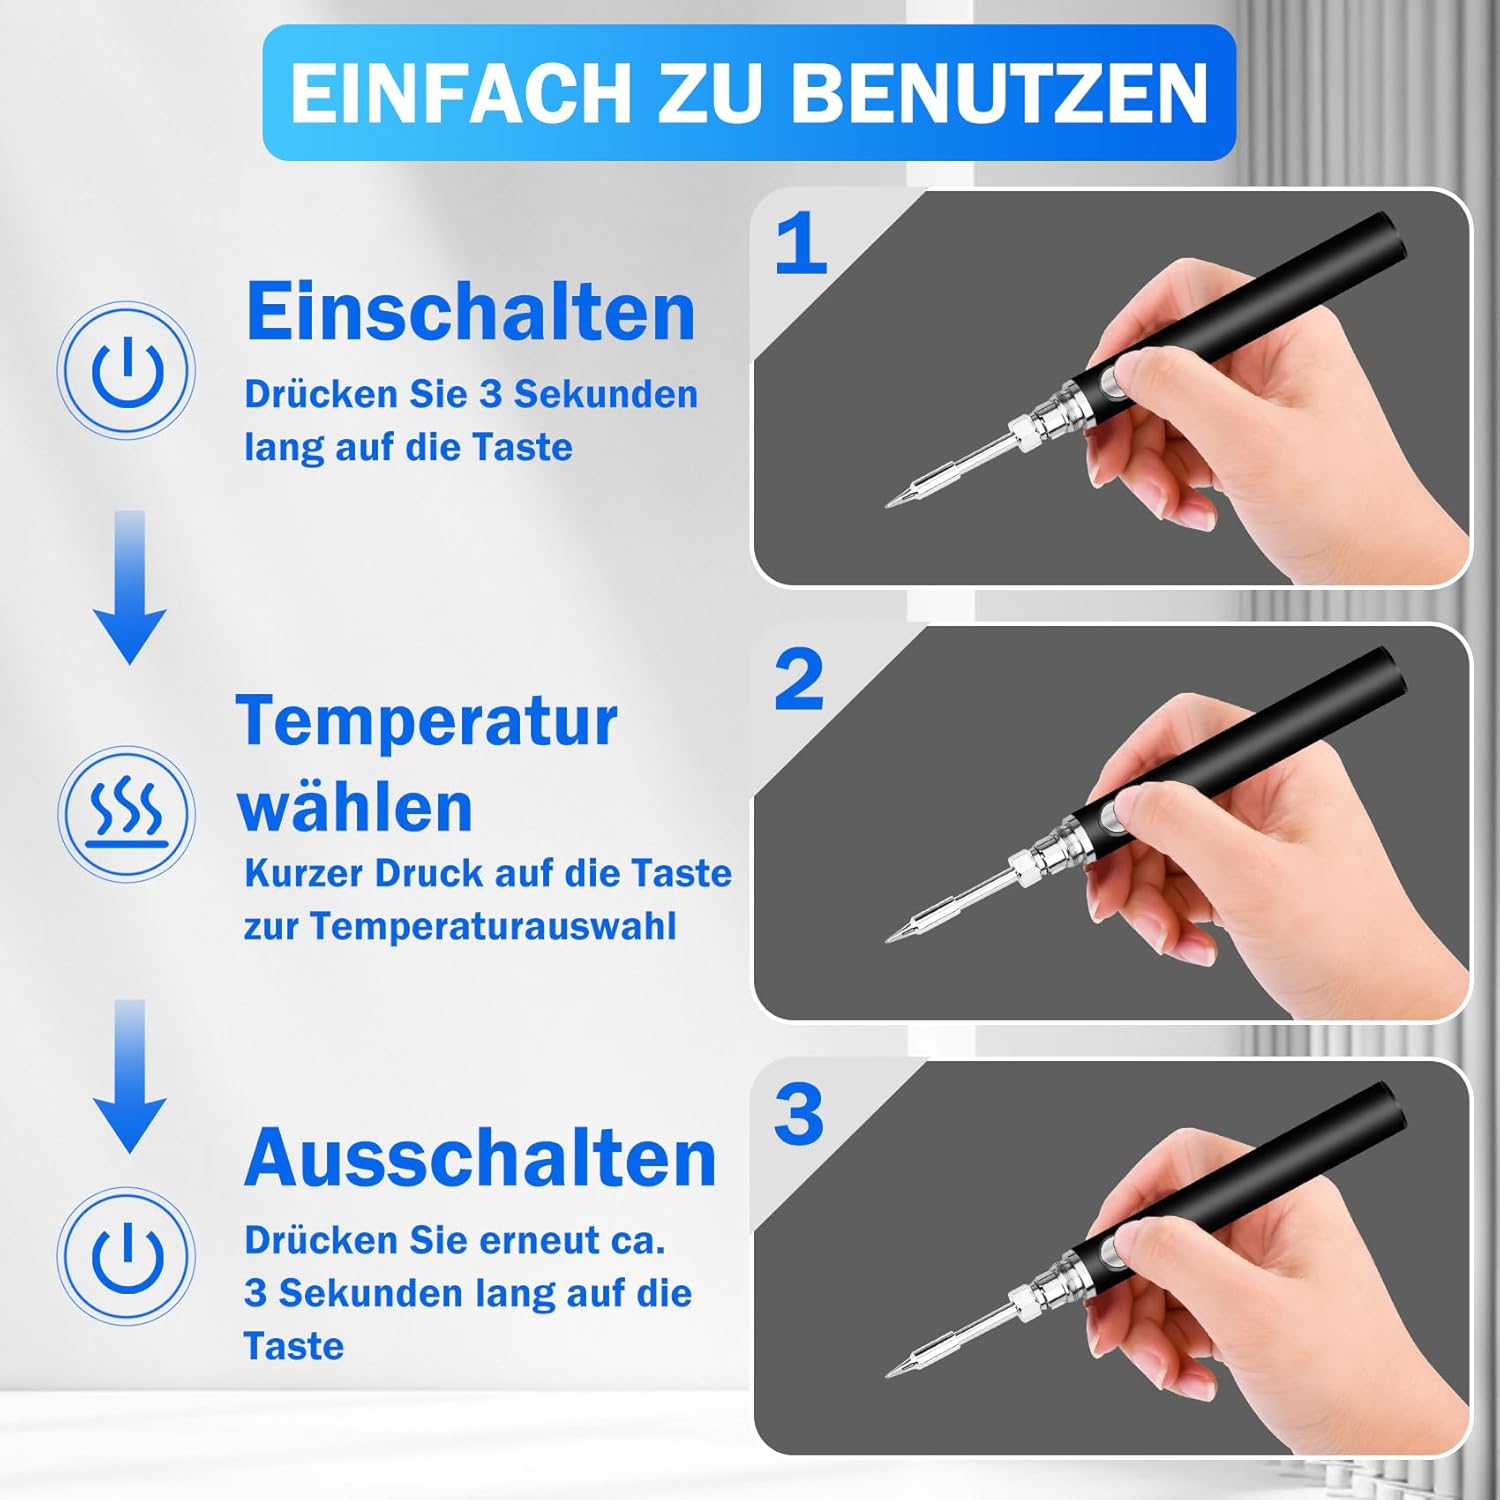
Image: Visual guide for turning the soldering iron on (long press 3s), selecting temperature (short press), and turning off (long press 3s).

Image: Details the three temperature settings indicated by green, blue, and red lights on the soldering iron.
3. Soldering Process:
- Prepare the cleaning sponge by wetting it with water.
- Allow the soldering iron to heat up to the selected temperature.
- Clean the tip on the wet sponge before applying solder.
- Apply the hot tip to the joint to be soldered, then feed solder wire into the joint.
- Remove the solder wire, then remove the iron. Allow the joint to cool without disturbance.

Image: A four-step visual guide demonstrating how to wet the cleaning sponge and use it to clean the soldering iron tip.
4. Resting the Soldering Iron:
When not actively soldering, place the hot soldering iron on the provided kickstand to prevent damage to your work surface and ensure safety.

Image: The soldering iron is shown resting securely on its kickstand, emphasizing safe placement when hot.
Note: Cordless soldering irons have limited power and are not suitable for large projects. For larger tasks, consider more powerful soldering irons.
Video: A comprehensive demonstration of the KKMOL Cordless Soldering Iron Kit, including unboxing, tip installation, power on/off, temperature selection, soldering application, and tip cleaning.
Maintenance
1. Cleaning the Soldering Tip:
Regularly clean the soldering tip using the wet sponge provided. This helps maintain optimal heat transfer and extends tip lifespan.
2. Replacing Soldering Tips:
If a tip becomes damaged or worn, replace it following the installation steps in the 'Setup' section. Ensure the iron is cool before attempting replacement.
Troubleshooting
This section addresses common issues you might encounter with your KKMOL Cordless Soldering Iron.
Common Faults and Solutions:
- Fault: Flashing Yellow Light
Cause: The soldering iron tip is not correctly installed.
Solution: Ensure the soldering iron tip is securely installed. - Fault: Flashing Red Light
Cause: The battery is out of power.
Solution: Charge the soldering iron using the provided USB Type-C cable. - Fault: Soldering Iron Tip is Damaged
Cause: Wear and tear or improper use.
Solution: Replace the damaged soldering iron tip with a new one.
Video: A guide demonstrating how to identify and resolve common issues with the soldering iron, specifically addressing flashing yellow and red indicator lights.
Specifications
| Brand | KKMOL |
| Model Number | GYCB0087-007 |
| Power Source | Battery Powered |
| Wattage | 15 watts |
| Battery Type | 1 Lithium Polymer (included) |
| Battery Capacity | 800mAh |
| Charging Time | Approx. 2 hours |
| Continuous Use Time | Approx. 30 minutes |
| Temperature Settings | 3 (330-350°C, 370-400°C, 430-450°C) |
| Included Components | Soldering Iron, Solder Wire, Holder with Cleaning Sponge, 3 Soldering Tips, Type-C Charging Cable, Manual |
| Item Weight | 5.6 ounces |
| Item Length | 14 Centimeters |
Warranty & Support
For warranty information or technical support, please refer to the contact details provided with your purchase documentation or visit the official KKMOL website. Keep your proof of purchase for any warranty claims.