PiMex 2915-20 M18 FUEL
Instruction Manual
PiMex M18 FUEL 1-1/8 SDS Plus Rotary Hammer
Model: 2915-20
1. Introduction and Product Overview
This manual provides essential information for the safe and effective operation, maintenance, and troubleshooting of your PiMex M18 FUEL 1-1/8 SDS Plus Rotary Hammer. This tool is designed to fit Milwaukee 2915-20 M18 FUEL systems and is often used in conjunction with compatible radio and light units (sold separately or as part of a kit).
The M18 FUEL Rotary Hammer features a Brushless Motor for maximum power and extended motor life. Its integrated Intelligence system ensures communication between the tool, battery, and charger, protecting against overloading, overheating, and over-discharging. It delivers 3.6 ft-lbs of impact energy and operates with an AVS Anti-Vibration System for user comfort. The tool offers three operational modes: Rotary Hammer, Hammer Only, and Rotary Only, with a no-load speed of 800 RPM and 4,600 BPM. It is part of the M18 system, offering broad compatibility with over 200+ solutions.
2. Important Safety Information
WARNING: Read all safety warnings, instructions, illustrations and specifications provided with this power tool. Failure to follow all instructions listed below may result in electric shock, fire and/or serious injury.
- Work Area Safety: Keep work area clean and well lit. Cluttered or dark areas invite accidents. Do not operate power tools in explosive atmospheres, such as in the presence of flammable liquids, gases or dust.
- Electrical Safety: Power tool plugs must match the outlet. Never modify the plug in any way. Do not expose power tools to rain or wet conditions.
- Personal Safety: Always wear eye protection. Use hearing protection when operating the tool. Wear a dust mask if operations create dust. Dress properly. Do not wear loose clothing or jewelry.
- Power Tool Use and Care: Do not force the power tool. Use the correct power tool for your application. Disconnect the battery pack from the power tool before making any adjustments, changing accessories, or storing power tools.
- Battery Tool Use and Care: Recharge only with the charger specified by the manufacturer. Use power tools only with specifically designated battery packs.
- Service: Have your power tool serviced by a qualified repair person using only identical replacement parts.
3. Components and Features
Familiarize yourself with the main components of your rotary hammer and compatible accessories.

Figure 3.1: The PiMex M18 FUEL 1-1/8 SDS Plus Rotary Hammer. This image shows the main tool unit, featuring its red and grey housing, SDS Plus chuck, and adjustable side handle. The 'FUEL' and 'ONE-KEY' branding are visible on the tool body.

Figure 3.2: A compatible jobsite radio. This image displays a rugged, black and red radio unit with a digital display showing '12:00', and various control buttons for power, Bluetooth, AM/FM, preset, play/pause, skip, and volume. It features dual speakers.
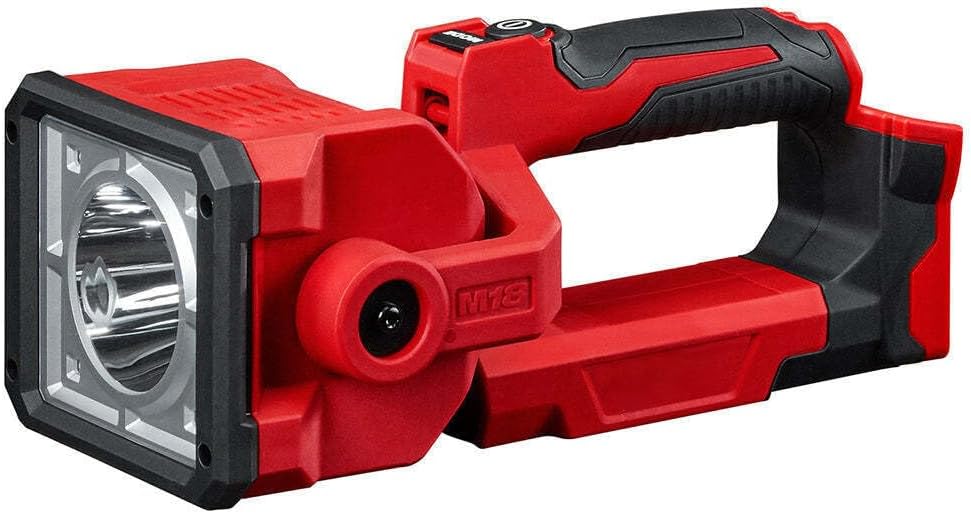
Figure 3.3: A compatible jobsite light. This image shows a compact, red and black LED work light with a sturdy handle, designed for portability and durability on job sites.
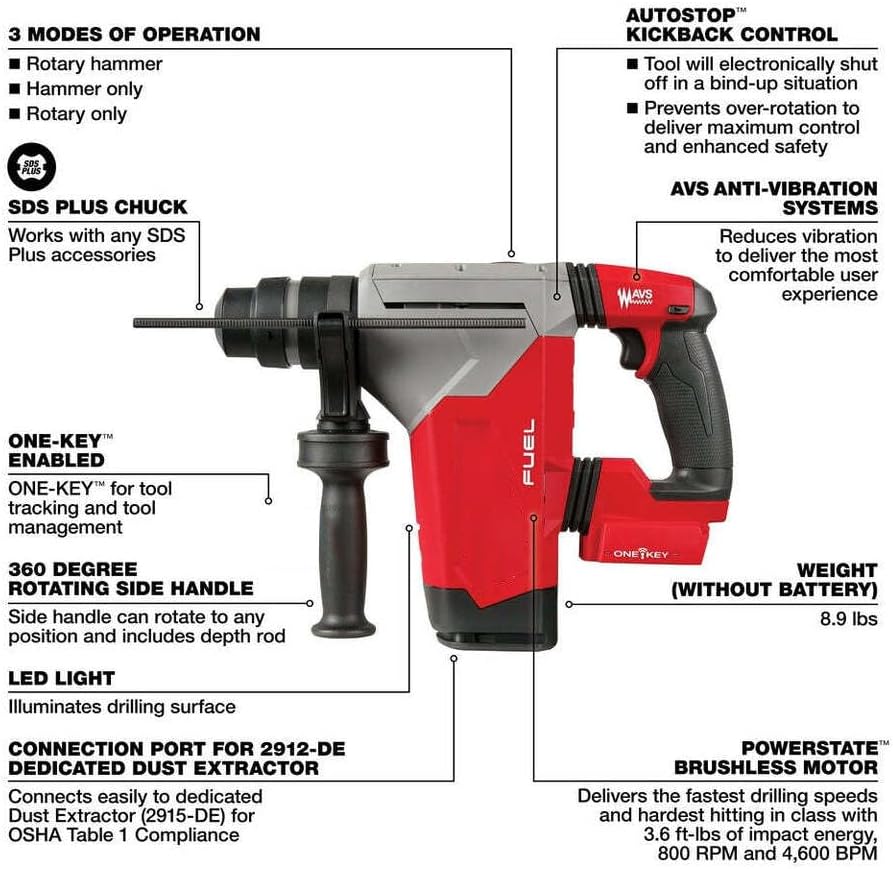
Figure 3.4: Detailed diagram highlighting key features of the rotary hammer. This diagram points out the 3 modes of operation (Rotary hammer, Hammer only, Rotary only), SDS Plus chuck, ONE-KEY enabled functionality, 360-degree rotating side handle, LED light, connection port for dedicated dust extractor (2912-DE), POWERSTATE Brushless Motor, AVS Anti-Vibration System, AUTOSTOP Kickback Control, and the tool's weight (8.9 lbs without battery).
4. Setup and Assembly
- Battery Installation: Ensure the battery pack is fully charged. Align the battery pack with the receptacle in the tool handle and slide it in until it clicks securely into place. To remove, press the release button and pull the battery out.
- Side Handle Adjustment: Loosen the side handle grip by twisting it counter-clockwise. Adjust the handle to a comfortable and secure position for your application. Tighten the grip by twisting clockwise until it is firm. The side handle can rotate 360 degrees.
- Bit Installation (SDS Plus Chuck):
- Clean the shank of the SDS Plus bit.
- Pull back the chuck collar and insert the bit into the chuck.
- Release the chuck collar. The bit should click into place. Pull on the bit to ensure it is securely locked. A slight axial play is normal for SDS Plus systems.
- Depth Rod Adjustment: Insert the depth rod into the hole on the side handle. Adjust the rod to the desired drilling depth and tighten the side handle grip to secure it.
- Dust Extractor Connection (Optional): If using a compatible dust extractor (e.g., 2912-DE), connect it to the designated port on the tool as per the dust extractor's instructions.
5. Operating Instructions
Before operation, ensure all safety precautions are followed and the work area is clear.

Figure 5.1: A user operating the rotary hammer with a long drill bit, demonstrating its use in a construction environment. The user is wearing appropriate personal protective equipment, including gloves and safety glasses.
5.1. Mode Selection
The tool features a 3-mode selector switch. Rotate the switch to select the desired operating mode:
- Rotary Hammer Mode: For drilling in concrete, masonry, and stone with impact.
- Hammer Only Mode: For chiseling applications (e.g., light demolition, tile removal). Use with chisel bits.
- Rotary Only Mode: For drilling in wood, metal, and plastic without impact. Use with appropriate drill bits (e.g., twist drills, spade bits).
5.2. Starting and Stopping
- To start the tool, firmly grasp the handles and press the trigger.
- To stop the tool, release the trigger.
- The LED light illuminates the drilling surface when the trigger is pressed.
5.3. AUTOSTOP™ Kickback Control
This feature electronically shuts off the tool in a bind-up situation, preventing over-rotation and enhancing user safety. Maintain a firm grip on the tool during operation.
5.4. ONE-KEY™ Enabled Functionality
This tool is ONE-KEY™ enabled, allowing for tool tracking, security, and inventory management through the ONE-KEY™ app. Refer to the ONE-KEY™ documentation for detailed instructions on setting up and utilizing these features.
6. Maintenance
Regular maintenance ensures optimal performance and extends the life of your tool.
- Cleaning: Keep the tool's ventilation openings clear and free of debris. Use a soft brush or compressed air to clean dust and chips from the tool. Do not use water or chemical cleaning agents.
- Lubrication: The tool's internal components are factory lubricated and generally do not require additional lubrication. For SDS Plus chucks, apply a small amount of grease to the bit shank periodically to ensure smooth operation and prevent wear.
- Inspection: Regularly inspect the power cord (if applicable), battery pack, and tool housing for any damage. Check that all screws are tight.
- Storage: Store the tool in a clean, dry place, out of reach of children and away from direct sunlight or extreme temperatures. Remove the battery pack before storage.
7. Troubleshooting
| Problem | Possible Cause | Solution |
|---|---|---|
| Tool does not start. | Battery pack not inserted correctly or discharged. | Ensure battery is fully seated. Recharge or replace battery pack. |
| Reduced power or performance. | Battery pack low on charge; tool overheating; worn carbon brushes (if applicable). | Recharge battery. Allow tool to cool down. Contact service for brush replacement. |
| Bit not rotating or impacting. | Mode selector in wrong position; bit not properly inserted. | Check mode selector. Re-insert bit into SDS Plus chuck. |
| Excessive vibration. | Bit bent or damaged; AVS system malfunction. | Replace bit. If problem persists, contact service. |
| Tool shuts off unexpectedly. | Overload protection activated (AUTOSTOP™); battery overheating. | Reduce load. Allow tool and battery to cool. |
If the problem persists after attempting these solutions, please contact customer support.
8. Specifications
| Feature | Detail |
|---|---|
| Brand | PiMex |
| Model Compatibility | Fits Milwaukee 2915-20 M18 FUEL |
| Power Source | Battery Powered, Corded Electric (via adapter, not included) |
| Voltage | 18V |
| No Load Speed | 800 RPM |
| Blow Energy | 3.6 ft-lbs |
| BPM (Blows Per Minute) | 0-4600 BPM |
| Solid Bit Capacity | 1-1/8" |
| Thin Wall Core Bit Capacity | 3" |
| Chuck Type | SDS Plus |
| Modes | Rotary Hammer, Hammer Only, Rotary Only |
| Anti-Vibration System | AVS |
| Kickback Control | AUTOSTOP™ |
| Connectivity | ONE-KEY™ Enabled |
| Length | 13.5" |
| Weight (without battery) | 8.9 lbs |
| Color | Red |
| UPC | 623709911837 |

Figure 8.1: Image showing compatibility with the M18 FUEL HAMMERVAC 1-1/8" Dedicated Dust Extractor (Model 2915-DE). This highlights the tool's integration with dust management systems for cleaner and safer operation.
9. Warranty and Support
Specific warranty information for this PiMex product is not provided in the available data. Please refer to the product packaging or the manufacturer's official website for detailed warranty terms and conditions.
For technical support, service, or replacement parts, please contact PiMex customer service through their official channels. Keep your purchase receipt as proof of purchase for any warranty claims.