GREENER C10 Plus
GREENER Electric Pressure Washer C10 Plus User Manual
Model: C10 Plus
1. Introduction
This manual provides essential information for the safe and effective operation, maintenance, and troubleshooting of your GREENER Electric Pressure Washer C10 Plus. Please read this manual thoroughly before using the product and retain it for future reference.

Image 1.1: GREENER Electric Pressure Washer C10 Plus and included accessories.
2. Important Safety Information
WARNING: Failure to follow these instructions may result in serious injury or property damage.
- Do NOT spray on people or animals due to high pressure. The high-pressure spray can cause severe injuries.
- Always wear appropriate personal protective equipment, including safety glasses, gloves, and protective footwear.
- Ensure the power cord is connected to a properly grounded outlet. The unit features GFCI protection for electrical safety.
- The electric power washer is equipped with an internal TSS (Total Stop System), which automatically shuts off the pump when the trigger is not engaged. This prolongs the pump's service life and enhances safety.
- A safety lock on the water hose handle prevents accidental activation when not in use. Always engage the safety lock when the unit is not actively spraying.
- Never operate the pressure washer without a water supply connected and turned on. Running the pump dry can cause damage.
- Keep children and pets away from the operating area.
- Do not direct the spray at electrical outlets, wiring, or the pressure washer unit itself.

Image 2.1: GFCI protection ensures electrical safety during operation.
3. Product Components
The GREENER Electric Pressure Washer C10 Plus includes the following main components and accessories:
- Pressure Washer Unit (main body with motor and pump)
- High-Pressure Spray Gun with Safety Lock
- High-Pressure Outlet Hose (23 ft / 7 meters)
- Power Cord (16 ft) with GFCI Protection
- 4 Quick-Connect Nozzles:
- 0° Red Nozzle: Concentrated, powerful stream for stubborn stains.
- 15° Yellow Nozzle: Narrow spray for intensive cleaning.
- 25° Green Nozzle: Medium spray for general cleaning tasks.
- 40° White Nozzle: Wide spray for gentle cleaning and rinsing.
- Foam Cannon (Soap Bottle)
- Nozzle Cleaning Pin
- Water Inlet Connector
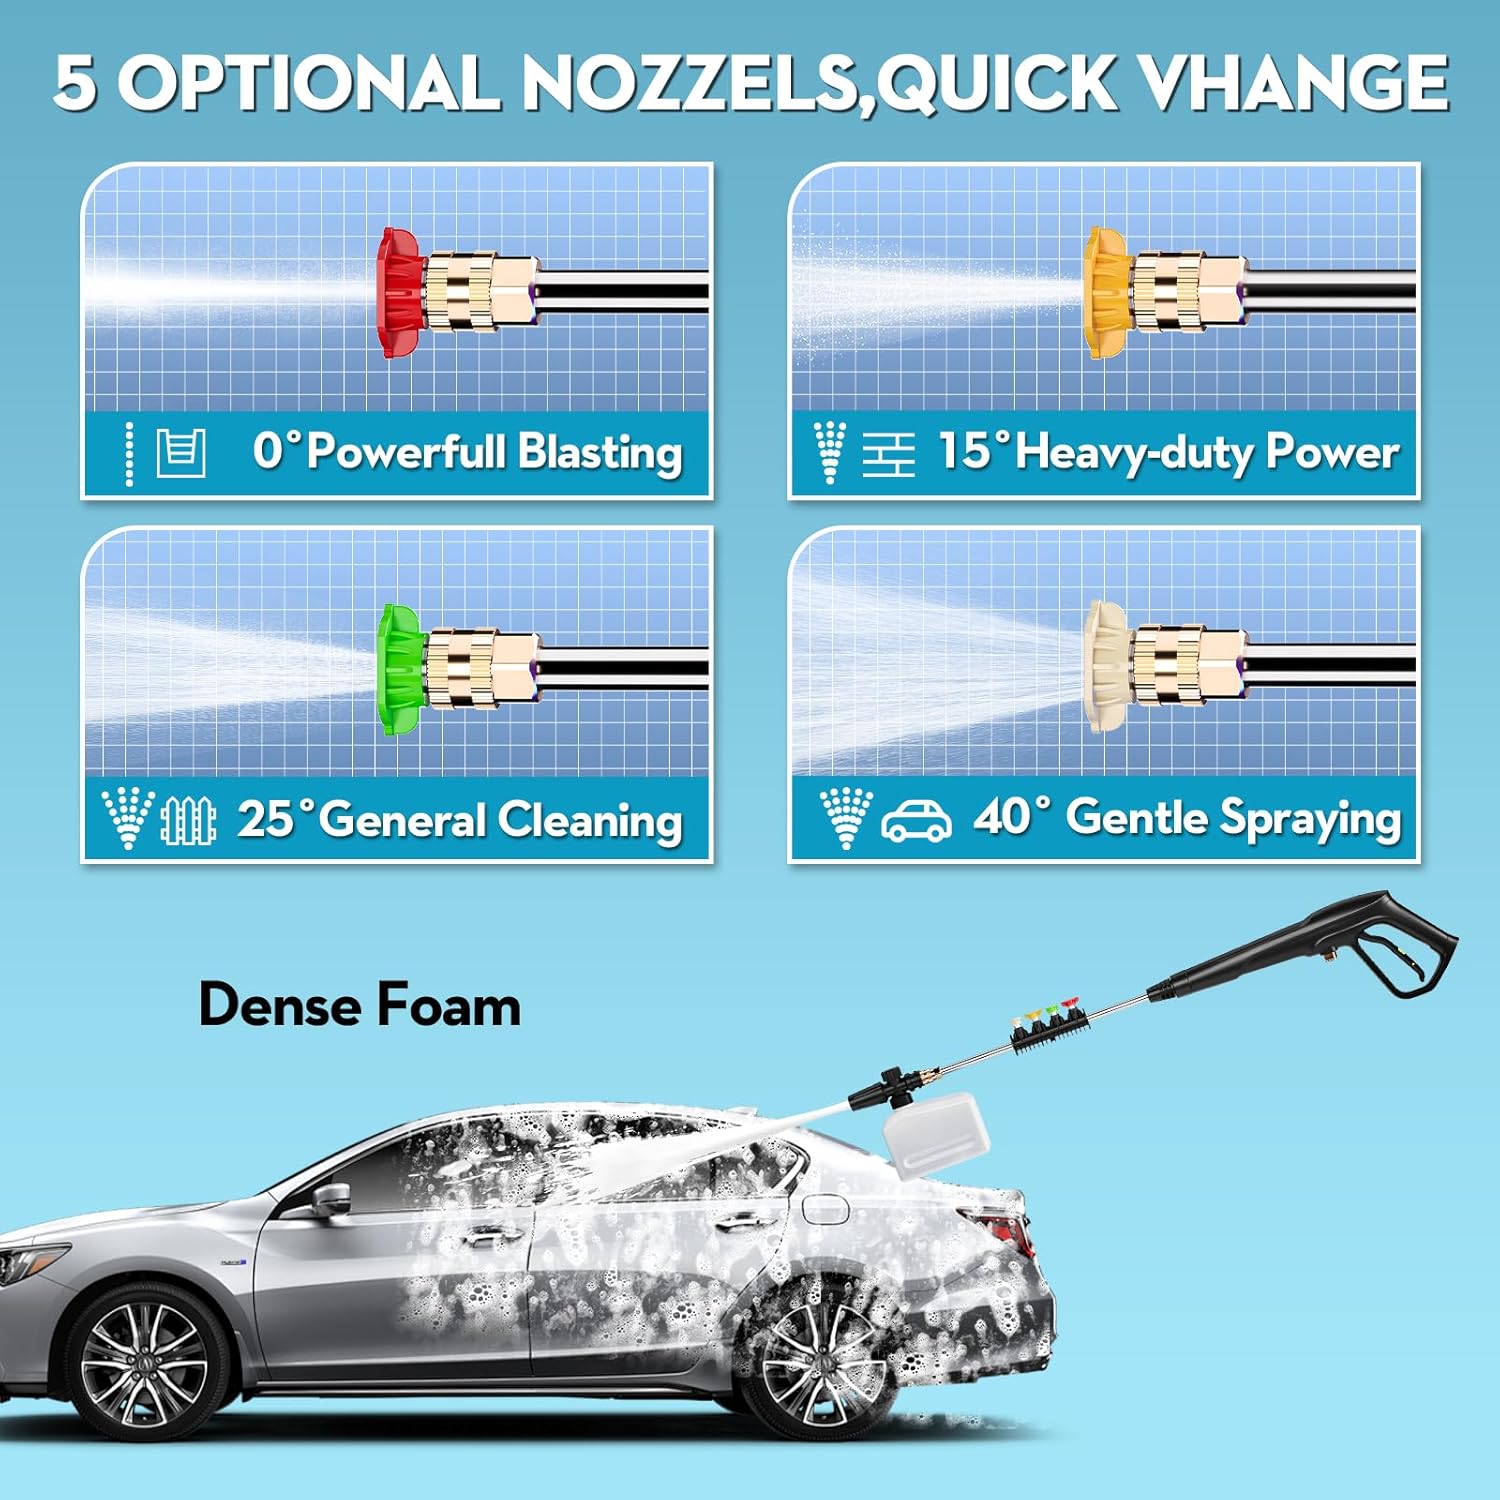
Image 3.1: The four quick-connect nozzles and foam cannon for versatile cleaning.
4. Setup and Assembly
Follow these steps to assemble and prepare your pressure washer for first use:
- Unpack Components: Carefully remove all parts from the packaging and ensure all components listed in Section 3 are present.
- Attach Handle (if detached): Secure the handle to the main unit using the provided screws. Refer to the "Easy Installation" image for guidance.
- Connect High-Pressure Hose: Attach one end of the high-pressure hose to the outlet on the pressure washer unit and the other end to the spray gun. Ensure connections are tight.
- Connect Water Supply:
- Faucet Connection: Connect a standard garden hose (not included) to the water inlet connector on the pressure washer, then connect the garden hose to a water faucet.
- Self-Priming (Bucket) Connection: If using a bucket for water supply, ensure the inlet hose (not included) is fully submerged in clean water.
Important: Ensure the water supply is clean and free of debris to prevent pump damage. The pressure washer requires a minimum water flow to operate correctly.
- Connect Power: Plug the power cord into a grounded electrical outlet. Ensure the GFCI plug is functioning correctly by pressing the "RESET" button.
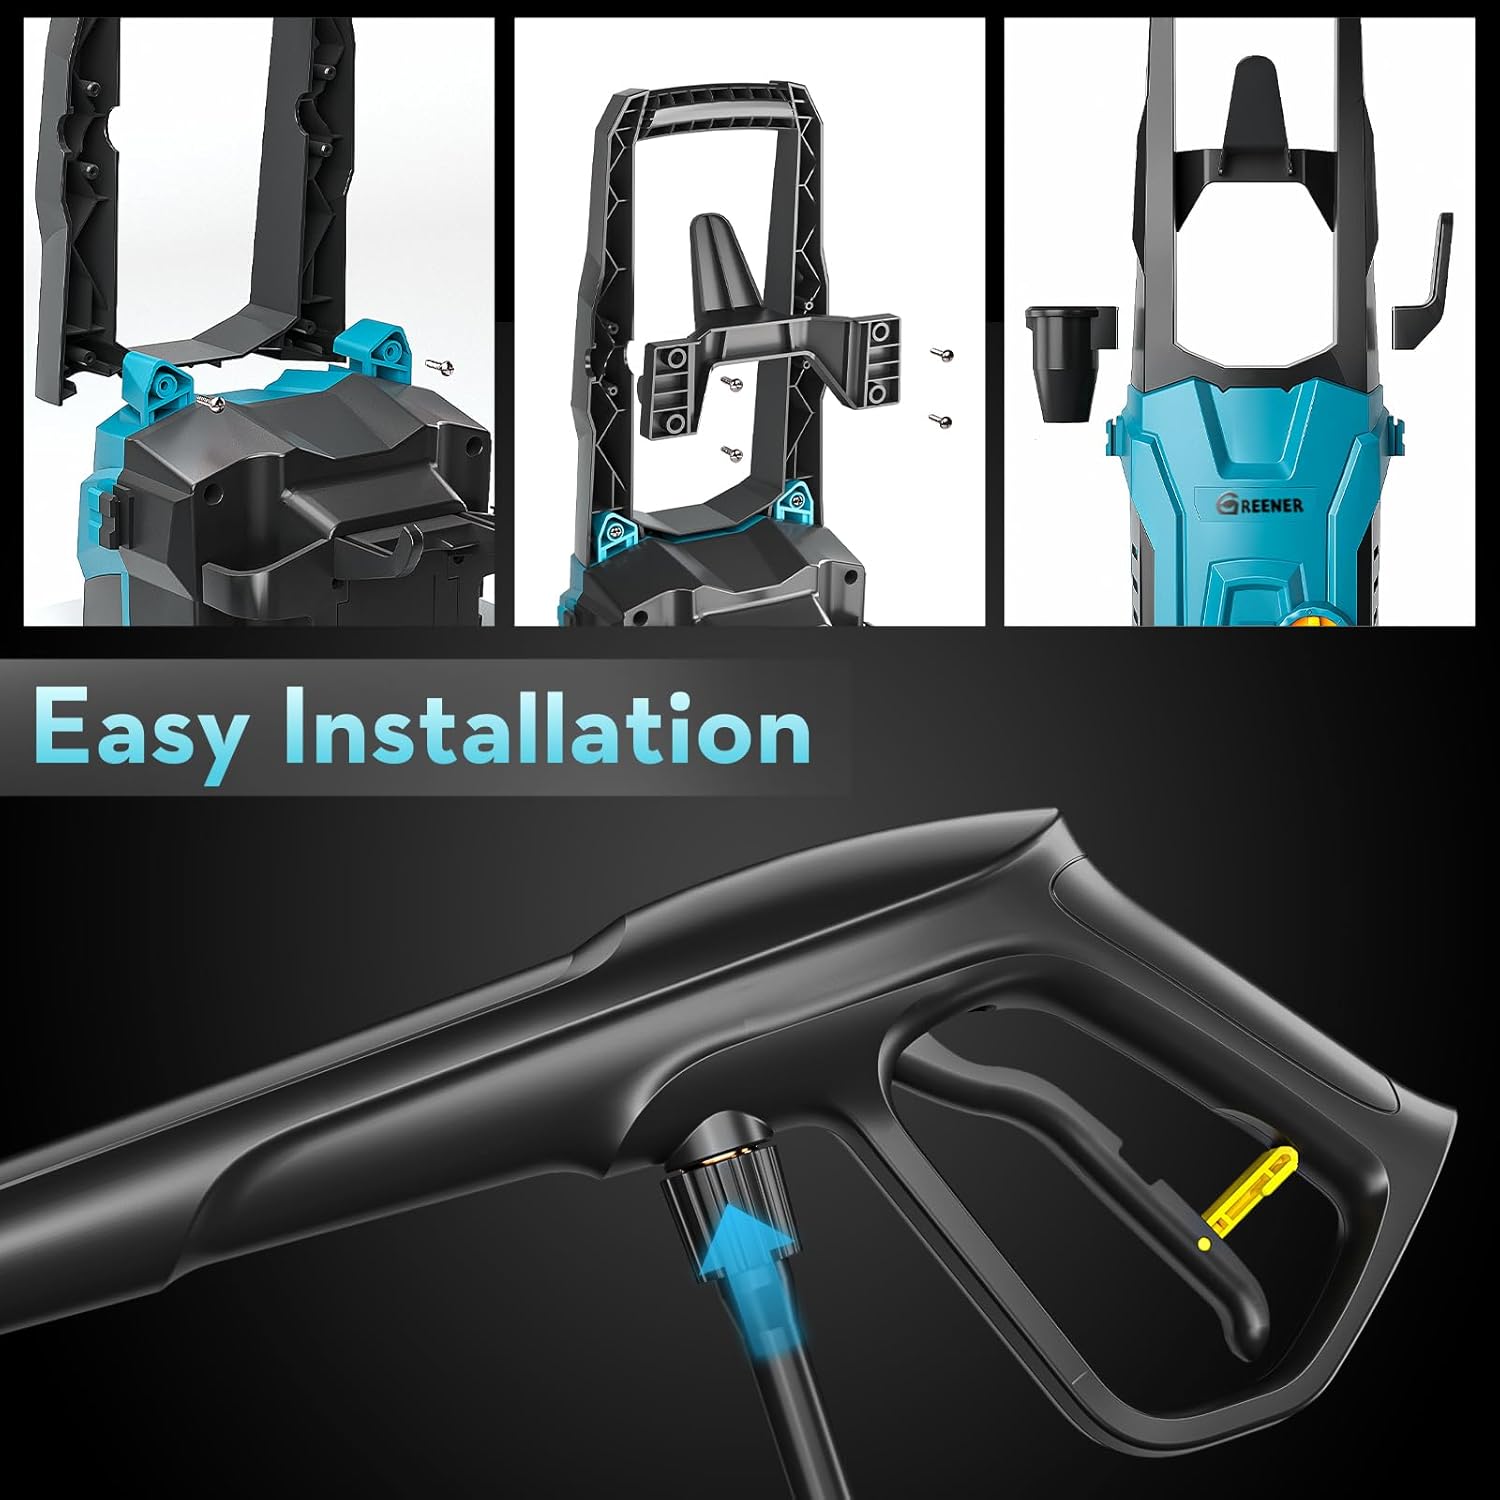
Image 4.1: Visual guide for easy installation of the handle and spray gun connection.
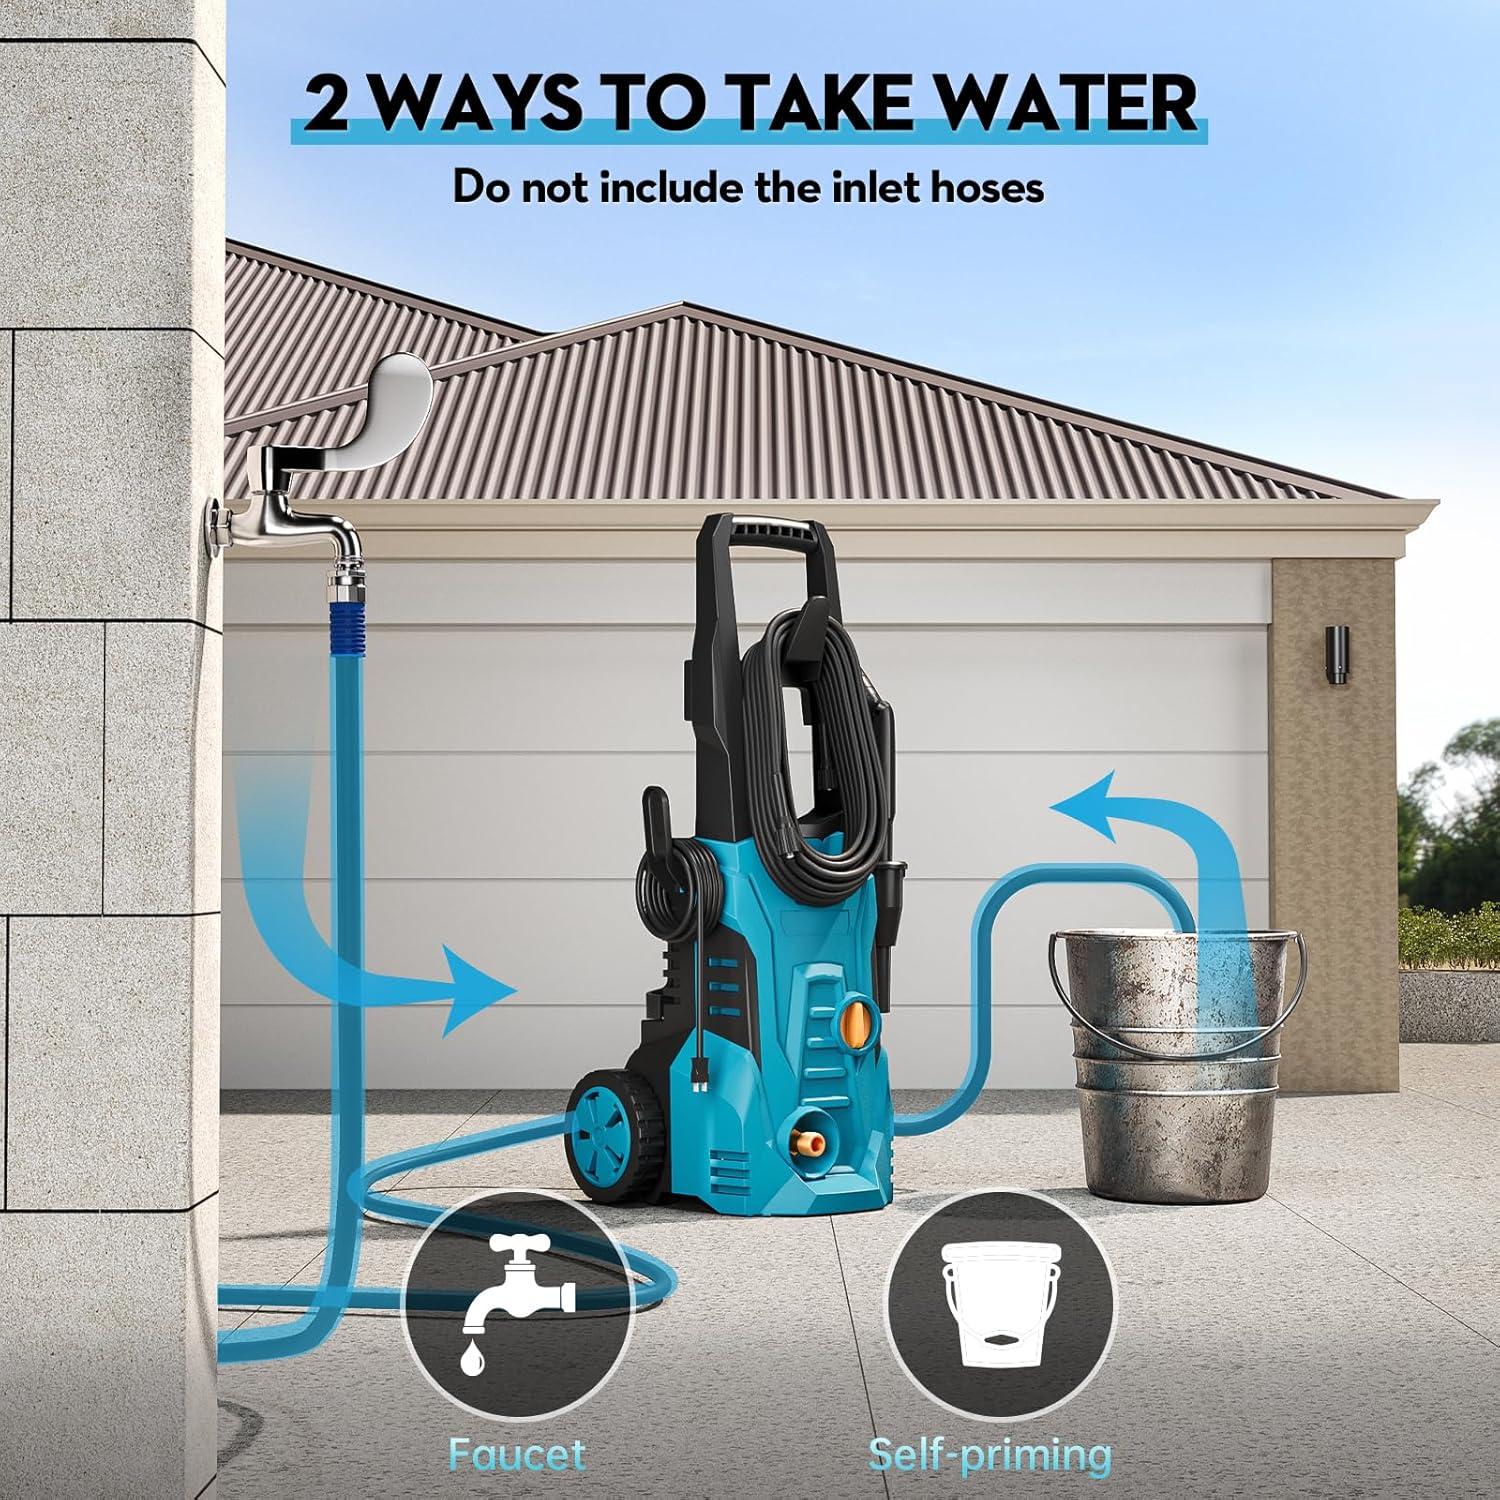
Image 4.2: Options for water intake: direct faucet connection or self-priming from a water source like a bucket.
5. Operating Instructions
Before starting, ensure all connections are secure and the water supply is turned on.
- Purge Air from System: Squeeze the trigger on the spray gun (without power on) to allow water to flow through the system and expel any trapped air. Continue until a steady stream of water emerges.
- Turn On Power: Switch the pressure washer unit to the "ON" position. The pump will start, and pressure will build.
- Select Nozzle: Choose the appropriate quick-connect nozzle for your cleaning task (refer to Section 3 for nozzle descriptions) and insert it into the spray gun wand.
- Begin Cleaning: Aim the spray gun at the surface to be cleaned, maintaining a safe distance. Squeeze the trigger to start the high-pressure spray.
- For general cleaning, start with the 40° or 25° nozzle and gradually move closer or switch to a narrower nozzle if more pressure is needed.
- Always test on an inconspicuous area first to avoid damaging the surface.
- Using the Foam Cannon:
- Fill the foam cannon reservoir with appropriate pressure washer detergent.
- Attach the foam cannon to the spray gun.
- Adjust the top knob on the foam cannon to control the foam density.
- Apply foam to the desired surface, allow it to dwell for a few minutes (as per detergent instructions), then rinse with a suitable nozzle.
- Total Stop System (TSS): The unit will automatically shut off the pump when the trigger is released, conserving energy and extending pump life. It will restart when the trigger is squeezed again.
- After Use:
- Turn off the pressure washer unit.
- Turn off the water supply.
- Squeeze the spray gun trigger to release any remaining pressure in the system.
- Disconnect the high-pressure hose and water supply hose.


6. Maintenance and Storage
Proper maintenance ensures the longevity and optimal performance of your pressure washer.
- Nozzle Cleaning: If a nozzle becomes clogged, use the provided nozzle cleaning pin to clear any debris.
- Filter Cleaning: Regularly check and clean the water inlet filter to prevent debris from entering the pump.
- Hose and Cord Management: Utilize the integrated storage options on the unit for the high-pressure hose and power cord to prevent tangles and damage.
- Winterization (for cold climates): If storing in an area where temperatures may drop below freezing, drain all water from the pump and hoses to prevent damage from freezing. Consider using a pump protector solution.
- General Cleaning: Wipe down the unit with a damp cloth after each use. Do not use harsh chemicals.

Image 6.1: Integrated storage features for organized and clutter-free storage of accessories.
7. Troubleshooting
| Problem | Possible Cause | Solution |
|---|---|---|
| Unit does not start. | No power; GFCI tripped; Power switch off. | Check power connection; Reset GFCI; Turn power switch ON. |
| Low pressure. | Insufficient water supply; Clogged nozzle; Air in pump; Kinked hose. | Ensure adequate water flow; Clean nozzle; Purge air from system; Straighten hose. |
| Water leaks. | Loose connections; Damaged O-rings. | Tighten all connections; Inspect and replace O-rings if damaged. |
| Motor runs but no water sprays. | No water supply; Air in pump; Clogged inlet filter. | Connect water supply; Purge air; Clean inlet filter. |
| Unit cycles on and off frequently. | Air in pump; Leak in system. | Purge air from system; Check for leaks and tighten connections. |
8. Technical Specifications
- Model: C10 Plus
- Maximum Pressure: 4500 PSI
- Water Flow Rate: 2.8 GPM
- Motor Type: Copper Core Motor
- Motor Power: 1700W
- Hose Length: 23 ft (7 meters)
- Power Cord Length: 16 ft
- Weight: 7.26 kg (16 lbs)
- Dimensions (L x W x H): 31.98 x 31.98 x 39.98 cm
- Safety Features: Total Stop System (TSS), GFCI Protection, Safety Lock on Spray Gun
- Ingress Protection: IPX5 Waterproof
- Noise Level: Approximately 68dB

Image 8.1: The 1700W copper core motor provides powerful and reliable performance.
9. Warranty Information
Your GREENER Electric Pressure Washer C10 Plus comes with the following assurances:
- Extended Warranty: 12+ Months Free Extended Warranty (activation may be required).
- Money Back Guarantee: 30 Days Money Back Guarantee.
- VIP Service: Free replacement service for eligible issues.
Please refer to the product packaging or contact customer support for specific terms and conditions regarding warranty activation and claims.
10. Customer Support
For any questions, assistance, or to activate your extended warranty, please contact GREENER customer service:
- Email: greener-serviceteam@outlook.com
- Availability: 24/7 Customer Support
We are committed to providing quality products and impeccable customer service. Please do not hesitate to reach out if you encounter any issues or have inquiries.
Related Documents - C10 Plus
 |
Greener Mini Electric Chainsaw Operation Instructions Comprehensive operation instructions for the Greener Mini Electric Chainsaw, covering safety rules, installation, usage, and technical parameters. Learn how to safely operate and maintain your cordless chainsaw for various cutting tasks. |
 |
Detroit Speed Billet Tailgate Handle Installation Guide for 1967-87 Chevy C10 Truck Detailed installation instructions and kit contents for the Detroit Speed Billet Tailgate Handle, designed for 1967-1987 Chevy C10 trucks. Features direct-fit replacement, anodized aluminum/stainless steel construction, and smooth operation. |
 |
CRANACH Shower System Installation Manuals & Guides Comprehensive installation manuals and guides for CRANACH bath and kitchen shower systems, including thermostatic valves, shower arms, rain shower heads, shower holders, hand showers, and hoses. Features safety notes, technical specifications, and warranty information. |
 |
CRANACH Bath & Kitchen Installation Manuals for Shower Systems Comprehensive installation guides from CRANACH for various bathroom fixtures including thermostatic valves, shower arms, shower heads, shower holders, hand showers, and shower hoses. Includes safety, warranty, and technical information. |
 |
CRANACH Installation Manuals for Shower Valves, Arms, and Heads This comprehensive CRANACH installation manual provides detailed instructions for pressure balance valves, shower arms, and rain shower heads. Includes safety guidelines, installation considerations, technical information, parts lists, and warranty details for CRANACH bathroom fixtures. |
 |
CRANACH Shower Installation Manuals: Rain Shower Heads, Hand Showers, Shower Sets, Arms & Hoses Comprehensive installation guides and warranty information for CRANACH bathroom fixtures, including rain shower heads, hand showers, pressure balance shower sets, shower arms, and shower hoses. Find model numbers, safety notes, and installation steps. |
Ask a question about this manual
Ask about setup, troubleshooting, compatibility, parts, safety, or missing instructions. Manuals+ will review the question and use this page’s manual context to help answer it.