1. Introduction
Welcome to the Freego Electric Dirt Bike user manual. This guide provides essential information for the safe and effective operation, assembly, and maintenance of your new Freego F3 Pro or F3 Pro Max electric dirt bike. Please read this manual thoroughly before your first ride to ensure a complete understanding of its features and safety precautions.

Image: The Freego F3 Pro electric dirt bike, showcasing its robust design and fat tires.
2. Safety Guidelines
Your safety is paramount. Adhere to the following guidelines to prevent injury and ensure a safe riding experience:
- Always wear a helmet and appropriate safety gear (gloves, knee pads, elbow pads) when riding.
- Perform a pre-ride inspection before each use, checking brakes, tire pressure, and battery level.
- Familiarize yourself with local laws and regulations regarding electric bikes.
- Do not ride under the influence of alcohol or drugs.
- Avoid riding in adverse weather conditions (heavy rain, snow, ice).
- Maintain a safe distance from other vehicles and pedestrians.
- Do not exceed the maximum weight capacity of 400 lbs.
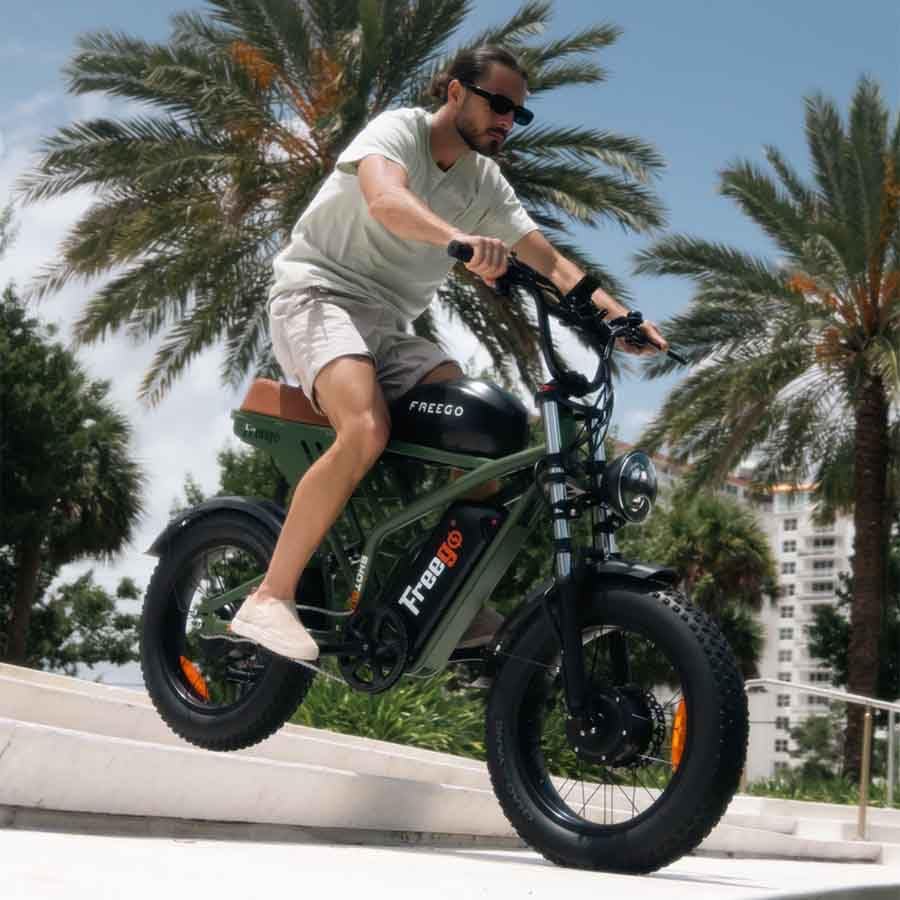
Image: A rider demonstrating safe operation of the Freego electric dirt bike on an incline.
3. Package Contents
Due to the weight of the Freego Electric Dirt Bike, your order will arrive in two separate packages. Please ensure you have received both before beginning assembly.
- Freego F3 Pro (40Ah model) OR F3 Pro Max (55Ah model) Electric Fat Tire Bike
- Assembly Tool Kit
- Instruction Manual (this document)
- Battery Charger
4. Assembly
Your Freego Electric Dirt Bike requires some assembly. Follow these general steps. Refer to the included assembly diagram for detailed instructions.
- Unpack all components carefully and verify against the package contents list.
- Attach the front wheel, ensuring the brake rotor is correctly aligned with the caliper.
- Install the handlebars, adjusting to a comfortable riding position.
- Attach the pedals, noting that they are typically left (L) and right (R) specific.
- Install the seat and adjust its height.
- Connect any remaining electrical cables (e.g., headlight, display) if not pre-connected.
- Perform a thorough safety check before the first ride.

Image: The Freego electric dirt bike fully assembled, ready for use.
5. Components Overview
Understanding the key components of your Freego Electric Dirt Bike is essential for operation and maintenance.

Image: Detailed diagram illustrating the dimensions and key components of the Freego electric dirt bike.
Key features include:
- Dual Motor System: Powerful 2000W dual motors for high performance and torque.
- Dual Hydraulic Brakes: Front and rear hydraulic disc brakes for reliable stopping power.
- Dual Suspension: Front fork and rear independent suspension for a smooth ride over varied terrain.
- Fat Tires: 20" x 4.0" fat tires provide excellent traction and stability.
- Removable Dual Batteries: Available in 40Ah or 55Ah configurations for extended range.
- LCD Display: Provides real-time information on speed, battery level, and mileage.
- Integrated Lighting: Bright front and rear lights for enhanced visibility.

Image: Visual representation of the dual suspension and hydraulic braking systems for enhanced safety and comfort.
6. Initial Setup
Before your first ride, ensure your bike is properly set up.
Battery Charging:
Fully charge the battery before initial use. Connect the charger to the bike's charging port and then to a standard power outlet. The indicator light on the charger will change when charging is complete. Charging time may vary.
Pre-Ride Checks:
- Check tire pressure (refer to tire sidewall for recommended PSI).
- Test both front and rear brakes for proper function.
- Ensure all quick releases and bolts are securely tightened.
- Verify the battery is securely seated and locked.
- Test the headlight and taillight.
7. Operating Instructions
Learn how to operate your Freego Electric Dirt Bike effectively.
Power On/Off:
Press and hold the power button on the LCD display to turn the bike on or off. The display will illuminate, showing current speed, battery level, and other metrics.
Riding Modes:
- Pedal-Assist Mode: The motor provides assistance as you pedal. Adjust the assist level via the display for more or less power. This mode extends range significantly (68-108 miles).
- Full Electric Mode (Throttle): Engage the throttle for motor power without pedaling. This mode offers a range of 56-68 miles.
LCD Display:
The intuitive LCD display provides vital information at a glance. Use the buttons to cycle through different data points and adjust settings.
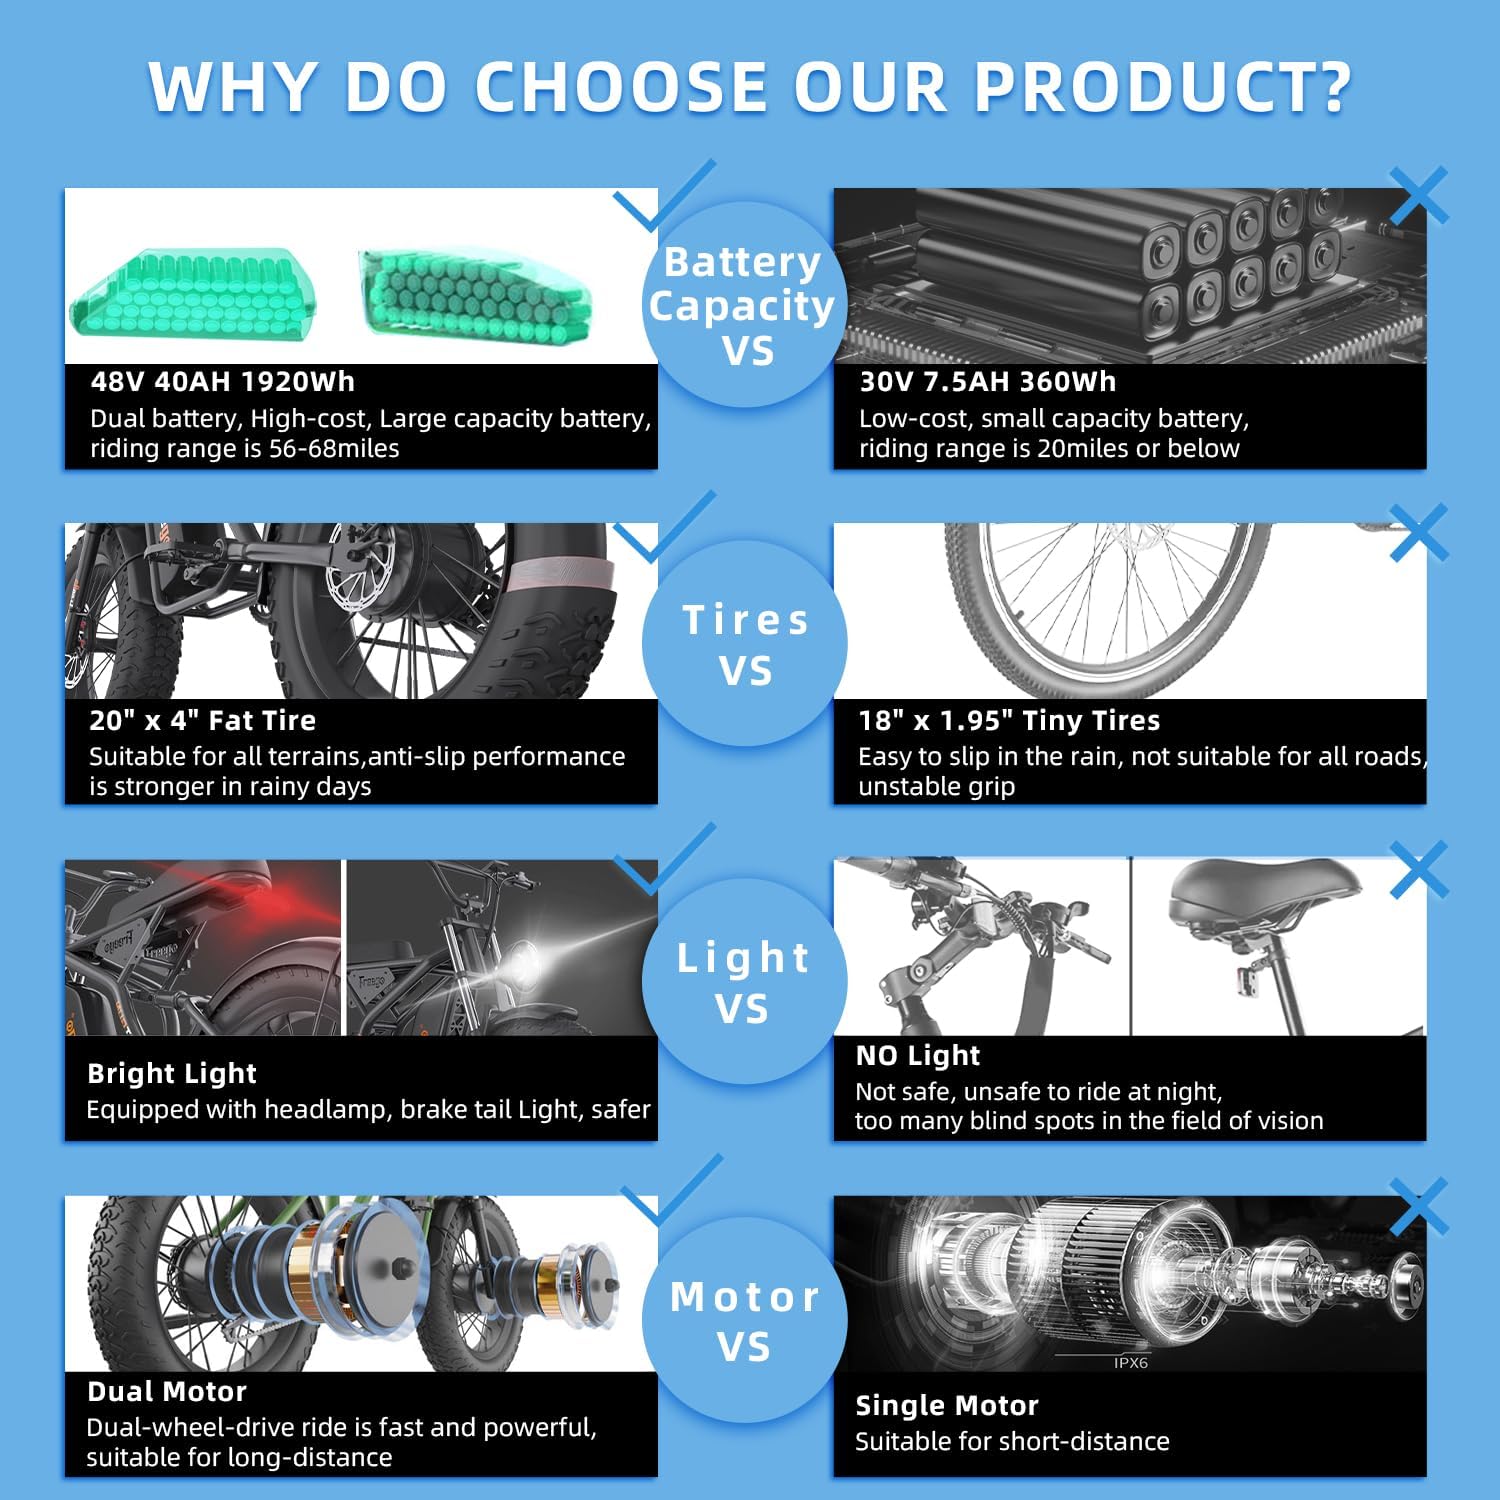
Image: Close-up of the Freego electric dirt bike's LCD display, showing speed and battery information.
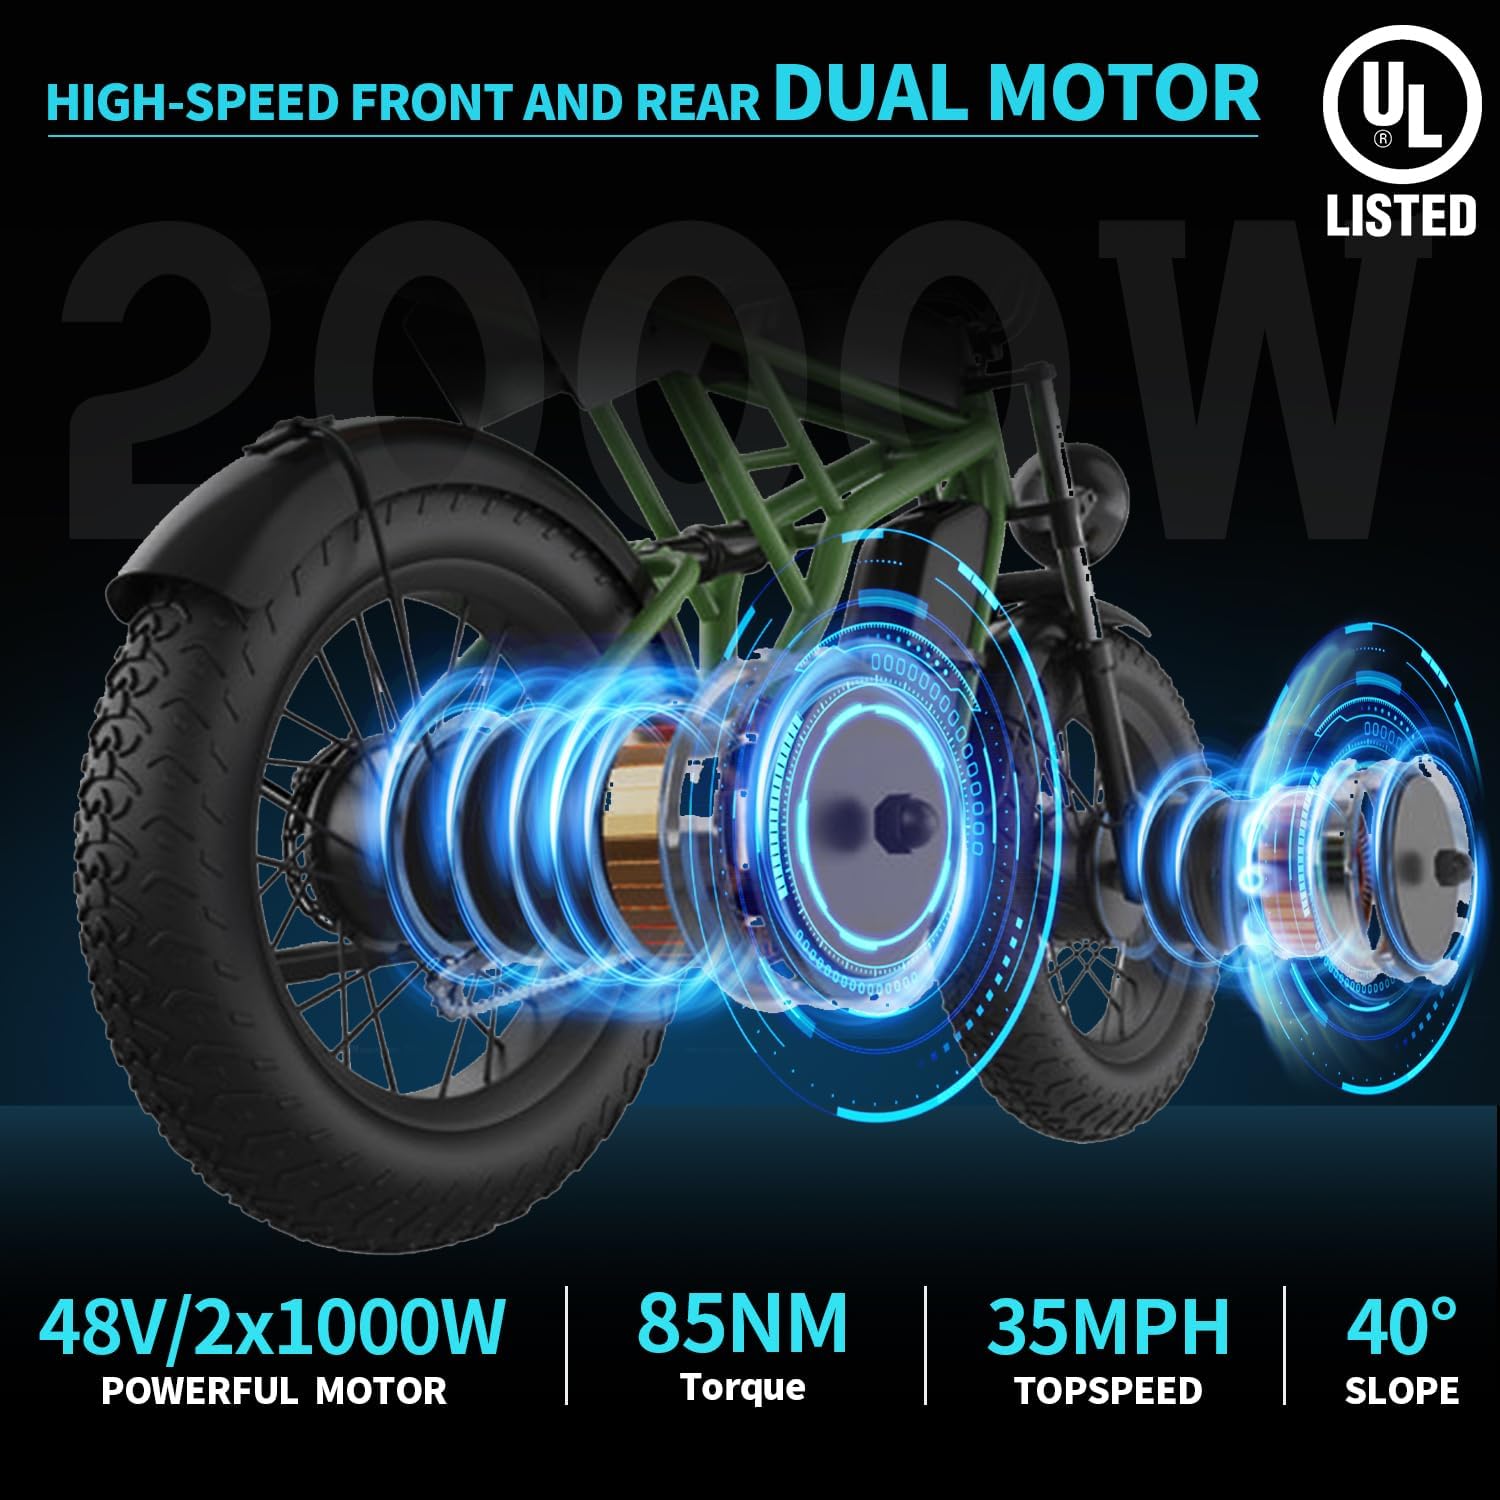
Image: A rider demonstrating the use of the Freego electric dirt bike on a paved road.
8. Maintenance
Regular maintenance ensures the longevity and optimal performance of your electric dirt bike.
General Maintenance:
- Keep the bike clean, especially after riding in dirt or wet conditions. Use a damp cloth; avoid high-pressure washing directly on electrical components.
- Regularly check and tighten all bolts and fasteners.
- Inspect brake pads for wear and replace as needed.
- Lubricate the chain periodically.
- Check tire tread and pressure regularly.
Battery Care:
- Store the battery in a cool, dry place when not in use.
- Avoid fully discharging the battery. Recharge after each ride or when the battery level is low.
- If storing for an extended period, charge the battery to 50-70% and recharge every 1-2 months.
- Only use the original Freego charger provided with your bike.
9. Troubleshooting
This section addresses common issues you might encounter with your Freego Electric Dirt Bike.
| Problem | Possible Cause | Solution |
|---|---|---|
| Bike does not power on. | Low battery, loose battery connection, power button issue. | Charge battery, ensure battery is securely seated, check power button connection. |
| Motor not assisting. | Low battery, assist level set to zero, sensor issue. | Charge battery, increase assist level on display, check pedal assist sensor. |
| Brakes feel spongy. | Air in hydraulic lines, worn brake pads. | Bleed brake lines (professional recommended), replace brake pads. |
| Reduced range. | Under-inflated tires, cold weather, frequent use of full electric mode, aging battery. | Inflate tires to correct pressure, ride in pedal-assist mode, consider battery replacement if significantly degraded. |
10. Technical Specifications
Detailed specifications for the Freego Electric Dirt Bike F3 Pro and F3 Pro Max models.
| Specification | Value |
|---|---|
| Model Name | F3 PRO/F3 PRO MAX |
| Bike Type | Electric Bike |
| Motor | 2000W Dual Motor (2x1000W) |
| Top Speed | Up to 35 MPH |
| Torque | 85 Nm |
| Battery (F3 Pro) | 48V/40Ah Dual Lithium-ion (1920Wh) |
| Battery (F3 Pro Max) | 48V/55Ah Dual Lithium-ion |
| Max Range (Pedal-Assist) | 68-108 Miles |
| Max Range (Full Electric) | 56-68 Miles |
| Wheel Size | 20 Inches (4.0" Fat Tires) |
| Frame Material | Aluminum |
| Suspension Type | Dual (Front Fork & Rear Independent) |
| Brake Style | Hydraulic Disc Brake |
| Maximum Weight Recommendation | 400 Pounds |
| Recommended Rider Height | 63 - 76 Inches (5'3" - 6'4") |
| Assembly Required | Yes |
| UL Certified | Yes |

Image: Diagram illustrating the powerful 2000W dual motor system of the Freego electric dirt bike.

Image: Comparison chart highlighting key advantages of the Freego F3 Pro/Max, including battery capacity, tire type, lighting, and motor configuration.
11. Warranty and Support
Freego stands behind the quality of its products.
Warranty Information:
Your Freego Electric Dirt Bike comes with a 12-month limited warranty covering manufacturing defects. Please retain your proof of purchase for warranty claims. The warranty does not cover normal wear and tear, misuse, or damage from accidents.
Customer Support:
For technical assistance, warranty claims, or general inquiries, please contact Freego customer support:
- Call Center: +1 231-640-6875, +1 310-678-1530
- Live Chat: Via Official Freego Website (Visit Freego Store on Amazon)

Image: Freego customer service team ready to assist with inquiries and support.