Pumwry WJ-CO999
Pumwry Carbon Monoxide Detector User Manual
Model: WJ-CO999
1. Introduction
Thank you for choosing the Pumwry Carbon Monoxide Detector. This device is designed to provide continuous monitoring of carbon monoxide (CO) levels in your home, offering an early warning system to protect your family from the dangers of CO poisoning. This manual provides essential information for the proper installation, operation, and maintenance of your detector.

Image: Three Pumwry Carbon Monoxide Detectors, showcasing the product's design and quantity.
2. Important Safety Information
Carbon monoxide (CO) is a colorless, odorless, and tasteless gas that can be fatal. This detector is designed to alert you to the presence of CO, but it is not a substitute for proper maintenance of fuel-burning appliances or adequate ventilation. Always ensure proper installation and regular testing.
Potential Carbon Monoxide Sources
Common sources of carbon monoxide in the home include furnaces, portable fuel-fired generators, water heaters, fireplaces, portable fuel heaters, dryers, and stoves. Vehicles running in an attached garage can also produce dangerous levels of CO.

Image: Illustration of common household appliances and areas that can generate carbon monoxide, such as furnaces, water heaters, and attached garages.
General Safety Guidelines
- Do not paint the detector. Paint can clog the sensor and interfere with its operation.
- Ensure proper ventilation in areas with fuel-burning appliances.
- Never ignore an alarm. Follow the procedures outlined in this manual immediately.
- This detector complies with UL 2034 Standards for carbon monoxide alarms.

Image: A cutaway view of a house showing recommended placements for carbon monoxide detectors in different rooms to ensure comprehensive safety.
3. Product Features
The Pumwry Carbon Monoxide Detector is equipped with several features to ensure reliable and user-friendly operation:
- Easy to Install: Comes with screws for easy installation on walls or ceilings.
- Battery Powered: Operates on 3 x 1.5V AA batteries (not included), ensuring constant monitoring even during power failures. Battery life is approximately 36 months.
- High Accuracy & Reliability: Features an advanced electrochemical carbon monoxide sensor for accurate real-time CO level detection.
- Instant Alert: A loud 85-decibel alarm and flashing red LED provide an early warning when CO levels reach dangerous thresholds.
- Self-test Function: Unit performs a self-test upon power-up, indicated by a “chirp” and red LED flash.
- Informative LCD: Displays real-time CO levels and remembers dangerous CO levels since the last preset. Also indicates malfunctions ('Err') and low battery ('Lb').
- Wide Application: Suitable for living rooms, kitchens, bedrooms, offices, hotels, dormitories, and portable use for travel.

Image: Detailed view of the detector's components, including LED indicators (Green-Operate, Red-Alarm), Buzzer, Test/Silence Button, Air Vents, and LCD display.

Image: Visual representation of the detector's core technologies, emphasizing its intelligent chipset, advanced sensor, low energy use, and comprehensive air intake.
4. Setup
4.1 Battery Installation
The detector requires 3 x 1.5V AA batteries (not included). To install the batteries:
- Twist the back cover of the detector counter-clockwise to open the battery compartment.
- Insert three AA batteries, ensuring correct polarity (+ and -).
- Close the back cover by twisting it clockwise until it clicks securely into place.
4.2 Mounting
For optimal performance, install the detector on a wall or ceiling. Avoid corners or areas with limited airflow.
- Choose a suitable location, typically in or near sleeping areas and on every level of your home.
- Use the provided screws to secure the mounting bracket to the wall or ceiling.
- Align the detector with the mounting bracket and twist clockwise to lock it into place.

Image: A close-up side view of the detector, highlighting the mounting holes for easy installation.
5. Operating Instructions
5.1 Power On and Self-Test
Upon successful battery installation, the unit will sound a “chirp” and the red LED will flash once. The LCD will display “888” for a few seconds, then “000” for 3 seconds, indicating it has entered normal operation mode.
5.2 Understanding the LCD Display
The LCD provides real-time information about the CO levels and the detector's status:
- Real-time CO Levels: Displays the current carbon monoxide concentration in parts per million (PPM).
- '000' Display: Indicates the unit is in normal operation mode or during the self-test.
- 'Err' Display: Indicates the unit is malfunctioning. Refer to the Troubleshooting section.
- 'Lb' Display: Indicates low battery and requires replacement.

Image: The detector's LCD screen displaying different codes and their corresponding meanings for easy user understanding.

Image: The easy-to-read LCD display, showing a clear '000 PPM' reading, indicating safe CO levels.
5.3 Alarm Sensitivity Settings (UL 2034 Compliant)
The detector is designed to alarm at specific CO concentrations and exposure times:
- 50 PPM: Alarms within 60-90 minutes.
- 100 PPM: Alarms within 10-40 minutes.
- 300 PPM: Alarms within 3 minutes.

Image: Visual representation of the detector's alarm sensitivity settings, showing the different CO concentration levels and their corresponding alarm times.
5.4 Alarm Activation
When carbon monoxide levels rise to alarm thresholds, the detector will activate a loud 85-decibel alarm and the red LED will flash rapidly. If the alarm sounds, immediately move to fresh air and call emergency services.
6. Maintenance
6.1 Regular Testing
It is crucial to test your carbon monoxide detector regularly to ensure it is functioning correctly. Perform a test at least once a month.
To test the detector:
- Press and hold the 'TEST/RESET' button on the front of the unit.
- The unit will sound beeps and the red LED will flash, indicating a successful test.
- Release the button to return to normal operation.
For a more comprehensive test, you can use a controlled source of CO:
- Create test smoke by carefully burning a rolled-up newspaper (blow out the flames to let it smolder) or lighting a cigarette in an ashtray.
- Hold the smoke source about 2 inches below your detector.
- Watch the display - you'll see the numbers rise as it detects CO, and the screen will flash "CO" when gas is present.
- You'll hear the 85dB alarm sound within 1-2 minutes if working correctly.
- Clear the smoke and press the reset button when finished.
Important Testing Note: For accurate results, always use the newspaper or cigarette method described above. Avoid testing with car exhaust, gas stoves or grills, or other open flame sources, as these methods often don't produce enough concentrated CO to properly test your detector. The smoldering paper or cigarette gives the most reliable results while keeping you safe.
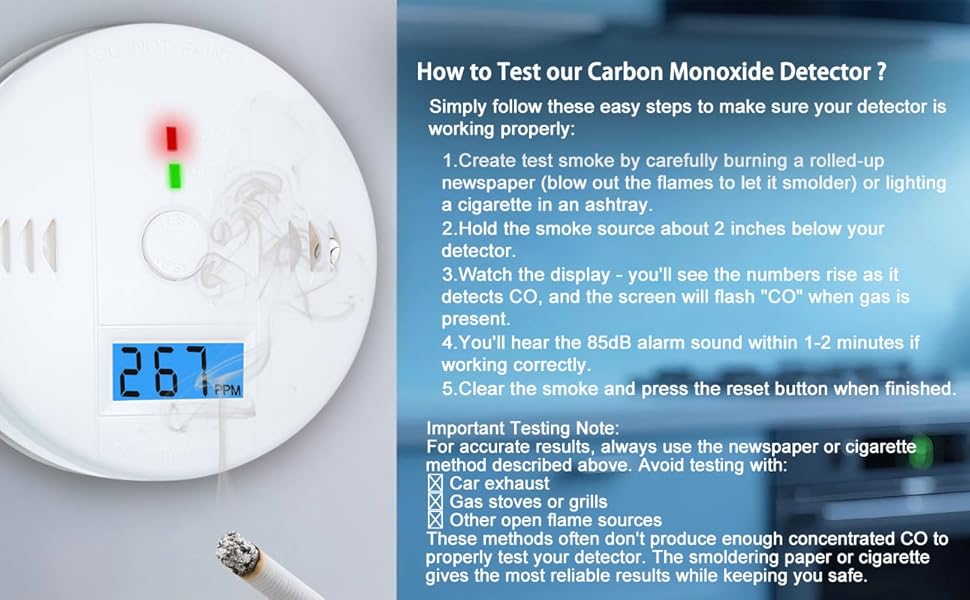
Image: Step-by-step guide on how to test the CO detector using a controlled smoke source, showing the detector's response.
6.2 Battery Replacement
When the LCD displays 'Lb', it indicates that the batteries are low and need to be replaced. Replace all three AA batteries simultaneously with new ones to ensure continuous protection.
6.3 Cleaning
Clean your detector regularly to prevent dust and debris from interfering with its operation. Use a soft, damp cloth to wipe the exterior. Do not use cleaning solvents or spray directly onto the unit.
7. Troubleshooting
| Problem | Possible Cause | Solution |
|---|---|---|
| Alarm sounds frequently without apparent CO source. | False alarm due to strong fumes (e.g., paint, cleaning products) or high humidity. | Ventilate the area. If alarm persists, evacuate and call emergency services. Relocate detector if false alarms are common due to fumes. |
| LCD displays 'Err'. | Unit malfunction. | Press the 'TEST/RESET' button. If 'Err' persists, the unit may need replacement. |
| LCD displays 'Lb'. | Low battery. | Replace all three AA batteries immediately. |
| No display or unit does not power on. | Incorrect battery installation or dead batteries. | Check battery polarity. Replace with new batteries. |
8. Specifications
| Attribute | Detail |
|---|---|
| Brand | Pumwry |
| Model | WJ-CO999 |
| Power Source | 3 x 1.5V AA Batteries (not included) |
| Sensor Type | Electrochemical |
| Alarm Volume | 85 dB at 3 meters |
| Product Dimensions | 4"D x 4"W x 1.5"H (approx. 100mm x 100mm x 35mm) |
| Item Weight | 4.48 ounces (approx. 127g) |
| Material | ABS |
| Certifications | UL 2034 Standards Compliant |

Image: Product dimensions for easy reference.
9. Warranty and Support
Your Pumwry Carbon Monoxide Detector includes a 60-day return policy, a 12-month warranty, and lifetime technical support. For any questions, troubleshooting assistance, or warranty claims, please contact our customer support team.
Customer Support: Please refer to the contact information provided on your product packaging or the retailer's website for the most up-to-date support details.
Ask a question about this manual
Ask about setup, troubleshooting, compatibility, parts, safety, or missing instructions. Manuals+ will review the question and use this page’s manual context to help answer it.