PE010-G03-U
Powr-Flite Photon 3.5 Gallon Portable Spotter User Manual
Model: PE010-G03-U
1. Product Overview
The Powr-Flite Photon is a compact and powerful 3.5-gallon portable spotter designed for efficient spot cleaning of carpets, rugs, and upholstery. Its lightweight design, telescopic handle, and large wheels ensure easy portability, making it suitable for various cleaning tasks.
Key Features:
- Lightweight and portable 3.5-gallon capacity.
- Commercial-grade power for effective spot and stain removal.
- Includes a 4-inch clear-sight upholstery tool.
- Features a 2.5-10 ft. expandable hose.
- Constructed with heavy-duty poly housing for durability.
- Equipped with a telescopic handle and large wheels for easy transport.
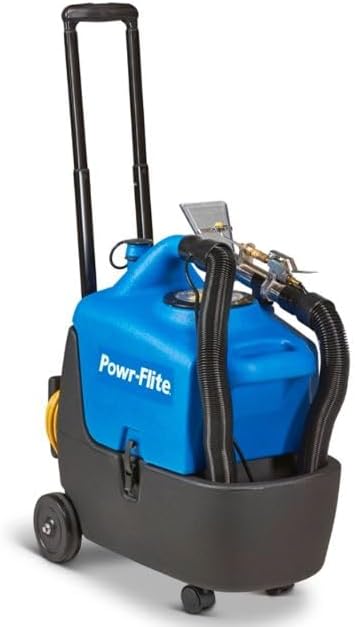
Figure 1.1: Front view of the Powr-Flite Photon Portable Spotter with its handle extended, showcasing its compact design and integrated hose and tool storage.
2. Components and Parts
Familiarize yourself with the main components of your Powr-Flite Photon Spotter:
- Main Unit: Houses the motor, pump, and recovery tank.
- Solution Tank: Removable blue tank for clean water and cleaning solution.
- Telescopic Handle: Extendable handle for easy transport.
- Wheels: Large rear wheels and smaller front casters for mobility.
- Vacuum Hose: Flexible hose for suction.
- Solution Hose: Clear hose that delivers cleaning solution to the tool.
- 4-inch Clear-Sight Upholstery Tool: Hand tool for applying solution and extracting dirt.
- Power Cord: Electrical cord for power supply.
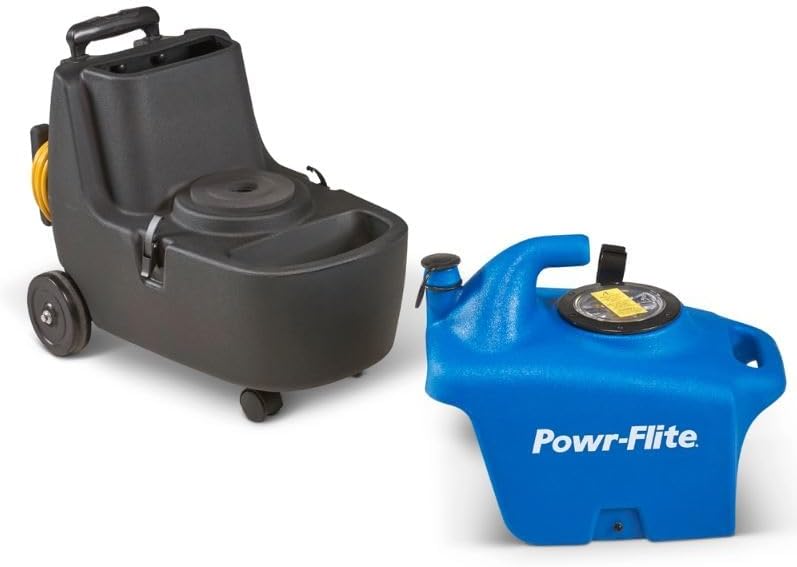
Figure 2.1: The Powr-Flite Photon main unit and its removable blue solution tank, illustrating how the tank detaches for filling and emptying.
3. Setup
3.1 Unpacking
- Carefully remove the unit and all accessories from the packaging.
- Inspect the unit for any signs of damage during shipping. If damage is found, contact your supplier immediately.
- Retain the packaging for future storage or transport.
3.2 Initial Assembly
- Ensure the solution tank is securely seated in the main unit.
- Connect the vacuum hose to the vacuum port on the main unit.
- Connect the solution hose to the quick-connect fitting on the main unit.
- Attach the 4-inch clear-sight upholstery tool to the end of the vacuum and solution hoses. Ensure connections are secure to prevent leaks.
- Extend the telescopic handle to a comfortable height for transport.
4. Operating Instructions
4.1 Filling the Solution Tank
- Remove the blue solution tank from the main unit.
- Unscrew the fill cap on the solution tank.
- Fill the tank with warm water and the recommended cleaning solution according to the solution manufacturer's instructions. Do not overfill.
- Securely replace the fill cap.
- Place the filled solution tank back into the main unit, ensuring it is properly seated.
4.2 Spot Cleaning Procedure
- Plug the power cord into a grounded electrical outlet.
- Turn on the vacuum switch (usually marked 'VAC').
- Turn on the pump switch (usually marked 'PUMP').
- Position the clear-sight upholstery tool directly over the spot to be cleaned.
- Press the trigger on the tool to spray cleaning solution onto the spot while simultaneously pulling the tool slowly towards you to extract the solution and dirt.
- Overlap strokes slightly to ensure thorough cleaning.
- Continue spraying and extracting until the spot is removed and the extracted water appears clean.
- For heavily soiled areas, allow the solution to dwell for a few minutes before extracting, but do not let it dry.
- Once cleaning is complete, turn off the pump switch, then the vacuum switch.
4.3 Emptying the Recovery Tank
- The recovery tank is integrated into the main unit. When the vacuum suction decreases or the tank is full, it needs to be emptied.
- Remove the solution tank to access the recovery tank.
- Carefully lift the main unit (or tilt it if too heavy) and pour the dirty water from the recovery tank into a drain or disposal area.
- Rinse the recovery tank with clean water after emptying.
- Replace the solution tank.
5. Maintenance
5.1 After Each Use
- Empty and rinse both the solution and recovery tanks thoroughly with clean water.
- Flush the vacuum and solution hoses by running clean water through them.
- Clean the clear-sight upholstery tool, removing any debris or residue.
- Wipe down the exterior of the machine with a damp cloth.
5.2 Regular Maintenance
- Periodically check hoses and connections for wear, cracks, or leaks. Replace if necessary.
- Inspect the power cord for any damage. Do not use if the cord is frayed or damaged.
- Ensure the wheels are clean and roll freely.
5.3 Storage
- Store the unit in a clean, dry place, away from extreme temperatures.
- Ensure all tanks are empty and clean before storage.
- Wrap the power cord neatly around the designated cord wraps.
6. Troubleshooting
Refer to the table below for common issues and their solutions:
| Problem | Possible Cause | Solution |
|---|---|---|
| No power to unit | Unit unplugged; Circuit breaker tripped; Faulty power cord | Check power connection; Reset circuit breaker; Inspect/replace power cord |
| No spray from tool | Pump switch off; Solution tank empty; Clogged spray tip; Kinked solution hose | Turn on pump switch; Refill solution tank; Clean spray tip; Straighten hose |
| Low or no vacuum suction | Vacuum switch off; Recovery tank full; Clogged vacuum hose/tool; Loose hose connection | Turn on vacuum switch; Empty recovery tank; Clear obstruction; Secure hose connections |
| Leaking from unit/hoses | Loose hose connections; Damaged O-rings/seals; Cracked tank/hose | Tighten connections; Inspect/replace O-rings/seals; Contact service for repair |
7. Specifications
Technical specifications for the Powr-Flite Photon Portable Spotter:
| Attribute | Value |
|---|---|
| Brand | Generic |
| Model Name | PE010-G03-U |
| Capacity | 3.5 Gallons |
| Power Source | Corded Electric |
| Color | Blue |
| Style | Modern |
| Item Model Number | PE010-G03-U |
| Date First Available | January 11, 2024 |
8. Warranty Information
This product is covered by a manufacturer's warranty. Specific warranty terms and conditions may vary. Please refer to the warranty card included with your purchase or visit the manufacturer's official website for detailed information regarding coverage, duration, and claims procedures. Keep your proof of purchase for warranty validation.
9. Customer Support
For technical assistance, replacement parts, or any questions not covered in this manual, please contact the manufacturer's customer support. You can typically find contact information on the product packaging, the manufacturer's website, or through your point of purchase.
When contacting support, please have your product model number (PE010-G03-U) and serial number (if applicable) ready to expedite the process.
Ask a question about this manual
Ask about setup, troubleshooting, compatibility, parts, safety, or missing instructions. Manuals+ will review the question and use this page’s manual context to help answer it.