1. Introduction
Thank you for purchasing the CAMECHO CM-686 Double DIN Car Stereo. This unit features a 6.86-inch touchscreen, wireless CarPlay, Android Auto, Bluetooth, FM radio, Mirror Link, and supports various multimedia inputs. This manual provides detailed instructions for installation, operation, and troubleshooting to ensure optimal performance and user experience.
2. Safety Information
Please read all instructions carefully before installation and operation. Failure to follow these instructions may result in injury or damage to the unit or vehicle.
- Always operate the unit safely and in accordance with traffic laws.
- Do not disassemble or modify the unit. This may cause malfunction or electric shock.
- Ensure proper wiring connections to prevent short circuits or damage.
- Keep the volume at a level that allows you to hear outside traffic sounds.
- Avoid exposing the unit to extreme temperatures, direct sunlight for prolonged periods, or excessive moisture.
3. Package Contents
Verify that all items are present in the package:
- CAMECHO Double DIN Car Stereo Unit
- Power Cable
- Horn Cable
- Antenna
- External Microphone
- Steering Wheel Remote Control
- Mounting Brackets (4 screws included)
- User Manual

Image: Main unit and accessories. This image displays the CAMECHO car stereo unit, a remote control, an external microphone, and a smartphone illustrating the CarPlay/Android Auto interface.
4. Product Overview
The CAMECHO CM-686 features a responsive 6.86-inch HD touchscreen and intuitive physical buttons for essential functions.
4.1. Display Features
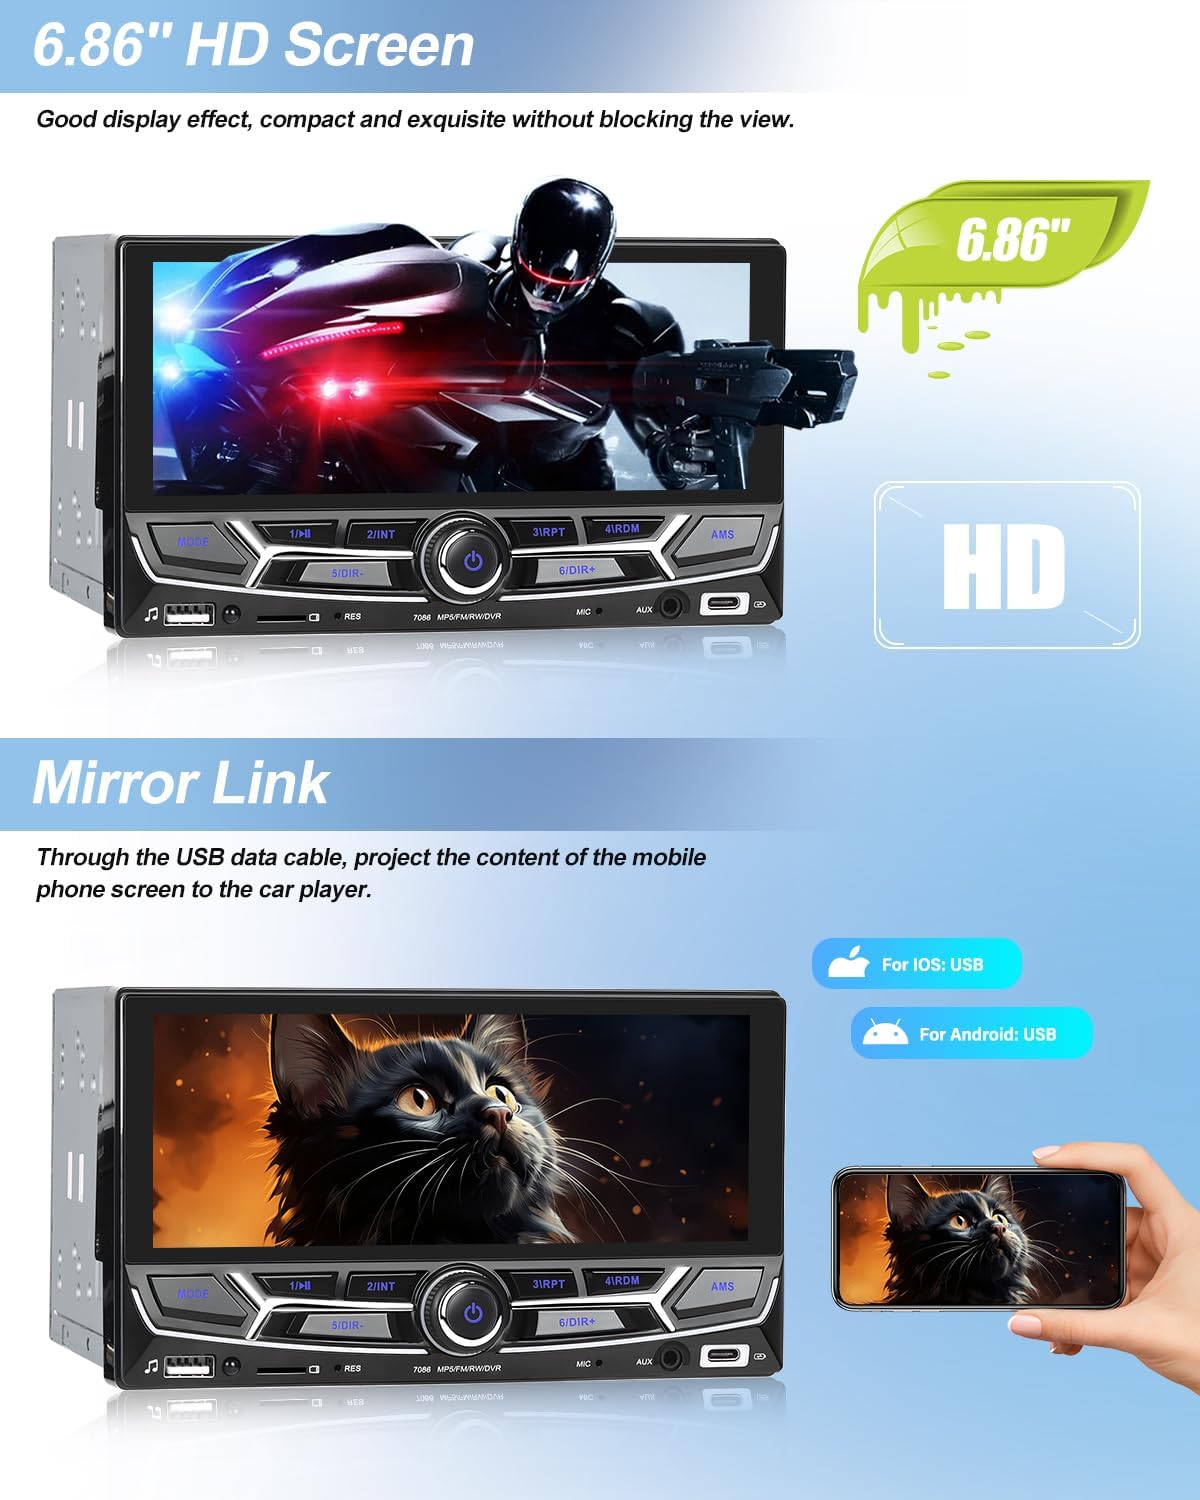
Image: 6.86-inch HD Screen. This image highlights the high-definition display of the car stereo, showing a vibrant image on its 6.86-inch screen.
4.2. Front Panel Layout and Dimensions
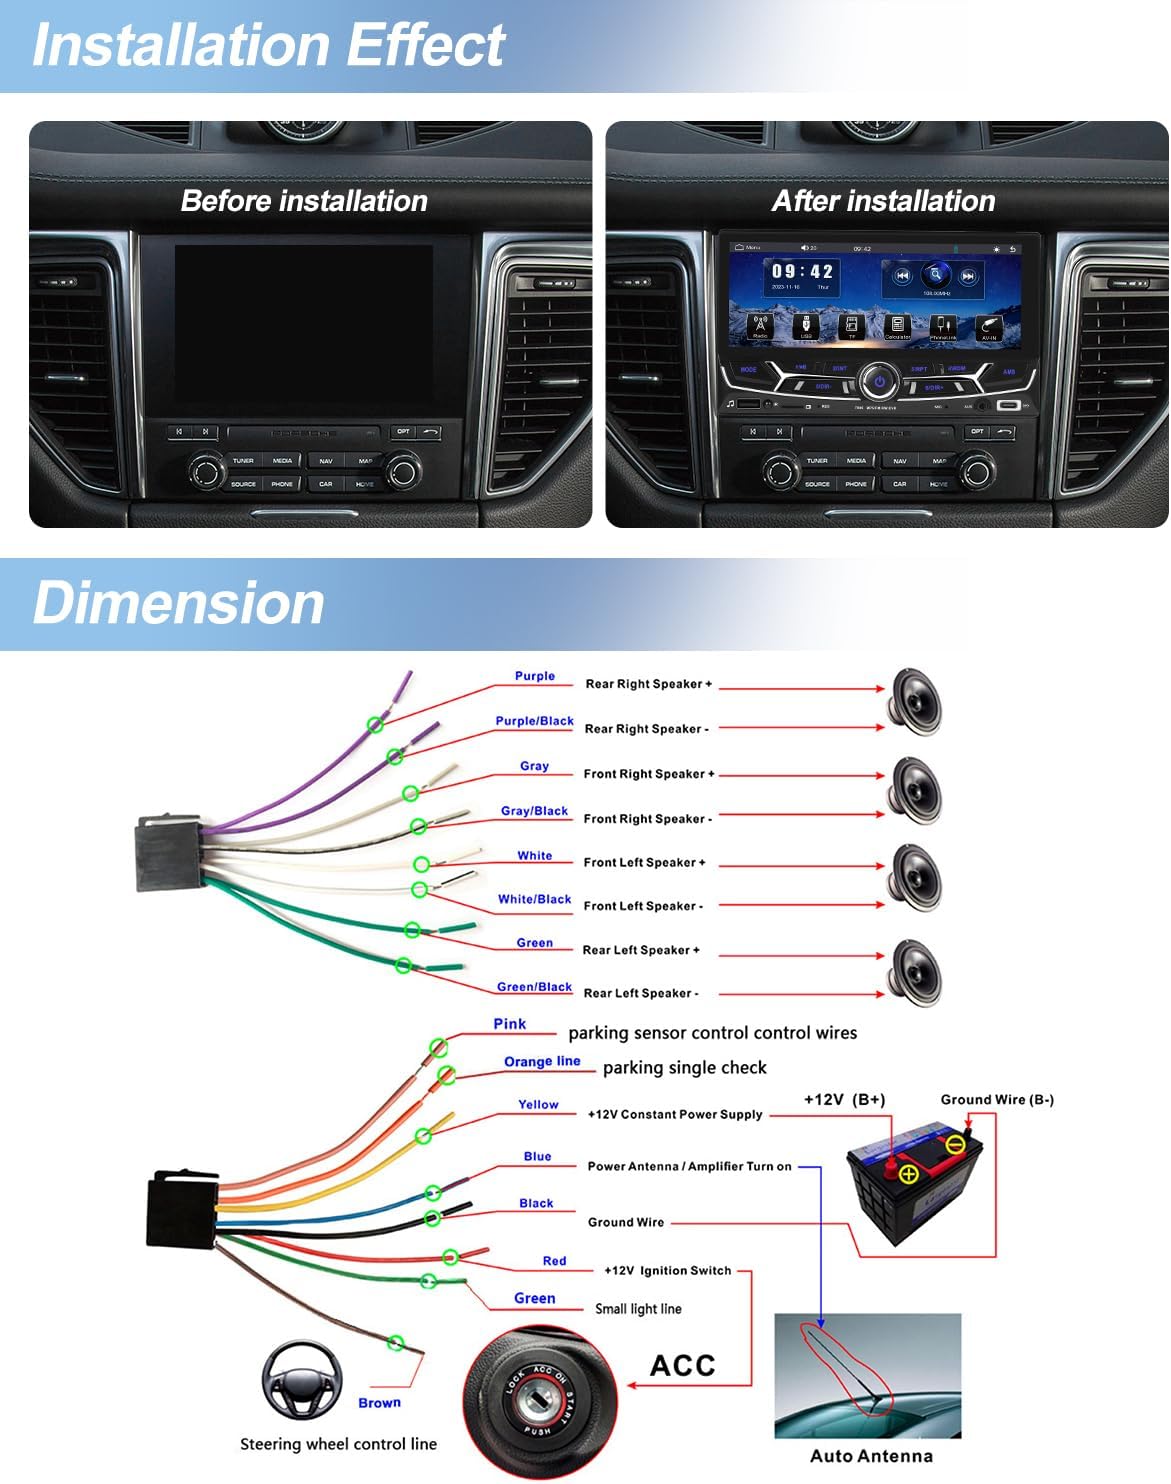
Image: Front Panel and Dimensions. This diagram illustrates the front panel of the car stereo, labeling ports such as USB, IR, Reset, TF Port, MIC, AUX, and Type-C Port, along with button functions. It also indicates the unit's dimensions: 180mm (7.09 inches) width and 104mm (4.09 inches) height.
The front panel includes:
- MODE Button: Switches between input sources.
- Power Button/Rotary Knob: Press to power on/off, rotate for volume control.
- USB Port: For multimedia playback and charging.
- TF Card Slot: For multimedia playback.
- AUX Input: 3.5mm audio input.
- Type-C Port: For charging and data transfer.
- MIC Input: For external microphone connection.
- Reset Button: Small pinhole for factory reset.
- IR Receiver: For remote control.
5. Installation
Proper installation is crucial for the unit's performance and vehicle safety. If you are unsure about any steps, consult a professional installer.
5.1. Wiring Diagram
Image: Wiring Diagram. This diagram illustrates the various wiring connections for the car stereo, including speaker outputs (front/rear left/right), power (ACC, B+, Ground), parking sensor control, reverse input, and steering wheel control.
Key Wiring Connections:
- Yellow (B+): Connect to constant +12V power supply.
- Red (ACC): Connect to +12V ignition switched power supply.
- Black (Ground): Connect to vehicle chassis ground.
- Orange (Parking Line): Connect to parking brake signal (if applicable for video playback safety).
- Brown (Steering Wheel Control): Connect to vehicle's steering wheel control wire.
- Reverse Input (CVBS): Connect to the reverse camera video signal.
- Speaker Wires: Connect to corresponding vehicle speakers (e.g., White/White-Black for Front Left, Gray/Gray-Black for Front Right, Green/Green-Black for Rear Left, Purple/Purple-Black for Rear Right).
5.2. Mounting the Unit
Use the provided mounting brackets and screws to secure the unit into your vehicle's double DIN slot. Ensure the unit is firmly in place to prevent movement during driving.
Image: Installation Effect. This image shows a 'Before' and 'After' comparison of the car stereo installation, demonstrating how the unit integrates into the vehicle's dashboard once installed.
6. Operating Instructions
6.1. Basic Operations
- Power On/Off: Press the power button (rotary knob) to turn the unit on or off.
- Volume Control: Rotate the knob clockwise to increase volume, counter-clockwise to decrease.
- Source Selection: Press the 'MODE' button to cycle through available input sources (Radio, USB, TF, AUX, Bluetooth, CarPlay/Android Auto).
6.2. Wireless CarPlay
Connect your iPhone wirelessly to access CarPlay features directly on the car stereo's display.
- Ensure Bluetooth and Wi-Fi are enabled on your iPhone.
- On the car stereo, select the CarPlay icon.
- Follow the on-screen prompts to pair your iPhone.
- Once connected, you can use navigation, make calls, send messages, and listen to music via Siri voice control or the touchscreen.

Image: Wireless CarPlay. This image shows the car stereo display running Apple CarPlay, featuring app icons for phone, music, maps, messages, and other compatible applications.
6.3. Wireless Android Auto
Connect your Android phone wirelessly to use Android Auto features on the car stereo.
- Ensure Bluetooth and Wi-Fi are enabled on your Android phone.
- On the car stereo, select the Android Auto icon.
- Follow the on-screen prompts to pair your Android phone.
- Access navigation, communication, and media apps through the car stereo.
- Note: Samsung and Huawei phones may not be supported for wireless Android Auto.
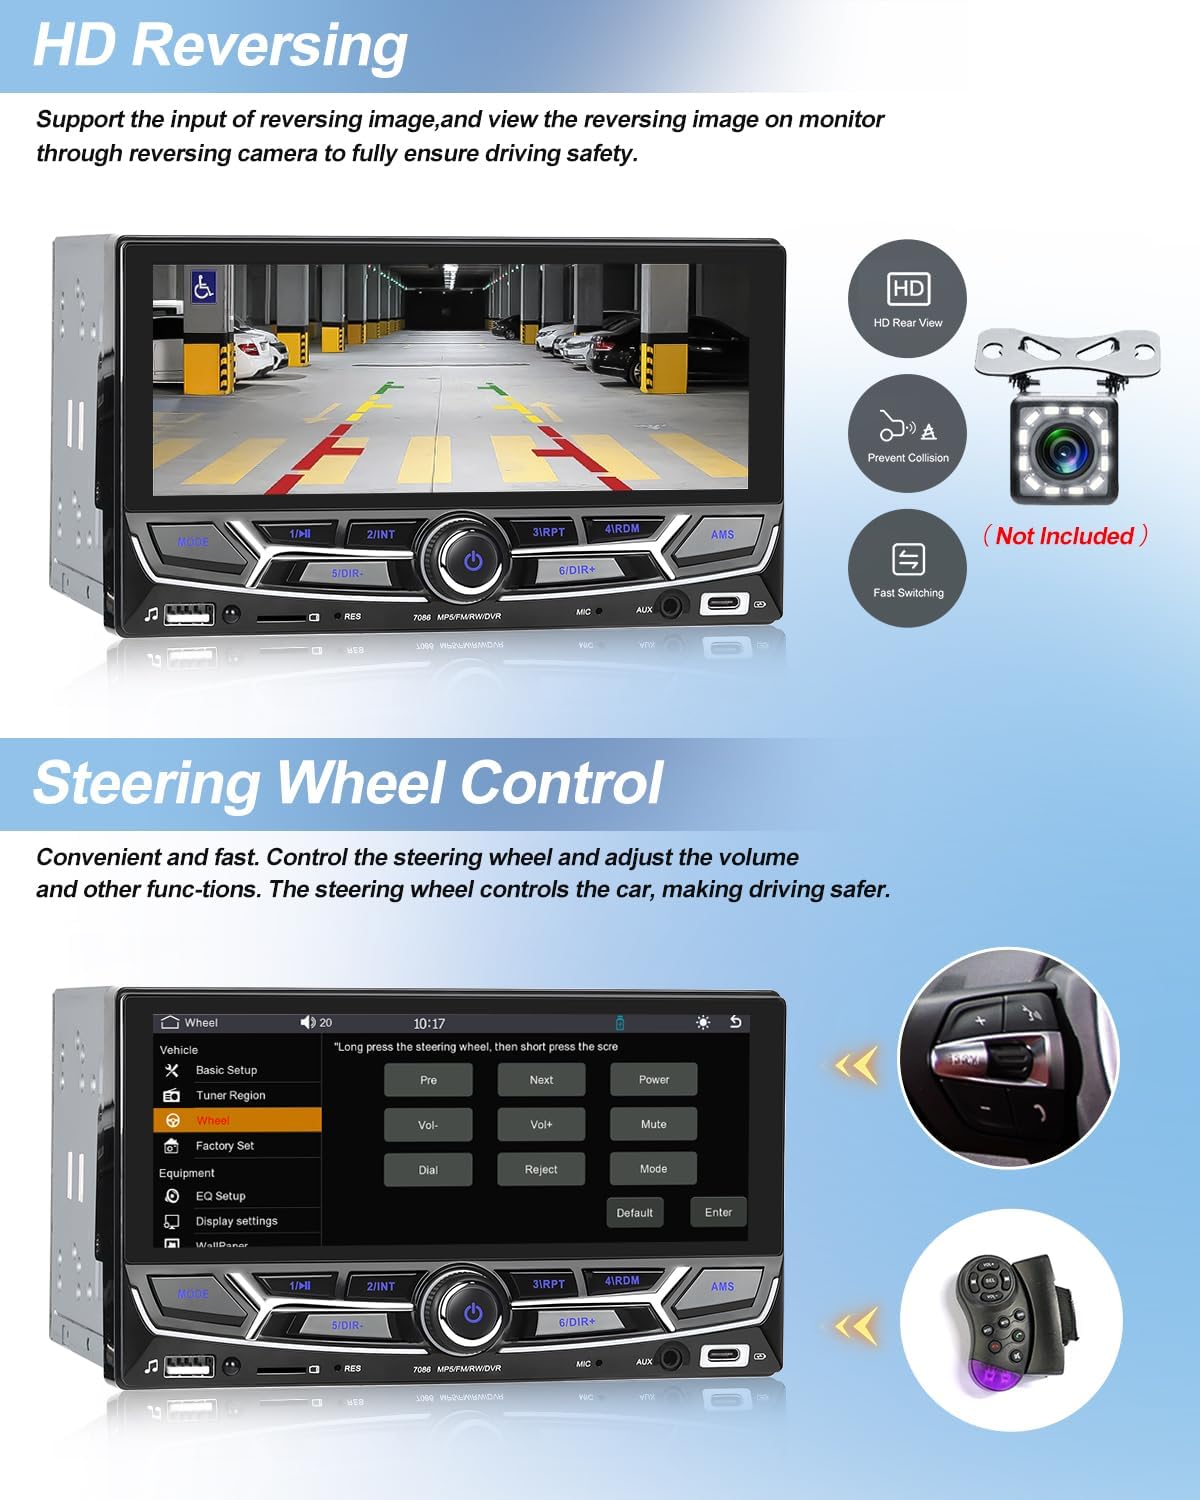
Image: Wireless Android Auto. This image displays the car stereo interface with Android Auto active, showing a layout of common applications for navigation, media, and communication.
6.4. Bluetooth Hands-free Calling
Pair your smartphone via Bluetooth for hands-free calling and audio streaming.
- Enable Bluetooth on your phone and the car stereo.
- Search for the car stereo's Bluetooth name on your phone and pair.
- Once connected, you can make/receive calls and play music from your phone through the car speakers.
- The unit supports phonebook download for easy contact access.

Image: Bluetooth Hands-free Call. This image shows the car stereo's Bluetooth interface, displaying a dial pad for making calls and a screen for Bluetooth music playback, alongside a smartphone showing an incoming call.
6.5. Mirror Link
Project your smartphone screen onto the car stereo display via a USB data cable.
- Connect your smartphone to the car stereo's USB port using a data cable.
- Select the Mirror Link function on the car stereo.
- Follow any prompts on your phone to allow screen mirroring.
- This feature supports both Android and iPhone devices.

Image: Mirror Link. This image demonstrates the Mirror Link function, where the car stereo's screen displays the content of a connected smartphone, in this case, an image of a cat. Icons indicate USB connectivity for both iOS and Android devices.
6.6. FM Radio
Tune into your favorite FM radio stations.
- Select the FM Radio source.
- Use the search functions (automatic, semi-automatic, or precise tuning) to find stations.
- Save preferred stations to presets for quick access.
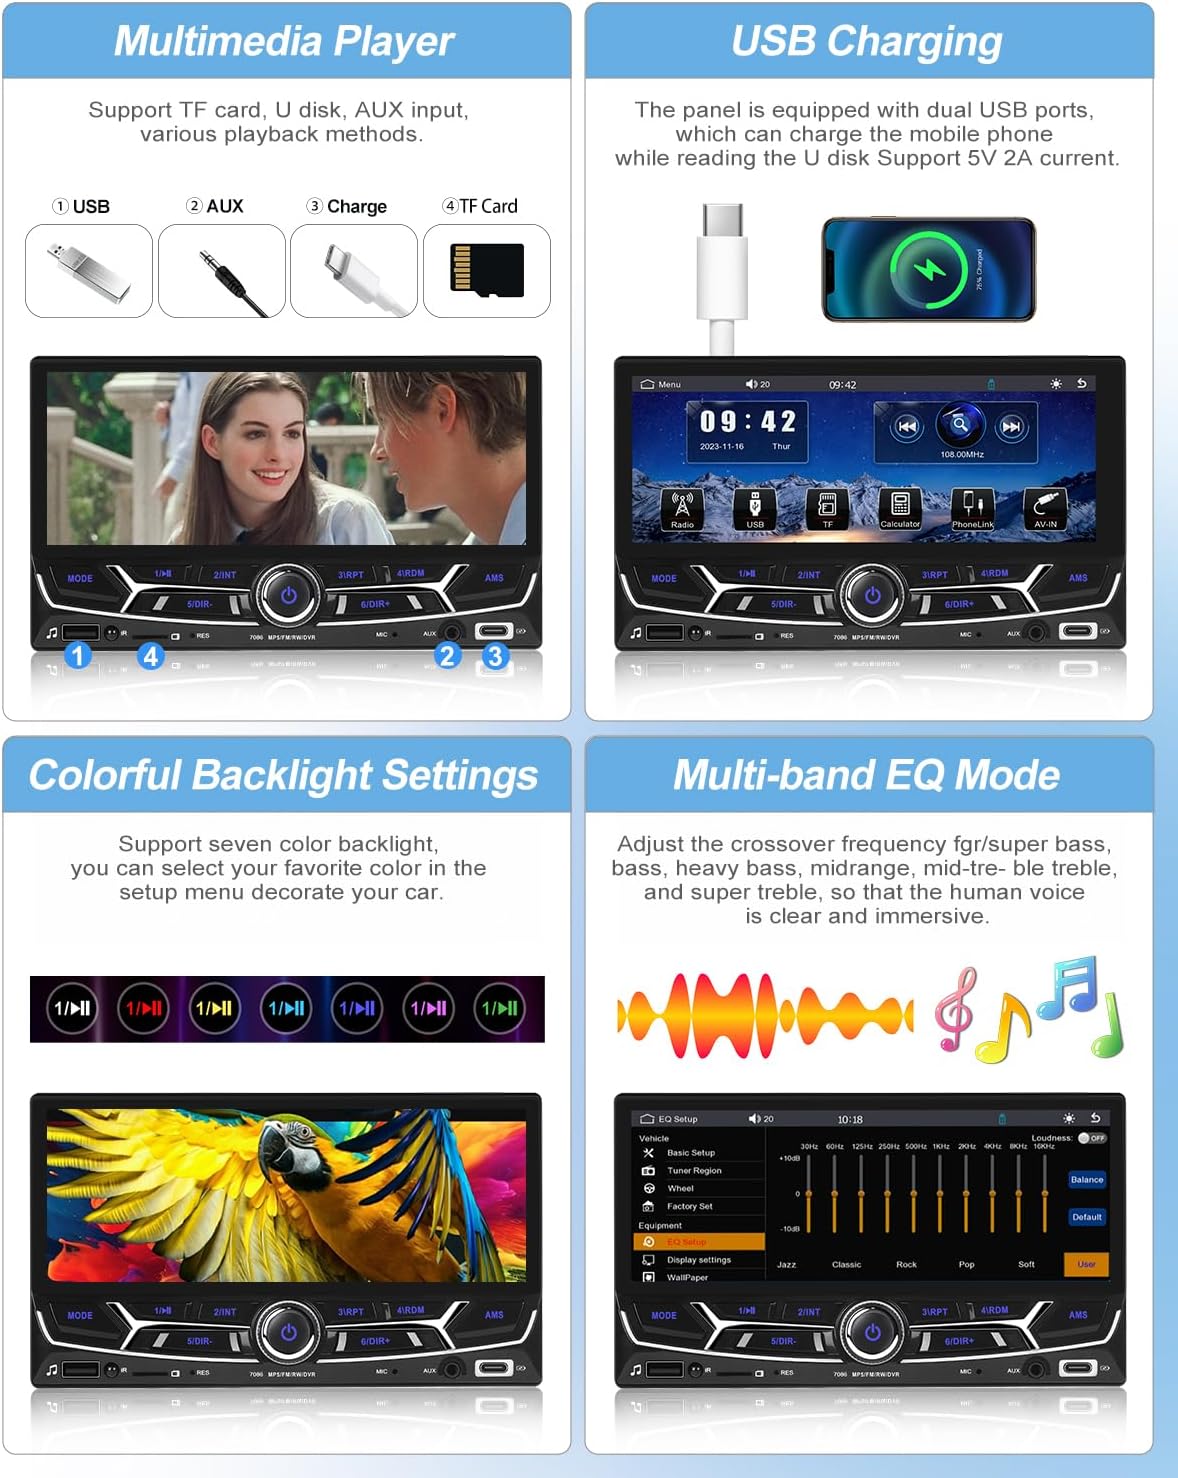
Image: FM Radio. This image shows the car stereo's FM radio interface, displaying the current frequency (108.00 MHz) and controls for tuning and station presets.
6.7. Multimedia Player (USB, TF Card, AUX)
Play audio, video, and image files from various sources.
- Insert a USB drive or TF card into the respective port.
- Connect an external audio device to the AUX-IN port.
- Select the corresponding source (USB, TF, AUX) from the main menu.
- Browse and select your desired media files for playback.
Image: Multimedia Player. This section of the image illustrates the various multimedia input options: USB, AUX, and TF Card. It also shows the car stereo playing a video, demonstrating its multimedia playback capabilities.
6.8. HD Reversing Camera Support
Connect an optional CVBS reversing camera for enhanced safety when backing up.
- Connect the reversing camera to the CVBS input on the unit.
- Ensure proper wiring for the reverse trigger signal.
- When the vehicle is shifted into reverse, the display will automatically switch to the camera view.
Image: HD Reversing. This image shows the car stereo display presenting a clear, high-definition view from a reversing camera, complete with parking guidelines, to assist with safe maneuvering.
6.9. Steering Wheel Control (SWC)
Program your vehicle's steering wheel buttons to control the car stereo for convenience and safety.
- Access the Steering Wheel Control learning function in the unit's settings menu.
- Follow the on-screen instructions to assign functions (e.g., volume up/down, track skip, mode) to your steering wheel buttons.
Image: Steering Wheel Control. This image displays the car stereo's interface for learning steering wheel controls, alongside a visual of a steering wheel with integrated control buttons, and the included remote control.
6.10. Equalizer (EQ) Settings
Adjust audio output to your preference with the multi-band equalizer.
- Navigate to the EQ settings in the audio menu.
- Choose from preset EQ modes (e.g., Jazz, Classic, Rock, Pop) or customize individual frequency bands.
Image: Multi-band EQ Mode. This section of the image shows the car stereo's multi-band equalizer interface, allowing users to adjust frequency levels for bass, midrange, and treble, or select from various preset sound modes like Jazz, Classic, Rock, and Pop.
6.11. Colorful Backlight Settings
Customize the button backlight color to match your vehicle's interior or personal preference.
- Access the backlight settings in the system menu.
- Select from seven available colors or set it to automatically cycle through colors.
Image: Colorful Backlight Settings. This section of the image illustrates the car stereo's interface for customizing the button backlight colors, offering a selection of seven colors or an automatic color-changing mode.
6.12. USB Charging
The unit provides USB ports for charging mobile devices.
- Connect your device to the USB or Type-C port using a compatible cable.
- The unit supports 5V 2A output for charging.
Image: USB Charging. This section of the image shows a smartphone connected to the car stereo's USB port, indicating that the unit can charge mobile devices.
7. Troubleshooting
If you encounter issues, refer to the following common problems and solutions:
| Problem | Possible Cause | Solution |
|---|---|---|
| Unit does not power on. | Incorrect wiring (B+, ACC, Ground). Blown fuse. | Check power connections. Verify fuse integrity. |
| No sound. | Speaker wires disconnected. Volume too low. Mute function active. | Check speaker connections. Increase volume. Disable mute. |
| Bluetooth connection issues. | Bluetooth not enabled. Pairing failed. | Ensure Bluetooth is on for both devices. Re-attempt pairing. Clear previous pairings. |
| CarPlay/Android Auto not connecting wirelessly. | Wi-Fi/Bluetooth off. Incompatible phone model (e.g., some Samsung/Huawei for Android Auto). | Ensure Wi-Fi and Bluetooth are active. Check phone compatibility. Try a wired connection if wireless fails. |
| Touchscreen unresponsive. | Temporary software glitch. | Press the Reset button with a thin object. |
8. Specifications
| Feature | Specification |
|---|---|
| Model Number | 3a210879-aa34-4433-934b-e947e6122da7 |
| Screen Size | 6.86 inches |
| Screen Resolution | 480 x 1280 |
| CPU Chip | F133 |
| Output Power | 45W x 4 |
| Bluetooth Version | 5.0 |
| Radio Frequency | 87.5-108 MHz |
| Operating Voltage | DC 12V |
| Operating Temperature | -10 ~ 60 ℃ |
| Supported Audio Formats | MP3/WMA/WAV/APE/FLAC |
| Supported Video Formats | RM/RMVB/AVI/MP4/MKV/3GP |
| Supported Image Formats | JPG/BMP/PNG |
| Connectivity | USB, Type-C, AUX, Bluetooth |
| Special Features | Wireless CarPlay, Android Auto, Built-in Bluetooth, FM Tuner, Mirror Link, SWC |
9. Maintenance
To ensure the longevity and optimal performance of your car stereo, follow these maintenance guidelines:
- Cleaning the Screen: Use a soft, lint-free cloth to gently wipe the touchscreen. For stubborn smudges, slightly dampen the cloth with water or a screen-safe cleaner. Avoid harsh chemicals or abrasive materials.
- Cleaning the Unit: Wipe the exterior of the unit with a dry, soft cloth. Do not use liquid cleaners directly on the unit.
- Avoid Extreme Conditions: Protect the unit from direct sunlight for extended periods, extreme heat, or cold, as these can affect performance and lifespan.
- Software Updates: Check the manufacturer's website periodically for any available firmware updates to improve functionality and fix bugs.
10. Warranty and Support
This product comes with a standard manufacturer's warranty. Please refer to the warranty card included in your package for specific terms and conditions. For technical support, troubleshooting assistance, or warranty claims, please contact CAMECHO customer service through your purchase platform or the official CAMECHO website.
Please retain your proof of purchase for warranty purposes.