
LANRU M469D
LANRU M469D Network Cable Tester User Manual
Model: M469D | Brand: LANRU
1. Introduction
This manual provides detailed instructions for the safe and effective use of the LANRU M469D Network Cable Tester. This multi-function instrument is designed for checking the on/off state of lines, testing shielded network cables, and performing long-distance cable tests. It supports RJ11 and RJ45 interfaces, making it suitable for various network communication maintenance and engineering tasks.
2. Product Features
- Network cable pairing instrument suitable for checking on/off state of the line, shielded network cable testing, and long-distance testing.
- Removable split structure, allowing easy separation or combination of the two parts for various testing needs and convenient operation.
- Offers a free choice of two testing speeds: a default constant speed test upon boot-up, and a faster 'S' gear that can be adjusted manually.
- Crystal head on-off test capability: can test 2-core, 4-core, and 6-chip telephone lines. Corresponding indicator lights illuminate for each tested core.
- Applicable to RJ11, RJ45, telephone lines, routers, optical modems, and more, making it widely used in network communication maintenance and wiring network engineering monitoring line maintenance.
3. Package Contents
Please verify that all items are present in your package:
- 1 x LANRU M469D Network Cable Tester (Master and Remote units)
- 1 x User Manual (English)
4. Setup
4.1 Battery Installation
The LANRU M469D Network Cable Tester requires one 6F22 9V battery (not included) for operation. To install the battery:
- Locate the battery compartment cover on the back of the Master unit.
- Slide the cover open.
- Connect a 9V battery to the battery clip, ensuring correct polarity.
- Place the battery into the compartment and close the cover securely.
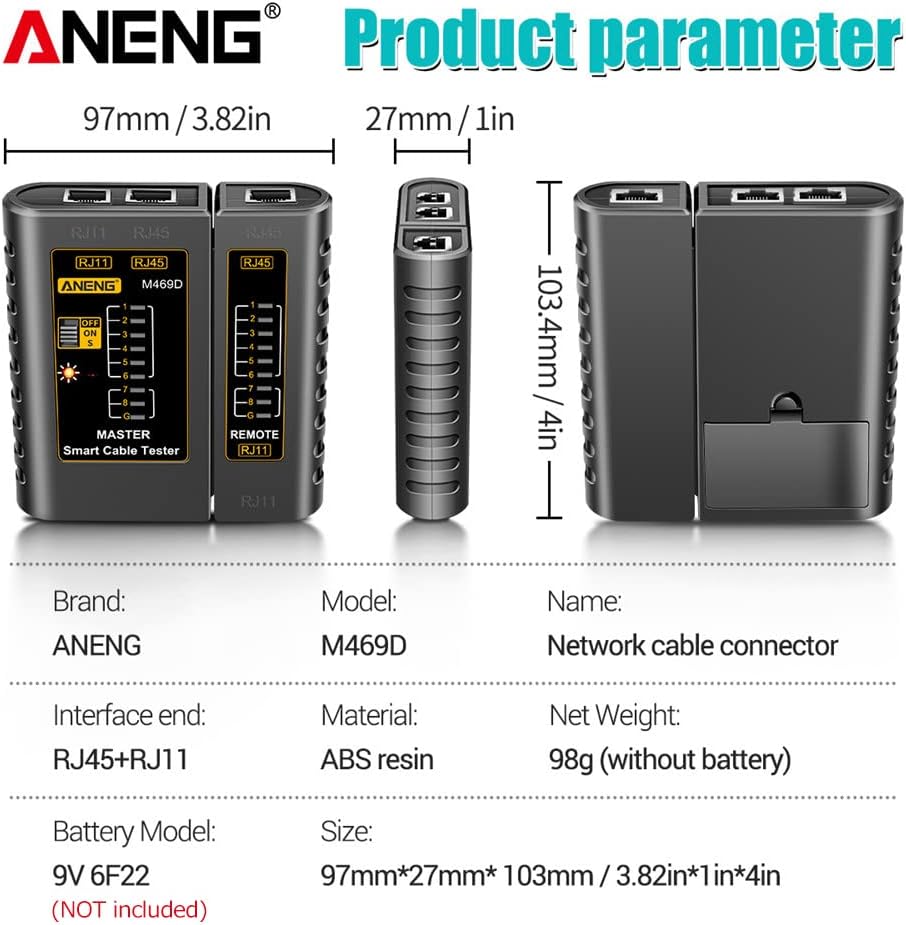
Figure 4.1: Rear view of the Master unit, illustrating the battery compartment.
4.2 Assembling the Tester
The LANRU M469D features a removable split structure. For standard testing, the Master and Remote units can be combined. For long-distance testing, they can be separated.
- To combine: Slide the Remote unit onto the Master unit until they click into place.
- To separate: Gently slide the Remote unit away from the Master unit.

Figure 4.2: The removable split structure of the tester, allowing for separation for long-distance testing.
5. Operating Instructions
5.1 Powering On/Off and Speed Selection
The tester has a three-position slide switch: OFF (power off), ON (standard test speed), and S (fast test speed).
- Slide the switch to ON for a constant, standard speed test.
- Slide the switch to S for a faster test sequence.
- Slide the switch to OFF to power down the device when not in use.
5.2 Cable Testing Procedures
The LANRU M469D supports testing of RJ11 (telephone) and RJ45 (network) cables.

Figure 5.1: Front view of the tester, highlighting the RJ11 and RJ45 ports and LED indicators for wire mapping.
5.2.1 Standard Network Cable Test (RJ45)
- Ensure the Master and Remote units are either combined or separated as needed for your cable length.
- Insert one end of the RJ45 cable into the RJ45 port on the Master unit.
- Insert the other end of the RJ45 cable into the RJ45 port on the Remote unit.
- Slide the power switch to ON or S.
- Observe the LED indicators (1-8 and G) on both the Master and Remote units. The LEDs will light up sequentially, indicating the continuity of each wire pair.

Figure 5.2: The network cable tester in use, connected to an RJ45 cable for testing.
5.2.2 Telephone Line Test (RJ11)
The tester can test 2-core, 4-core, and 6-chip telephone lines.
- Insert one end of the RJ11 cable into the RJ11 port on the Master unit.
- Insert the other end of the RJ11 cable into the RJ11 port on the Remote unit.
- Slide the power switch to ON or S.
- Observe the LED indicators. For RJ11, only the LEDs corresponding to the connected cores (e.g., 2, 3, 4, 5) will light up sequentially.

Figure 5.3: The tester performing a phone line test with an RJ11 cable.
5.2.3 Interpreting LED Indicators
- Sequential Lighting (1-8): Indicates proper continuity for each wire. If an LED on the Master unit lights up but its corresponding LED on the Remote unit does not, there is an open circuit (break) in that wire.
- No LED Lighting: Indicates a complete open circuit or no connection.
- Crossed Wires: LEDs will light up out of sequence (e.g., Master 1 lights, Remote 2 lights).
- Short Circuit: Multiple LEDs may light up simultaneously or not at all, indicating a short between wires.
- 'G' LED (Ground/Shield): This LED indicates the continuity of the shield wire in shielded network cables. If it lights up, the shield is connected. If it does not, the shield is open or not present.
6. Maintenance
- Cleaning: Use a soft, dry cloth to clean the exterior of the tester. Do not use abrasive cleaners or solvents.
- Battery Replacement: Replace the 9V battery when the LED indicators become dim or the tester does not power on. Always dispose of used batteries responsibly.
- Storage: Store the tester in a cool, dry place away from direct sunlight and extreme temperatures. If storing for extended periods, remove the battery to prevent leakage.
- Handling: Avoid dropping the tester or subjecting it to strong impacts, as this may damage internal components.
7. Troubleshooting
| Problem | Possible Cause | Solution |
|---|---|---|
| Tester does not power on. | Battery is dead or incorrectly installed. | Check battery polarity; replace with a new 9V battery. |
| LEDs are dim or flicker. | Low battery power. | Replace the 9V battery. |
| Incorrect or inconsistent LED readings. | Poor cable connection; damaged cable; incorrect cable type for test. | Ensure cables are fully inserted; try a different cable; verify cable type (RJ11/RJ45) matches port. |
| Remote unit LEDs do not light up. | Cable break; remote unit not connected properly; remote unit malfunction. | Check cable for damage; ensure remote unit is securely connected or separated correctly for long-distance test. |
8. Specifications
Figure 8.1: Product dimensions and key parameters.
| Parameter | Value |
|---|---|
| Model | M469D |
| Color | Black / Yellow (Optional) |
| Material | ABS Resin |
| Interface End | RJ11, RJ45 |
| Power Supply | 6F22 9V Battery (Not included) |
| Item Size | 97 x 27 x 103.4 mm (3.82 x 1.06 x 4.07 in) |
| Item Weight (without battery) | 98 g (3.46 oz) |
| Package Size | 104 x 100 x 30 mm (4.09 x 3.94 x 1.18 in) |
| Package Weight | 115 g (4.06 oz) |
| Manufacturer | LANRU |
| Country of Origin | China |
9. Warranty and Support
For warranty information, technical support, or service inquiries regarding your LANRU M469D Network Cable Tester, please refer to the contact details provided with your original purchase documentation. You may also visit the official LANRU website for the most up-to-date support resources and contact information.
Ask a question about this manual
Ask about setup, troubleshooting, compatibility, parts, safety, or missing instructions. Manuals+ will review the question and use this page’s manual context to help answer it.