1. Introduction
This user manual provides comprehensive instructions for the installation, configuration, and operation of the Geuxe Sboard Wifi Controller Single Door Access Control Panel. This device is designed to manage access to a single door, offering features such as WiFi connectivity, remote control, and support for Wiegand readers. Please read this manual thoroughly before installation and use to ensure proper functionality and safety.
2. Safety Information
- Ensure the power supply is disconnected before performing any wiring or maintenance.
- Only use a 12V DC power supply as specified. Incorrect voltage may damage the device.
- Do not expose the device to moisture, extreme temperatures, or direct sunlight.
- Installation should be performed by qualified personnel if you are unsure about electrical wiring.
- Keep the device away from strong electromagnetic fields.
3. Package Contents
Verify that all items are present in the package:
- Geuxe Sboard Wifi Controller Unit
- Remote Control
- Mounting Screws and Anchors (may vary)
- User Manual (this document)
4. Product Overview
The Geuxe Sboard Wifi Controller is a compact access control panel designed for single-door applications. It features multiple connection terminals for power, readers, lock mechanisms, and alarm systems, alongside an integrated WiFi module for remote management.

Figure 4.1: The Geuxe Sboard Wifi Controller unit shown alongside its accompanying remote control. The controller features various terminal blocks for power, reader connections, lock control, and alarm outputs. The remote control has a standard numeric keypad for operation.

Figure 4.2: Top-down view of the Geuxe Sboard Wifi Controller, highlighting the terminal connections and the integrated WiFi capability indicated by the wireless signal icon. The unit includes an IR receiver and an LED indicator.
4.1. Components and Ports
- POWER (DC+, GND): 12V DC power input.
- READER (DC+, GND, D0, D1, LED, BZ): Connections for an external Wiegand reader.
- LOCK (NC, COM, NO): Relay outputs for connecting to electric locks (Normally Closed, Common, Normally Open).
- ALARM (ALARM-, Doorbell): Alarm output and doorbell connection.
- REX & DPC (OPEN, GND, D_IN): Request to Exit (REX) button input and Door Position Contact (DPC) input.
- IR: Infrared receiver for the remote control.
- LED: Status indicator light.
5. Installation
The controller should be mounted in a secure, dry location, preferably indoors, away from direct weather exposure. Ensure adequate space for wiring connections.
- Choose a suitable mounting location near the door and power source.
- Use the provided screws and anchors to securely mount the controller to the wall.
- Proceed with wiring as described in the next section.
6. Wiring Diagram
Carefully follow the wiring instructions below. Incorrect wiring can damage the device or connected components.
- Power Supply: Connect a 12V DC power supply to the "DC+" and "GND" terminals under the "POWER" section.
- Electric Lock:
- For Normally Closed (NC) locks (fail-secure), connect the lock to "NC" and "COM".
- For Normally Open (NO) locks (fail-safe), connect the lock to "NO" and "COM".
- Wiegand Reader: Connect the Wiegand reader's D0, D1, DC+, and GND wires to the corresponding terminals under the "READER" section. Ensure correct polarity.
- Request to Exit (REX) Button: Connect the REX button to "OPEN" and "GND" under "REX & DPC".
- Door Position Contact (DPC): Connect the DPC to "D_IN" and "GND" under "REX & DPC".
- Doorbell: Connect the doorbell button to the "Doorbell" terminal and a common ground.
- Alarm: Connect the alarm system to the "ALARM-" terminal and a common ground.
Figure 6.1: Close-up of the Geuxe Sboard Wifi Controller showing the clearly labeled terminal blocks for power, reader, lock, alarm, and REX/DPC connections. This image serves as a visual guide for wiring.
7. Setup
7.1. WiFi Connection and App Setup (Tuya Smart / Smart Life)
The controller integrates with the Tuya Smart or Smart Life application for remote management.
- Download the "Tuya Smart" or "Smart Life" app from your mobile device's app store.
- Register or log in to your account.
- Power on the Geuxe Sboard Wifi Controller. The LED indicator should blink, indicating pairing mode. If not, consult the troubleshooting section for how to enter pairing mode.
- In the app, tap "+" to add a new device. Select "Security & Video Surveillance" then "Access Control".
- Follow the on-screen instructions to connect the controller to your 2.4GHz WiFi network.
- Once connected, the LED indicator on the controller will become solid.
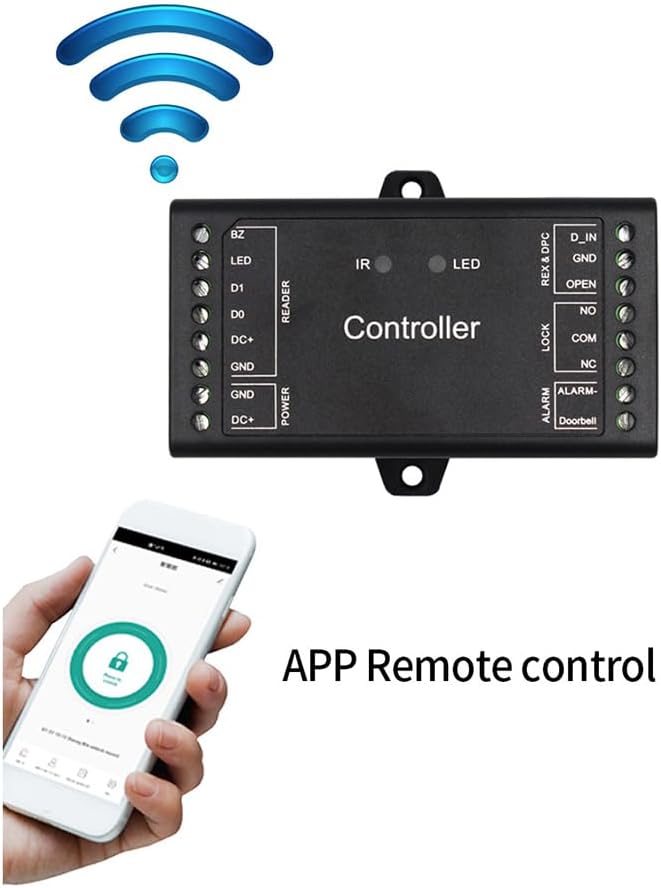
Figure 7.1: The Geuxe Sboard Wifi Controller shown with a smartphone displaying the mobile application interface, illustrating the device's WiFi connectivity and remote control capabilities.

Figure 7.2: An illustration showing the Geuxe Sboard Wifi Controller mounted on a wall, connected via WiFi, and being controlled remotely through a smartphone application. This setup allows for remote access management and user administration.
7.2. User Management (via App)
The app allows for adding, deleting, and managing up to 1000 users.
- Adding Users: In the app, navigate to the device settings. Select "User Management" or similar. You can add users by assigning unique access codes, RFID cards (if using a Wiegand reader), or fingerprints (if supported by the reader).
- Deleting Users: Select the user you wish to remove from the "User Management" list and confirm deletion.
- Temporary Codes: The system supports generating temporary access codes for guests or service personnel, which can be set to expire after a certain time or number of uses.

Figure 7.3: This image illustrates two key features: the ability to generate temporary access codes (represented by a combination lock) and the controller's compatibility with various Wiegand readers (26-44, 56, 58 bits), shown with a user presenting a card to a reader.
7.3. Wiegand Reader Integration
The controller is compatible with Wiegand 26-44 bit readers, and potentially 56 or 58 bit readers, allowing for various access methods like RFID cards or keypads.
- Connect your Wiegand reader to the "READER" terminals as per Section 6.
- Once connected, the reader will transmit card data or keypad entries to the controller for verification.
8. Operating Instructions
8.1. Remote Control Operation
The included remote control can be used to open the door or perform other functions within its range.
- Point the remote control towards the IR receiver on the controller.
- Press the designated button (e.g., "#" or a specific number) to trigger the door unlock function. Refer to the remote's specific programming for exact button functions.
8.2. App Operation
Once connected to the Tuya Smart/Smart Life app, you can:
- Remotely Unlock: Tap the unlock icon in the app to open the door from anywhere with internet access.
- Manage Users: Add, delete, or modify user access permissions.
- View Access Logs: Check who accessed the door and when (if supported by the app version).
- Set Schedules: Configure time-based access for specific users or groups.
8.3. Wiegand Reader Operation
If an external Wiegand reader is connected:
- Present a registered RFID card or enter a valid access code on the reader's keypad.
- Upon successful verification, the controller will activate the lock relay, granting access.
9. Maintenance
- Keep the controller clean and free from dust. Use a soft, dry cloth for cleaning.
- Regularly check wiring connections for any signs of wear or looseness.
- Ensure the power supply is stable and within the specified voltage range.
- Periodically check for firmware updates through the Tuya Smart/Smart Life app to ensure optimal performance and security.
10. Troubleshooting
| Problem | Possible Cause | Solution |
|---|---|---|
| Controller not powering on. | No power supply; incorrect wiring; faulty power adapter. | Check power connections. Ensure 12V DC power supply is connected correctly. Test power adapter. |
| Door not unlocking. | Incorrect lock wiring; lock malfunction; invalid access credential; controller not receiving signal. | Verify lock wiring (NC/NO/COM). Test the lock independently. Ensure access credential is valid and registered. Check remote/app signal. |
| Cannot connect to WiFi. | Incorrect WiFi password; 5GHz network; controller not in pairing mode; weak signal. | Ensure correct 2.4GHz WiFi network and password. Reset controller to enter pairing mode (refer to app instructions). Move controller closer to router. |
| Wiegand reader not working. | Incorrect reader wiring; incompatible reader; faulty reader. | Check D0, D1, DC+, GND wiring. Ensure reader is Wiegand 26-44 bit compatible. Test reader independently. |
11. Specifications
| Feature | Detail |
|---|---|
| Brand | Geuxe |
| Model | Sboard Wifi Controller |
| Voltage | 12 Volts DC |
| User Capacity | Up to 1000 users |
| Wiegand Input | 26-44 Bits (compatible with 56, 58 bits) |
| Connectivity | WiFi (2.4GHz), IR Remote |
| App Support | Tuya Smart / Smart Life |
| Package Dimensions | 4.72 x 4.33 x 1.18 inches |
| Item Weight | 5.2 ounces |
| Color | Black |

Figure 11.1: Diagram showing the physical dimensions of the Geuxe Sboard Wifi Controller, measuring approximately 91mm in length, 48mm in width, and 20mm in height.
12. Warranty and Support
Geuxe products are designed for reliability and performance. For warranty information, please refer to the purchase documentation or contact your retailer. For technical support, please reach out to the manufacturer or your local distributor.