1. Product Overview
The Paramount Flame Patio Heater is designed to provide both warmth and visual appeal to your outdoor living space. Featuring a dancing flame within a protective glass tube, this heater delivers up to 41,000 BTUs of heat, creating a comfortable environment for cooler evenings. It is fueled by a standard 20-lb propane tank (not included), which is discreetly stored within the base. The electronic ignition system ensures easy startup, and integrated wheels allow for convenient repositioning.

Image 1.1: Front view of the Paramount Flame Patio Heater, showcasing its design and the visible flame.
Key Features
- Constructed from powder-coated steel for enhanced durability and a modern aesthetic.
- Generates up to 41,000 BTUs of heat, suitable for outdoor use.
- Features a stylish "Ultimate Grey" finish with silver accents.
- Operates with a 20-lb propane tank (not included) and an electronic ignition system.
- Includes a reflector and a protective guard for safety and heat distribution.
- Equipped with an electric ignition (batteries not included) for easy startup.
- ETL Certified, ensuring compliance with safety standards.
- Provides an estimated maximum heating area of 125 square feet.

Image 1.2: The patio heater positioned on an outdoor patio, demonstrating its integration into a living space.
2. Safety Information
Read and understand all safety warnings and instructions before assembling, operating, or servicing this heater. Failure to follow these instructions could result in fire, explosion, serious injury, or death.
General Safety Warnings
- FOR OUTDOOR USE ONLY: Never operate this heater indoors or in an enclosed area.
- CLEARANCE: Maintain adequate clearance from combustible materials. Refer to the assembly instructions for specific distances.
- VENTILATION: Ensure proper ventilation during operation.
- PROPANE GAS: Use only propane gas. Do not use natural gas or any other fuel.
- LEAK TEST: Always perform a leak test on all gas connections before initial use and after each propane tank change.
- CHILDREN AND PETS: Keep children and pets away from the heater, especially during operation.
- HOT SURFACES: Surfaces of the heater become extremely hot during operation. Avoid direct contact.
- STABILITY: Ensure the heater is placed on a firm, level surface to prevent tipping.
- DO NOT MOVE: Never move the heater while it is operating or still hot.
- STORAGE: Store the propane tank outdoors in a well-ventilated area when not in use.
- MAINTENANCE: Only qualified service personnel should perform repairs.
3. Package Contents
Carefully unpack all components and ensure all parts are present before beginning assembly. If any parts are missing or damaged, do not attempt to assemble or operate the heater. Contact customer support for assistance.
Typical Components Include:
- Top Reflector Assembly
- Glass Tube
- Burner Assembly
- Protective Grids (4 sections)
- Main Body/Base Panels
- Control Panel Assembly
- Wheels (2)
- Hardware Pack (screws, nuts, washers, etc.)
- Regulator and Hose Assembly
- User Manual
4. Assembly Instructions
Assembly typically requires two people and basic tools (e.g., screwdriver, wrench). Follow the steps carefully to ensure proper and safe operation.
General Assembly Steps:
- Attach the wheels to the base panel.
- Assemble the main body panels to form the base enclosure.
- Install the control panel and secure the burner assembly.
- Carefully insert the glass tube into the central column. Ensure it is clean and free of fingerprints.
- Attach the protective grid sections around the glass tube.
- Mount the top reflector assembly.
- Connect the regulator and hose assembly to the burner.
- Place a 20-lb propane tank (not included) inside the base and connect the hose.
- Perform a leak test on all gas connections using a soapy water solution. Bubbles indicate a leak.
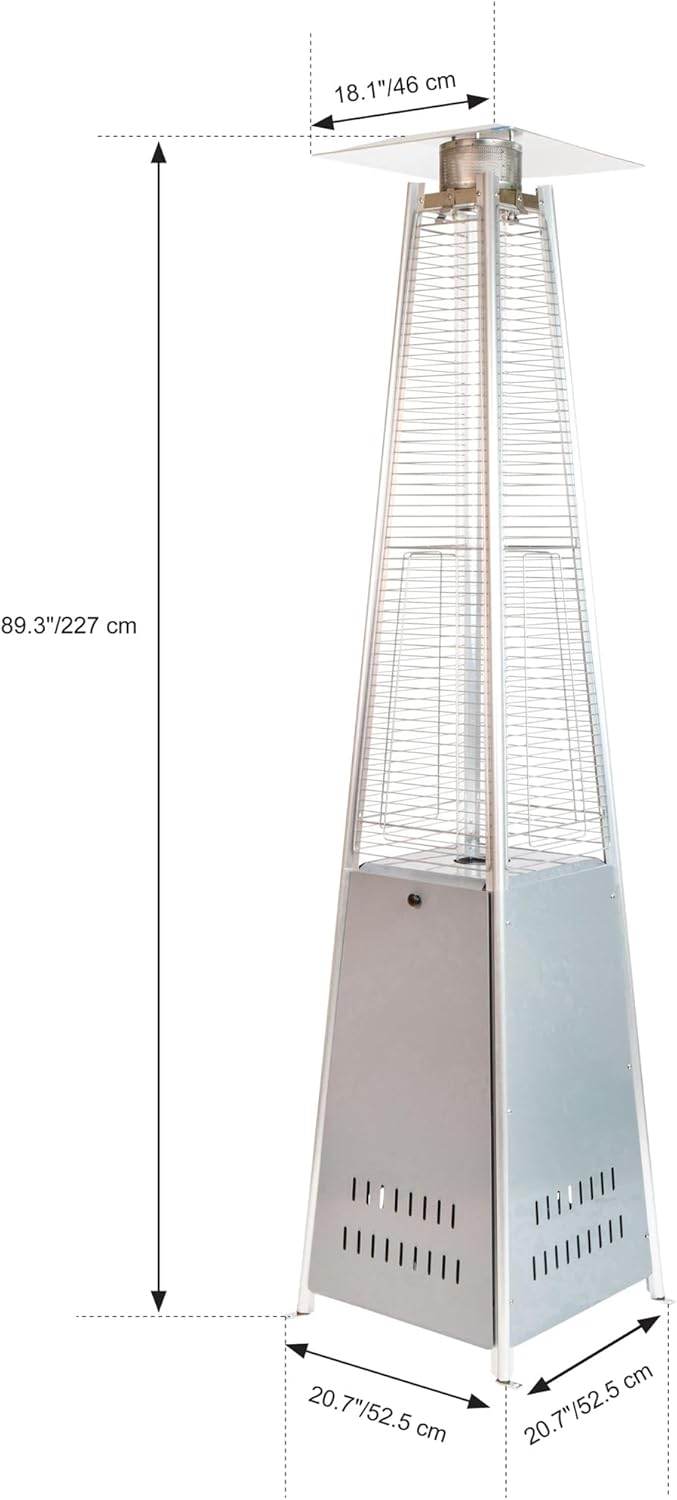
Image 4.1: Dimensional diagram of the patio heater, indicating height (89.3"/227 cm) and base width (20.7"/52.5 cm).

Image 4.2: Detail of the integrated wheels at the base, facilitating mobility.
5. Operating Instructions
Follow these steps to safely ignite and operate your Paramount Flame Patio Heater.
5.1. Starting the Heater
- Ensure the propane tank valve is fully open.
- Push and turn the variable control knob to the 'PILOT' position.
- While holding the control knob in, press the electronic igniter button repeatedly until the pilot flame lights. You may hear a clicking sound.
- Continue to hold the control knob in for approximately 15-30 seconds after the pilot lights to allow the thermocouple to heat up. Release the knob; the pilot should remain lit.
- Slowly turn the variable control knob to the desired heat setting (low to high). The main burner will ignite.
5.2. Adjusting the Flame
Rotate the variable control knob between the 'LOW' and 'HIGH' positions to adjust the flame height and heat output.
5.3. Shutting Down
- Turn the variable control knob to the 'OFF' position.
- Close the valve on the propane tank completely.
- Allow the heater to cool down completely before moving or storing.

Image 5.1: Detail of the heater's control panel, showing the red electronic ignition button and the black variable control knob.
6. Maintenance
Regular maintenance ensures the longevity and safe operation of your patio heater.
6.1. Cleaning
- Exterior Surfaces: Wipe down powder-coated steel surfaces with a soft, damp cloth. Avoid abrasive cleaners.
- Glass Tube: Clean the glass tube with a glass cleaner and a soft cloth when the heater is cool. Ensure no residue remains.
- Burner and Pilot Assembly: Keep the burner ports and pilot assembly free of dirt, dust, and spider webs. Use a soft brush or compressed air if necessary.
6.2. Storage
- Ensure the heater is completely cool before storing.
- Disconnect the propane tank and store it outdoors in a well-ventilated area, away from direct sunlight and heat sources.
- Cover the heater with a weather-resistant cover to protect it from elements.
- Store the heater in a dry, sheltered location during off-season periods.
7. Troubleshooting
Refer to the table below for common issues and their solutions.
| Problem | Possible Cause | Solution |
|---|---|---|
| Heater will not light | No propane gas flow; Igniter not sparking; Pilot light not staying lit. | Check propane tank valve is open; Ensure tank has fuel; Check igniter battery; Hold control knob longer after pilot lights. |
| Low flame or inconsistent heat | Low propane level; Regulator issue; Blocked burner ports. | Replace or refill propane tank; Inspect regulator for damage; Clean burner ports. |
| Smell of gas | Gas leak. | Immediately turn off gas supply; Perform a leak test on all connections. If leak persists, do not operate and contact qualified service. |
| Pilot light goes out | Thermocouple not heating sufficiently; Drafts; Loose connection. | Hold control knob in longer; Shield from wind; Check pilot assembly connections. |
8. Specifications
Detailed technical specifications for the Paramount Flame Patio Heater.
| Attribute | Detail |
|---|---|
| Model Number | PH-100066 GY |
| Brand | Paramount |
| Heat Output | 41,000 BTUs |
| Fuel Type | Propane Gas (20-lb tank, not included) |
| Ignition System | Electronic Ignition |
| Material | Powder-Coated Steel |
| Color | Ultimate Grey with Silver Accents |
| Product Dimensions (L x W x H) | 72.9 x 72.9 x 227 cm (28.7 x 28.7 x 89.3 inches) (approximate, based on base and height) |
| Weight | 22.95 kg (50.6 lbs) |
| Certifications | ETL Certified |
| Manufacturer | J & R Home Products Ltd. |
| Country of Origin | China |
9. Warranty and Support
Paramount products are manufactured to high-quality standards. For specific warranty details, please refer to the warranty card included with your product or visit the official Paramount website. Keep your proof of purchase for warranty claims.
Customer Support
If you have any questions, require technical assistance, or need to order replacement parts, please contact Paramount customer support. Contact information can typically be found on the manufacturer's website or on the product packaging.
For more information, visit the Paramount Store.


