Lucky Doug 8802
Lucky Doug STEM Building Projects Model Airplane Jet Set
Model: 8802 - Instruction Manual
Introduction
This instruction manual provides detailed guidance for assembling, operating, and maintaining your Lucky Doug STEM Building Projects Model Airplane Jet Set. This kit is designed to engage children aged 8 and above in hands-on construction, fostering concentration, imagination, and problem-solving skills through a rewarding building experience.

Figure 1: The Lucky Doug Model Airplane Jet Set, showcasing the assembled model and various parts.
The completed model airplane measures approximately 3 inches high, 15.4 inches long, and 15 inches wide, making it a suitable display piece once assembled.
Safety Information
Please read and understand all safety warnings before beginning assembly or allowing children to interact with the product.
- Small Parts Warning: This kit contains small parts (screws, nuts, etc.) which may pose a choking hazard for children under 3 years old. Adult supervision is recommended during assembly, especially for younger children.
- Sharp Edges: While parts are designed for safety, some metal edges may be sharp. Handle all components with care.
- Tool Use: The kit includes a wrench and screwdriver. Ensure proper handling of these tools to prevent injury. Do not use excessive force.
- Bending Metal Parts: Some soft iron parts may require manual bending. Exercise caution to avoid pinching fingers.
- Intended Use: This product is a building toy and model. It is not intended for flight or rough play that could lead to damage or injury.
Package Contents
Verify that all components listed below are present before starting assembly. This kit contains 282 parts and pieces.
- Metal construction plates (various shapes and sizes for fuselage, wings, tail)
- Transparent hatch cover (cockpit canopy)
- Glide wheels and axles
- Screws and nuts (various sizes)
- Specialized tools: 1x Wrench, 1x Screwdriver
- Instruction Manual (this document)
- Additional decorative or structural components (e.g., nose cone, bombs/missiles, small brackets)

Figure 2: Example of metal components and fasteners included in the kit.

Figure 3: The essential tools (wrench and screwdriver) provided for assembly.
Assembly Instructions
Follow the detailed, step-by-step instructions provided in the separate assembly guide included with your kit. The process requires patience and attention to detail.
- Preparation: Unpack all components and lay them out on a clean, flat surface. Identify the different types of metal plates, fasteners, and tools.
- Follow the Guide: Refer to the numbered steps in the dedicated assembly instruction booklet. Each step illustrates which parts are needed and how they connect.
- Connecting Parts: Use the provided screws and nuts to join the metal plates. Securely tighten nuts with the wrench and screwdriver, but do not overtighten.
- Forming the Fuselage: Begin by constructing the central body (fuselage) of the airplane, as this forms the primary structure.
- Attaching Wings and Tail: Once the fuselage is stable, attach the wing sections and tail fins according to the instructions. Ensure they are aligned correctly.
- Installing Landing Gear: Mount the glide wheels and their mechanisms to the underside of the aircraft.
- Adding Details: Install the transparent hatch cover, nose cone, and any other accessory parts like bombs or missiles.
- Final Check: After completing all steps, review the assembled model to ensure all connections are secure and no parts are loose.

Figure 4: Children engaged in the assembly process, demonstrating the hands-on nature of the kit.
Operating Instructions
The Lucky Doug Model Airplane Jet Set is a static display model and a building toy. It is not designed for flight or remote control operation.
- Display: Once assembled, the model can be displayed on a desk, shelf, or in a display case. Its sturdy metal construction ensures durability.
- Interactive Play: While not a flying toy, children can engage in imaginative play with the assembled model, simulating ground maneuvers using its glide wheels.
- Educational Tool: Use the completed model as a visual aid to discuss principles of engineering, mechanics, and aviation.
Maintenance
Proper care will ensure the longevity of your model airplane.
- Cleaning: Wipe the model gently with a soft, dry cloth to remove dust. For stubborn marks, a slightly damp cloth can be used, followed by immediate drying. Avoid abrasive cleaners or solvents.
- Storage: Store the model in a cool, dry place away from direct sunlight and extreme temperatures to prevent material degradation.
- Tightening Connections: Periodically check all screws and nuts. If any become loose from handling or play, re-tighten them using the provided tools to maintain structural integrity.
- Rust Prevention: The metal parts are anti-rust, but prolonged exposure to moisture should be avoided.
Troubleshooting
If you encounter issues during assembly or with the completed model, refer to the following common solutions:
- Difficulty Assembling a Step:
- Review the assembly instruction booklet carefully. Ensure you are using the correct parts and orientation for the current step.
- Sometimes, a slight adjustment or bending of a soft iron part may be necessary to align holes.
- If a connection is difficult, try loosening adjacent screws slightly to allow for more flexibility, then re-tighten once the new part is in place.
- Missing Parts:
- Double-check the packaging and work area thoroughly. Small parts can be easily overlooked.
- If a part is genuinely missing, contact Lucky Doug customer support for assistance.
- Loose Connections:
- Use the provided wrench and screwdriver to tighten any loose screws and nuts. Regular checks are recommended.
- Model Does Not Roll Smoothly:
- Ensure the glide wheels are properly attached and not obstructed by other parts. Check that axles are straight and not bent.
Specifications
| Product Model | 8802 |
|---|---|
| Brand | Lucky Doug |
| Material | Anti-rust Metal |
| Number of Parts | 282 |
| Assembled Dimensions (Approx.) | 3" (H) x 15.4" (L) x 15" (W) |
| Item Weight | 1.26 pounds |
| Recommended Age | 8 - 12 years (Manufacturer recommended age: 6 - 16 years) |
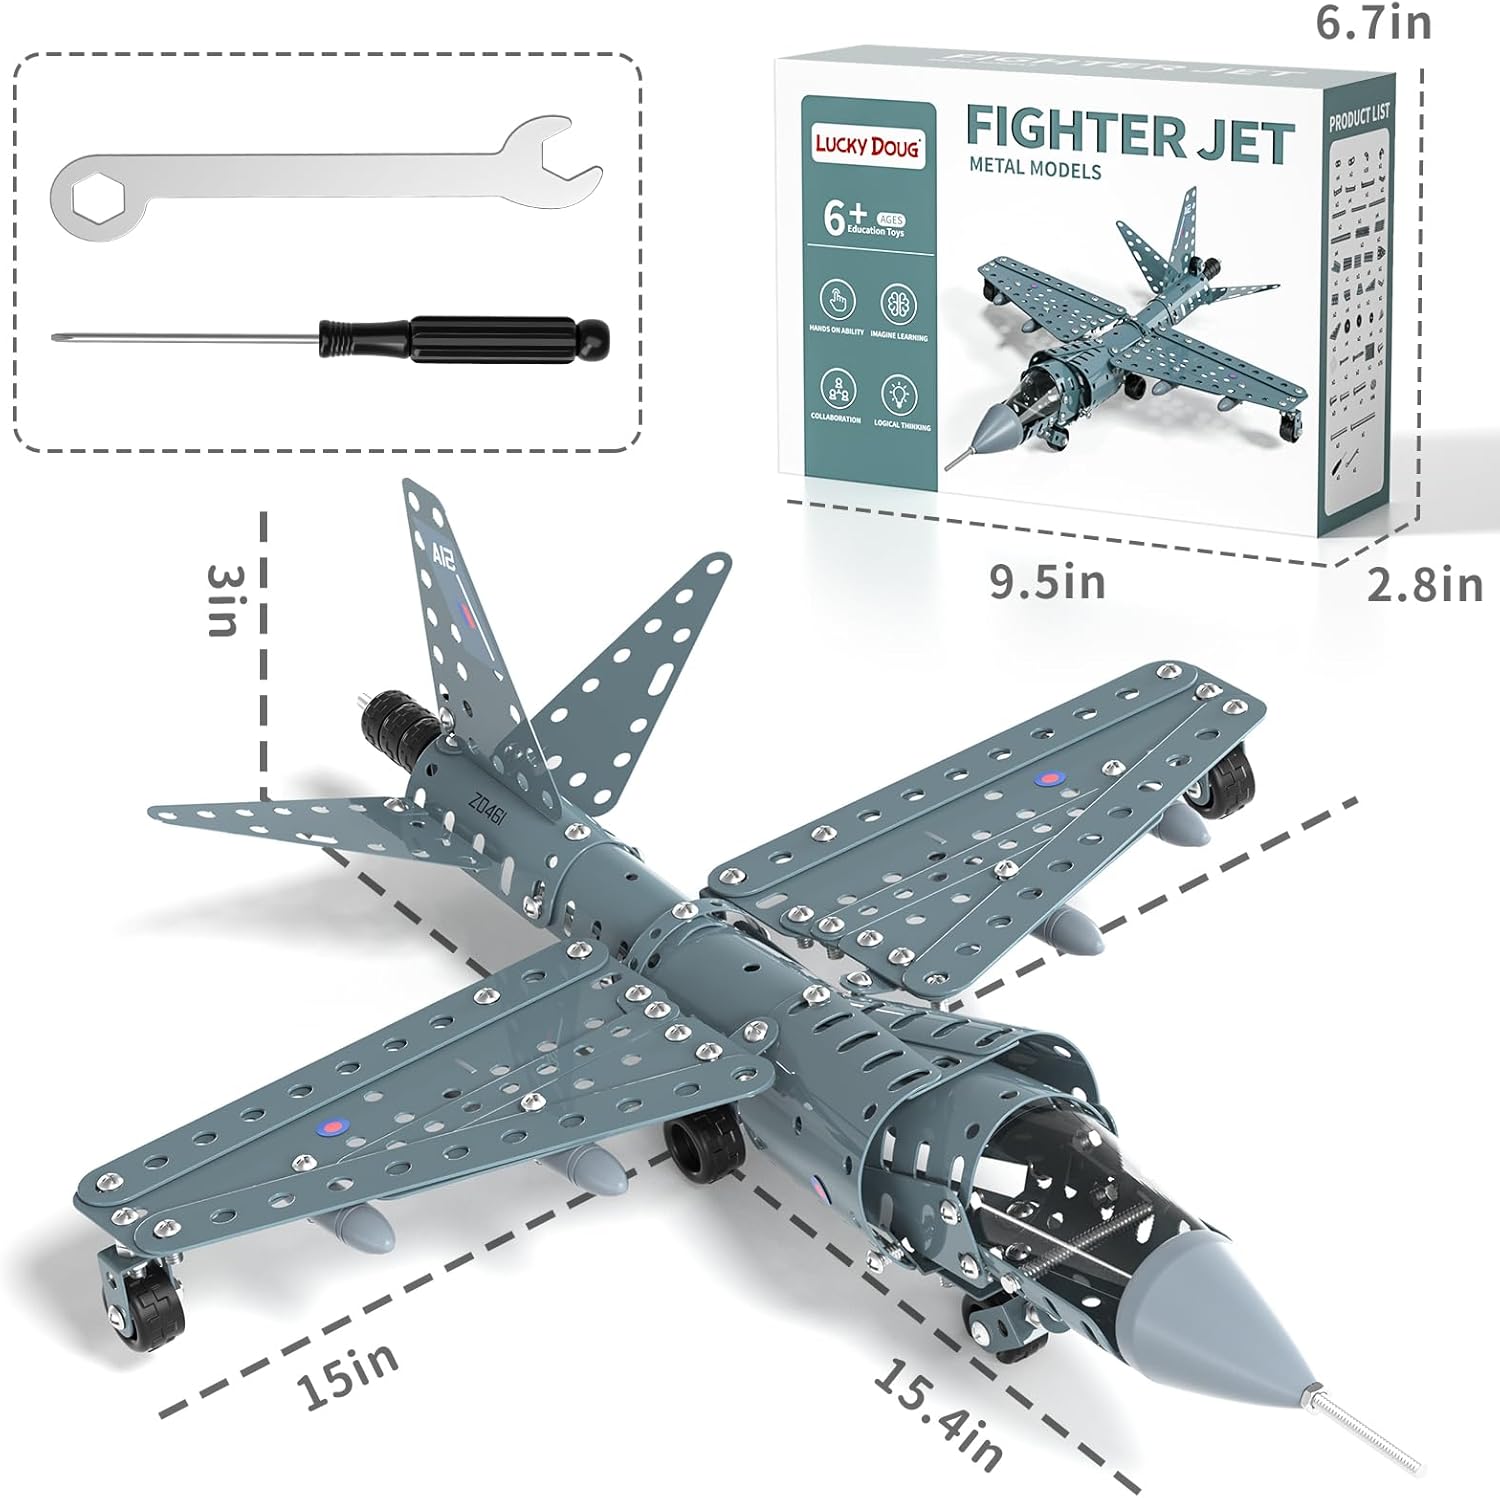
Figure 5: Approximate dimensions of the assembled model airplane.
Warranty and Support
Lucky Doug is committed to providing high-quality products and customer satisfaction. For any questions, concerns, or assistance with missing parts or assembly, please contact Lucky Doug customer support through the retailer where the product was purchased or visit the official Lucky Doug brand store online.
For more information and support, you may visit the Lucky Doug Store: Lucky Doug Store on Amazon.
Please retain your proof of purchase for any warranty claims or support inquiries.