VEVOR 520S
VEVOR Tiller Cultivator Gas Powered User Manual
Model: 520S | Brand: VEVOR
Important Safety Information
WARNING: Always wear appropriate protective gear, including safety glasses and gloves, when operating the tiller. Be aware of your surroundings and avoid operating the tiller near people or pets. Never refuel the tiller while it is running or while the engine is hot. Always turn off the tiller and allow it to cool before refueling. Keep the tiller's protective shield in place to prevent debris from being thrown.
Package Contents
Before assembly, ensure all items listed below are present and in good condition:
- 1 x Tiller Cultivator
- 1 x User Manual
- 1 x Funnel
- 1 x Socket Wrench
- 1 x Double-Ended Screwdriver
- 2 x Hex Key
- 2 x Allen Wrench
- 2 x Cable Ties
- 1 x Set of Installation Accessories
Setup and Assembly
The VEVOR Tiller Cultivator is designed for quick and easy assembly. Follow these steps to get your tiller ready for use:
- Handlebar Assembly: Attach the upper and lower handlebar sections using the provided knobs and bolts. Ensure they are securely tightened for stable operation.
- Wheel Installation: Secure the transport wheels to the designated mounts. These wheels aid in moving the tiller to and from the work area.
- Tine Guard Attachment: Install the protective shield above the tines. This guard is crucial for preventing debris from splashing during operation.
- Fuel and Oil Preparation:
- For the 2-stroke engine, mix gasoline with appropriate 2-stroke engine oil according to the manufacturer's recommended ratio (typically 25:1 or 50:1, refer to engine manual if provided separately).
- Fill the fuel tank with the prepared fuel mixture using the provided funnel.
- Important: Ensure the gearbox is filled with appropriate gear oil. Some units may ship without oil in the gearbox. Consult the manufacturer for the correct type and fill volume.
- Check Connections: Verify all cables and connections, including the throttle cable and spark plug wire, are properly secured.

Figure 1: Visual guide for initial setup and starting procedure, showing steps like adding fuel, engaging throttle, and pulling the start cord.
Operating Instructions
This 43CC 2-stroke tiller cultivator is designed for efficient soil cultivation in various garden and field conditions.
Pre-Operation Checklist:
- Ensure the fuel tank is adequately filled with the correct fuel mixture.
- Check that all fasteners are tight and secure.
- Verify the tines are clear of any obstructions.
- Wear appropriate personal protective equipment (PPE), including eye protection, gloves, and sturdy footwear.
Starting the Engine:
- Place the tiller on a flat, stable surface.
- Set the engine switch to the "ON" position.
- Engage the choke lever (if cold start).
- Press the primer bulb several times until fuel is visible in the return line.
- Pull the starter cord firmly and smoothly until the engine starts.
- Once the engine starts, gradually disengage the choke.
- Allow the engine to warm up for a few moments before beginning operation.
Cultivation:
The tiller features a cultivation width of 300 mm (11.8 inches) and a maximum depth of 100 mm (3.9 inches). The adjustable skid assembly allows you to set the desired cultivation depth.

Figure 2: Ergonomic stand-up operation of the tiller, designed to reduce physical strain during use.

Figure 3: The tiller's wide cultivation area and adjustable wheel height, allowing for precise control over tilling depth.
Guide the tiller forward slowly, allowing the tines to penetrate the soil. For tougher soil, you may need to make multiple passes or adjust the depth. The 5.8-inch large drive wheels assist in maneuvering the tiller across various terrains with reduced resistance.
Stopping the Engine:
To stop the tiller, release the throttle and move the engine switch to the "OFF" position.
Maintenance
Regular maintenance ensures the longevity and optimal performance of your VEVOR Tiller Cultivator.
After Each Use:
- Clean the Tines: Remove any accumulated soil, weeds, or debris from the tines. This prevents buildup and maintains efficiency.
- Wipe Down: Clean the exterior of the tiller with a damp cloth to remove dirt and grime.
- Inspect for Damage: Check for any loose bolts, damaged parts, or signs of wear. Address any issues promptly.
Regular Maintenance (Monthly or Seasonally):
- Air Filter: Inspect and clean or replace the air filter as needed. A clean air filter is essential for proper engine performance.
- Spark Plug: Check the spark plug for wear and proper gap. Clean or replace if necessary.
- Fuel System: If storing for an extended period, drain the fuel tank or use a fuel stabilizer to prevent fuel degradation.
- Gearbox Lubrication: Regularly check the oil level in the gearbox and replenish as needed with the recommended gear oil. Proper lubrication is critical for preventing premature wear and failure.
- Engine Oil (for 2-stroke): Ensure the correct oil-to-gasoline mixture is always used. For 2-stroke engines, there is no separate crankcase oil to check; lubrication comes from the mixed fuel.
- General Lubrication: Apply grease to any moving parts or pivot points as indicated in the detailed engine manual (if applicable).

Figure 4: The tiller's design incorporates enhanced heat dissipation to ensure continuous operation and prevent overheating.
Troubleshooting
This section provides solutions to common issues you might encounter with your tiller.
| Problem | Possible Cause | Solution |
|---|---|---|
| Engine Fails to Start |
|
|
| Loss of Power / Engine Stalls |
|
|
| Excessive Vibration or Noise |
|
|
| Tiller Head / Tines Malfunction |
|
|
Specifications
Detailed specifications for the VEVOR 43CC 2-Stroke Tiller Cultivator (Model 520S):
| Attribute | Value |
|---|---|
| Item Model Number | 520S |
| Displacement | 43CC |
| Max Cultivation Depth | 100 mm / 3.93 inch |
| Max Cultivation Width | 300 mm / 11.81 inch |
| Primary Material | PA6+30%GP, ADC Aluminum |
| Product Weight | 14.15 kg / 31.19 lbs |
| Wheel Material | Nylon |
| Cultivation Blade Material | Steel |
| Product Size (L x W x H) | 1110x448x910 mm / 43.70x17.63x35.82 inch |
| Power Source | Fuel Powered |
| Color | Orange |
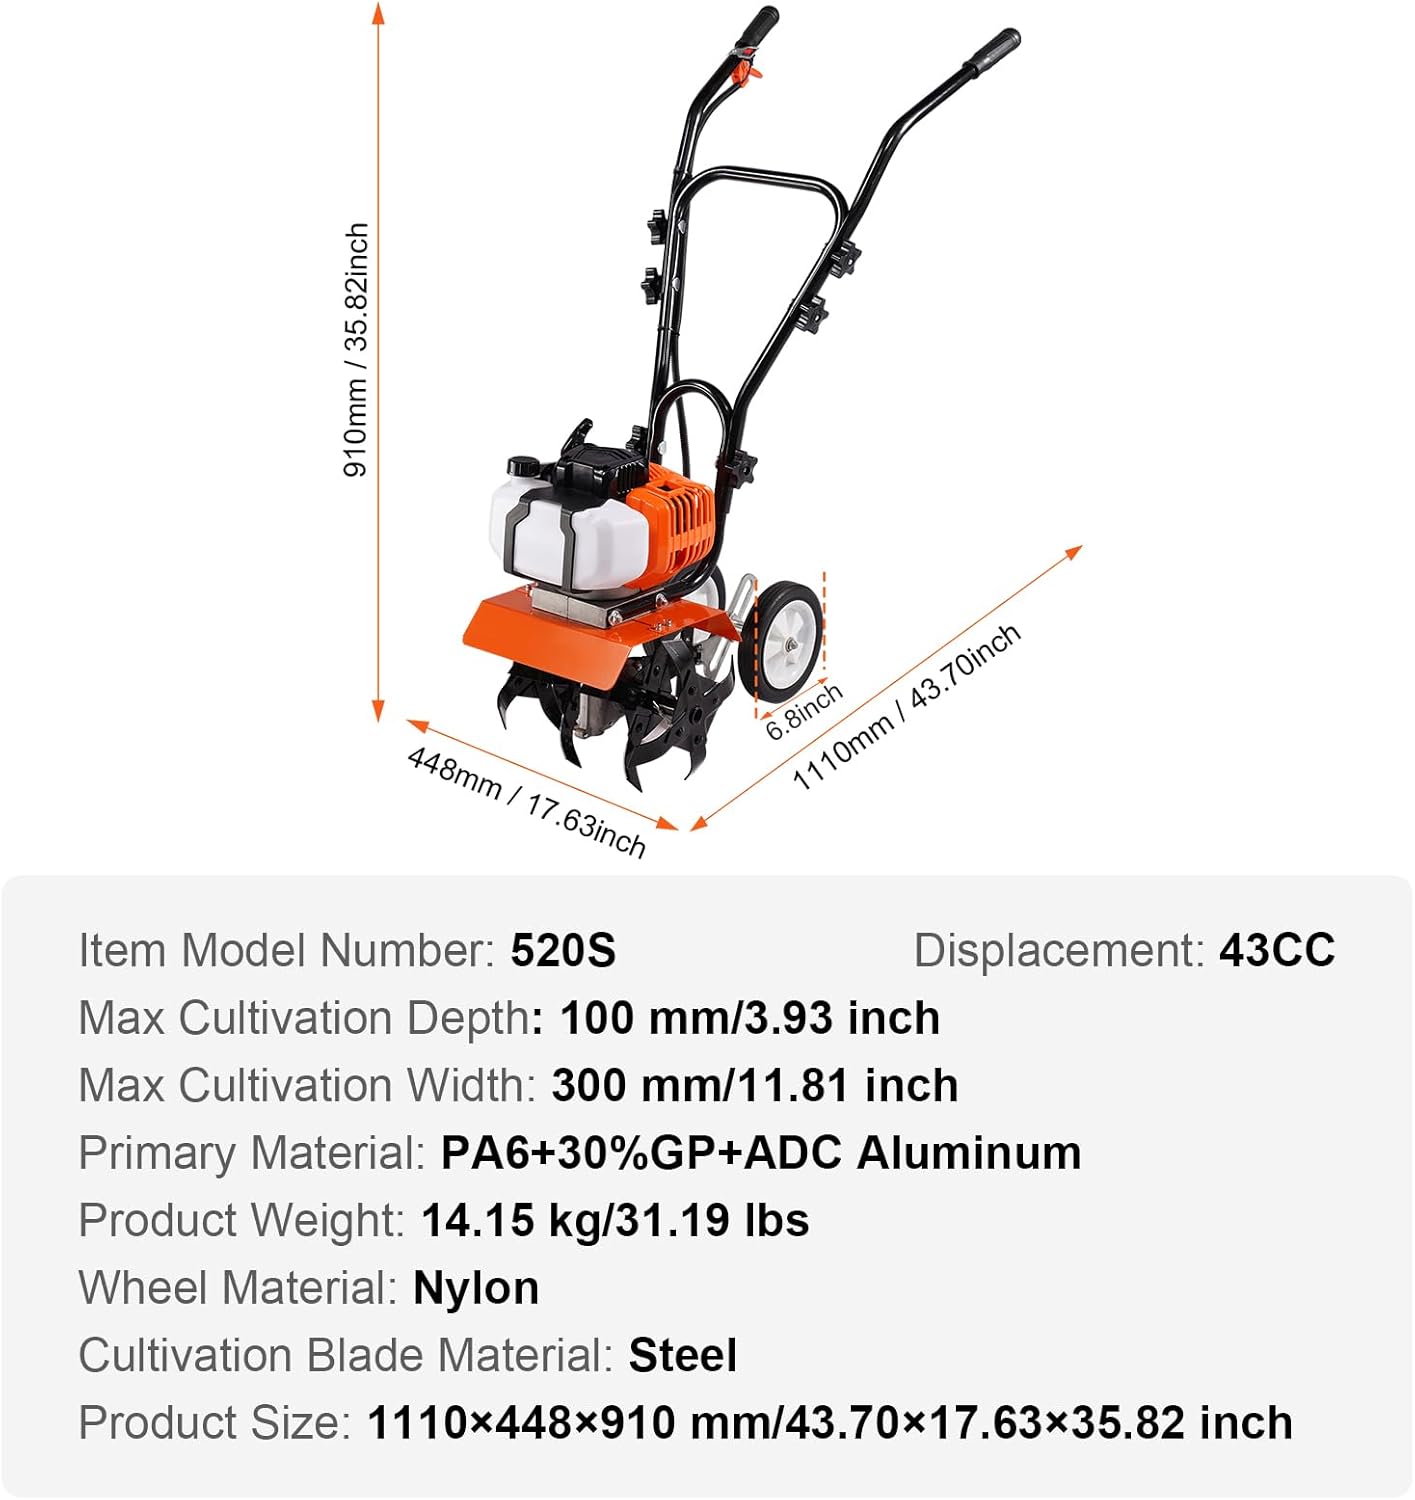
Figure 5: Detailed dimensions and specifications of the VEVOR Tiller Cultivator.
Warranty and Support
For information regarding product warranty, please refer to the warranty card included with your purchase or visit the official VEVOR website. For technical support, spare parts, or any inquiries not covered in this manual, please contact VEVOR customer service.
You can often find support contact details on the VEVOR official website or through your purchase platform.
Ask a question about this manual
Ask about setup, troubleshooting, compatibility, parts, safety, or missing instructions. Manuals+ will review the question and use this page’s manual context to help answer it.