Peslief Peslief
Peslief Rotary Tattoo Pen Kit Instruction Manual
Model: Peslief | Brand: Peslief
1. Introduction
This manual provides essential instructions for the safe and effective use of your Peslief Rotary Tattoo Pen Kit. Please read this manual thoroughly before operating the device to ensure proper setup, operation, and maintenance. Retain this manual for future reference.
2. Package Contents
The Peslief Rotary Tattoo Pen Kit includes the following components:
- 1 x Tattoo Pen
- 1 x Power Supply
- 1 x Charging Cable
- 20 x Ink Cups
- 1 x 30ML Tattoo Black Ink
- 10 x Colors Tattoo Ink
- 1 Pair x Tattoo Gloves
- 10 x Tattoo Cartridge Needles (5pcs 3RL, 5pcs 7RM)
- 1 x Tattoo Grip Cover
- 1 x Tattoo Scar Repair Gel
- 1 x 30ML Green Soap
- 1 x Practice Skin
- 5 x Tattoo Transfer Paper

Image: All components included in the Peslief Rotary Tattoo Pen Kit.
Unboxing and Kit Overview
Video: An overview of the Peslief Rotary Tattoo Pen Kit contents and initial setup.
3. Product Overview
Tattoo Pen
The tattoo pen features a powerful coreless motor, designed for stable performance, low vibration, and minimal noise. Its slim and lightweight body ensures a comfortable grip and convenient portability. It operates with an output voltage of 5-12V and a motor speed of 10000RPM, reducing overheating during extended use.

Image: Close-up of the Peslief Professional Rotary Tattoo Pen, highlighting its design and material.
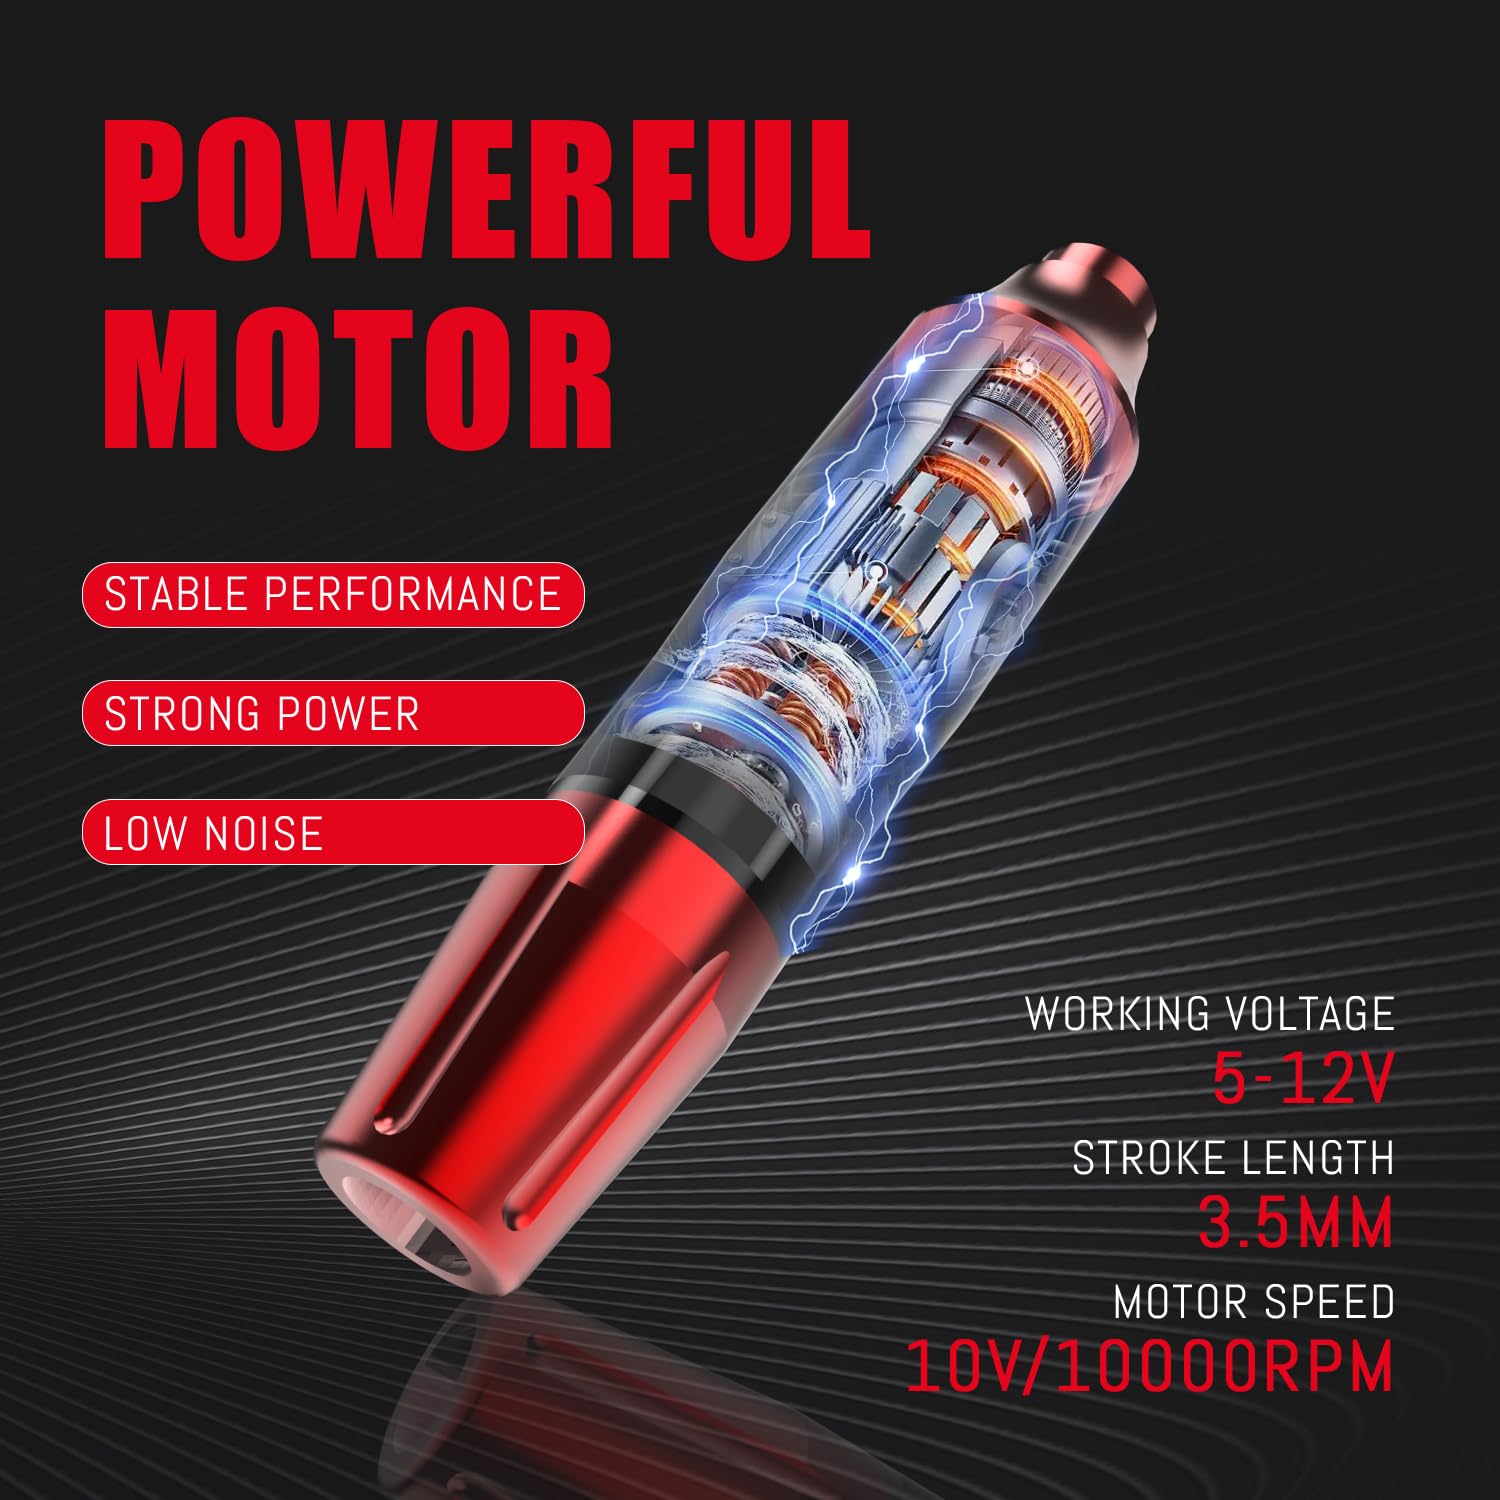
Image: Diagram illustrating the powerful motor and internal components of the tattoo pen.
Wireless Power Supply
The included wireless power supply has a 1200mAh battery capacity. It takes approximately 2-4 hours to fully charge and provides 2-6 hours of continuous operation. This wireless design simplifies the tattooing process by eliminating the need for external cables.

Image: The compact Peslief Mini Wireless Power Supply.

Image: Illustration of how the wireless power supply connects to the tattoo pen, featuring Type-C fast charging.
Tattoo Cartridge Needles
The kit includes 10 tattoo needles (5pcs 3RL and 5pcs 7RM), crafted from high-quality 304 stainless steel. Each needle is individually packaged for sterility and safety. Their transparent shell design allows for clear visibility, ensuring powerful needle output, fast coloring, and minimal skin trauma. These needles are compatible with most tattoo pen machines.

Image: Tattoo pen with various cartridge needles, demonstrating compatibility and needle depth adjustment.
4. Setup Instructions
Follow these steps to prepare your Peslief Rotary Tattoo Pen Kit for use:
- Unpack Components: Remove the tattoo pen, power supply, charging cable, ink cups, tattoo black ink, tattoo colors, tattoo gloves, tattoo cartridge needles, tattoo scar repair gel, green soap, practice skin, and tattoo transfer paper from the storage bag.
- Charge Power Supply: Connect the charging cable to the power supply and a suitable USB power source. Ensure the power supply is fully charged before use.
- Attach Power Supply: Securely twist the wireless power supply onto the top of the tattoo pen.
- Install Cartridge Needle: Insert a sterile tattoo cartridge needle into the front end of the tattoo pen. Twist gently until it locks into place.
- Prepare Ink: Fill the ink cups with the desired tattoo ink colors.
- Apply Grip Cover (Optional): If desired, wrap the tattoo grip cover around the pen's grip for added comfort and stability.
- Prepare Design: Use the tattoo transfer paper to apply your desired design onto the practice skin or a suitable surface.

Image: Visual guide detailing the four main steps for setting up the tattoo pen: inserting power supply, inserting needle, adjusting voltage, and adjusting needle depth.
5. Operating Instructions
Once the kit is set up, follow these guidelines for operation:
- Power On/Off: Press and hold the power button on the wireless power supply to turn the device on or off. The digital display will show the current voltage.
- Adjust Voltage: Use the '+' and '-' buttons on the power supply to increase or decrease the operating voltage. The recommended operating voltage for the Peslief pen is 5-12V. Adjust according to your specific needs and needle type.
- Adjust Needle Depth: Rotate the grip of the tattoo pen to adjust the needle depth. Turn clockwise to extend the needle and counter-clockwise to retract it. Ensure the needle depth is appropriate for your application.
- Begin Tattooing: Dip the needle into the ink cup, ensuring the needle is adequately loaded with ink. Carefully apply the pen to the prepared surface, following your design.
- Monitor Performance: Pay attention to the pen's sound and vibration. Consistent performance indicates proper operation. If you notice any unusual sounds or changes in performance, power off the device and inspect it.
6. Maintenance and Care
Proper maintenance ensures the longevity and hygienic operation of your tattoo pen kit:
- Cleaning the Tattoo Pen: After each use, disconnect the power supply and remove the needle cartridge. Wipe down the exterior of the tattoo pen with a clean cloth dampened with green soap solution. Do not submerge the pen in liquid.
- Needle Disposal: Always dispose of used tattoo cartridge needles in a designated sharps container. Never reuse needles.
- Ink Cup Disposal: Dispose of used ink cups and any remaining ink according to local regulations.
- Power Supply Care: Keep the wireless power supply clean and dry. Avoid exposing it to excessive moisture or extreme temperatures.
- Storage: Store all components of the kit in the provided storage bag in a cool, dry place, away from direct sunlight and out of reach of children.
7. Troubleshooting
If you encounter issues with your Peslief Rotary Tattoo Pen Kit, refer to the following common problems and solutions:
| Problem | Possible Cause | Solution |
|---|---|---|
| Tattoo pen not turning on | Low battery on power supply; Loose connection; Power button not pressed correctly. | Charge the power supply fully; Ensure the power supply is securely attached to the pen; Press and hold the power button for a few seconds. |
| Needle not moving or weak movement | Incorrect needle installation; Low voltage setting; Damaged needle cartridge. | Re-install the needle cartridge correctly; Increase the voltage setting; Replace with a new needle cartridge. |
| Ink not flowing properly | Needle not dipping deep enough into ink; Clogged needle; Ink too thick. | Ensure the needle dips adequately into the ink cup; Replace the needle cartridge; Use appropriate tattoo ink consistency. |
| Excessive vibration or noise | Loose components; Damaged motor; Incorrect needle type. | Check all connections; If the issue persists, contact customer support; Ensure compatible needle cartridges are used. |
8. Specifications
| Feature | Specification |
|---|---|
| Tattoo Pen Material | Aviation aluminum |
| Tattoo Pen Dimensions | 121mm x 27mm |
| Tattoo Pen Weight | 126g |
| Stroke Length | 3.5MM |
| Motor Speed | 10V/10000RPM |
| Working Voltage | 5-12V |
| Power Supply Battery Capacity | 1200mAh |
| Power Supply Charging Time | 2-4 hours |
| Power Supply Working Hours | 2-6 hours |
| Needle Material | 304 Stainless Steel |
| Kit Package Dimensions | 9.37 x 6.97 x 3.19 inches |
| Kit Weight | 1.61 Pounds |
9. Warranty and Support
Peslief is committed to customer satisfaction. If you have any questions, concerns, or require technical assistance regarding your Peslief Rotary Tattoo Pen Kit, please do not hesitate to contact our customer support team. Refer to your purchase documentation for specific warranty details and contact information.
Ask a question about this manual
Ask about setup, troubleshooting, compatibility, parts, safety, or missing instructions. Manuals+ will review the question and use this page’s manual context to help answer it.