
1. Introduction
The ASOFTY Infrared Motion Detector with Wireless Light Sensor (Model ASHT145) is designed to automate the activation of lamps and appliances based on detected motion and ambient light conditions. This system allows you to convert traditional household appliances into smart devices without requiring Wi-Fi or Bluetooth connectivity. It is ideal for enhancing convenience, security, and energy efficiency in various indoor and outdoor settings.
2. Package Contents
Please verify that all items are present in your package:
- 1 x PIR Motion Detector
- 1 x Remote-Controlled Socket
- 1 x Magnetic Mount
- 1 x Screw Accessory
- 1 x Self-Adhesive Iron Plate
- 1 x User Manual
Note: 2 AA batteries are required for the motion detector and are not included in the package.
3. Specifications
| Feature | Detail |
|---|---|
| Model Number | ASHT145 |
| Material | ABS + PC |
| Input Voltage (Socket) | 100-240 V AC, 50/60 Hz |
| Maximum Power (Socket) | 3600 W (16 A) |
| Operating Temperature | -10 to 45°C |
| Detection Distance | Adjustable: 0-4 m, 4-8 m, 8-12 m (Default: 4-8 m) |
| Delay Setting | Adjustable: 3s, 10s, 30s, 1min, 3min, 5min, 10min (Default: 3s) |
| Light Sensitivity | Adjustable: All day, Low light, Darkness (Default: All day) |
| Power Source (Detector) | 2 x AA Alkaline Batteries (not included) |
| Water Resistance (Detector) | IP54 (for outdoor/indoor use) |
| Mounting Type | Adhesive, Drilling, Magnetic, Ceiling Mount |
| Compatible Devices | Appliances with power sockets |
4. Setup & Installation
4.1 Battery Installation
- Open the battery compartment on the back of the PIR motion detector.
- Insert two (2) AA alkaline batteries, ensuring correct polarity (+/-).
- Close the battery compartment securely.
4.2 Mounting Options
The ASOFTY motion detector offers flexible installation methods:
- Adhesive: Use the provided self-adhesive iron plate to attach the magnetic mount to a clean, flat surface.
- Drilling: Use the screw accessory to securely mount the sensor to a wall or ceiling.
- Magnetic: The sensor can be directly attached to any magnetic surface using its built-in magnetic base.
4.3 Optimal Sensor Placement
Proper placement is crucial for effective detection and to avoid false triggers. The PIR sensor primarily detects movement in a horizontal direction. Optimal sensitivity is achieved when movement is tangential to the sensor.

Image: Diagram illustrating optimal PIR sensor placement. Green checkmarks indicate ideal positions for movement detection, while red crosses indicate less effective positions. For corridors, tangential movement is best. For rooms, avoid direct head-on approaches to the sensor.
Consider the following:
- Corridors: Install the sensor so that movement across its field of view is detected, rather than directly towards it.
- Rooms: Position the sensor to cover the main areas of activity. Avoid placing it where it might be triggered by pets or drafts if not desired.
- Angle Adjustment: The flexible mount allows you to adjust the sensor's angle to optimize its detection area and minimize unwanted triggers.

Image: Diagram illustrating the adjustable detection angle (120 degrees vertical and horizontal) and distance ranges (0-4m, 4-7.9m, 7.9-11.9m) of the motion sensor.
4.4 Connecting to Appliances
Plug the remote-controlled socket into a standard wall outlet. Then, plug the appliance you wish to control (e.g., a lamp, fan) into the remote-controlled socket. The motion detector will wirelessly communicate with this socket to activate or deactivate the connected appliance.

Image: The ASOFTY motion detector mounted on a wall, paired with a smart plug controlling a lamp, demonstrating a typical setup.

Image: A man walking in a living room, triggering the motion detector which then activates a fan and a lamp connected to smart plugs.

Image: The motion and light sensor shown operating in different ambient light conditions: day (off), evening (on), and night (on). The default setting is 'Available all day'.
5. Operating Instructions
The ASOFTY motion detector features adjustable parameters to customize its operation according to your needs.
5.1 Adjusting Detection Distance
The detection distance can be set to one of three ranges:
- 0-4 meters
- 4-8 meters (Default setting)
- 8-12 meters
Refer to the user manual for specific instructions on how to change this setting, typically via a switch or button on the sensor.
5.2 Adjusting Delay Time
The delay time determines how long the connected appliance remains active after motion is no longer detected. This setting helps prevent the light or appliance from turning off too quickly. Available settings are:
- 3 seconds (Default setting)
- 10 seconds
- 30 seconds
- 1 minute
- 3 minutes
- 5 minutes
- 10 minutes
Adjust this setting to suit the usage pattern of the area. For example, a longer delay might be suitable for a bathroom, while a shorter delay might be sufficient for a closet.
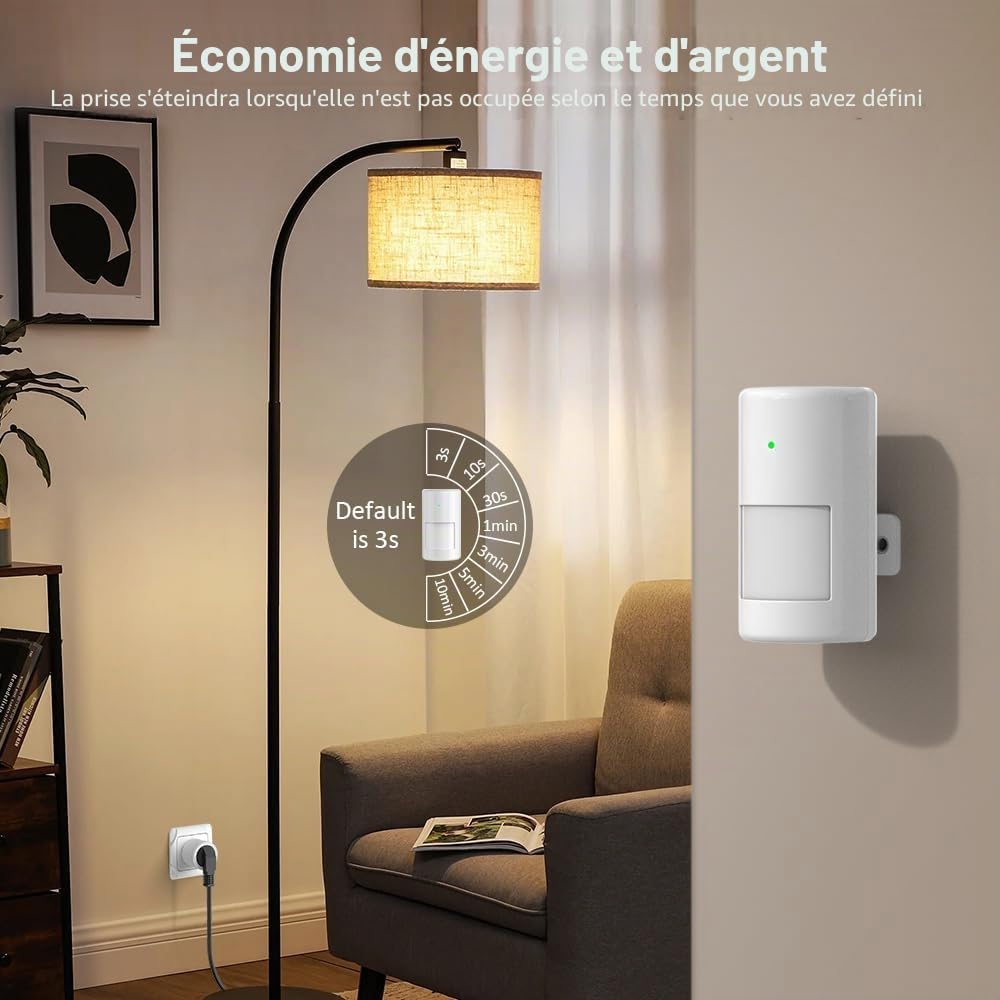
Image: The ASOFTY motion detector shown with a dial indicating various adjustable delay settings (3s, 10s, 30s, 1min, 3min, 5min, 10min). The default setting is 3 seconds.
5.3 Adjusting Light Sensitivity
The light sensor allows you to define the ambient light conditions under which the motion detector will activate the appliance. This feature helps save energy by preventing lights from turning on during daylight hours.
- All day: The sensor will activate the appliance regardless of ambient light (Default setting).
- Low light: The sensor will only activate the appliance when the ambient light falls below a certain threshold.
- Darkness: The sensor will only activate the appliance in complete or near-complete darkness.
This setting is particularly useful for lighting applications, ensuring lights only turn on when needed.
6. Maintenance
6.1 Battery Replacement
When the motion detector's performance decreases or the indicator light signals low battery, replace the two AA batteries. Always use new alkaline batteries for optimal performance.
6.2 Cleaning
Wipe the sensor's surface with a soft, dry cloth. Do not use abrasive cleaners or solvents, as these can damage the device. Ensure the sensor lens is clear of dust and obstructions for accurate detection.
6.3 Water Resistance
The motion detector itself has an IP54 waterproof rating, making it suitable for outdoor and indoor use. However, the remote-controlled sockets are not waterproof and should only be used in dry indoor environments.
7. Troubleshooting
- Appliance does not turn on:
- Check if the remote-controlled socket is properly plugged into a live outlet.
- Ensure the appliance is correctly plugged into the remote-controlled socket and is powered on.
- Verify the motion detector batteries are installed correctly and are not depleted.
- Check the light sensitivity setting. If set to 'Low light' or 'Darkness', it may not activate in bright conditions.
- Ensure the motion detector is within range of the remote-controlled socket.
- Appliance turns on too frequently or for no apparent reason (false triggers):
- Adjust the detection distance to a shorter range.
- Reposition the sensor to avoid areas with drafts, direct sunlight, or heat sources that might cause false triggers.
- Ensure the sensor is not pointing directly at a window or a busy area where unwanted movement might occur.
- Clean the sensor lens to remove any obstructions.
- Appliance turns off too quickly:
- Increase the delay time setting on the motion detector.
- Ensure the sensor has a clear line of sight to the area where continuous presence is expected.
- Sensor not detecting motion:
- Check battery levels and replace if necessary.
- Ensure the sensor is placed in an optimal position for detecting tangential movement.
- Verify the detection distance setting is appropriate for the area.
- Clean the sensor lens.
8. Support
For further assistance or inquiries, please refer to the contact information provided with your purchase or visit the ASOFTY official website.