Introduction
This manual provides detailed instructions for the assembly, operation, and maintenance of your new Jocisland Queen Bed Frame. Please read this manual thoroughly before beginning assembly or use to ensure safe and correct operation. Keep this manual for future reference.

Image: The Jocisland Queen Bed Frame in light grey velvet with an acrylic headboard featuring illuminated LED lights, set in a modern bedroom.
Safety Information
Important Safety Warnings:
- Always follow assembly instructions carefully. Incorrect assembly can lead to instability and potential injury.
- It is recommended that two adults assemble this bed frame.
- Be cautious when adjusting the headboard to prevent injury. Ensure all locking mechanisms are secure after adjustment.
- Keep the bed frame away from open flames, heaters, and other high heat sources to prevent fire hazards.
- Unplug the LED lights from the power source when not in use or during maintenance.
- Ensure all electrical connections for the LED lights are secure and not exposed to moisture.
- Do not exceed the maximum weight capacity of 1000 lbs.
- Keep small parts and packaging materials away from children to prevent choking hazards.
Package Contents
Before assembly, verify that all components are present and undamaged. Refer to the parts list provided in your packaging. Typical components include:
- Headboard (Velvet Upholstered with Acrylic Trim)
- Footboard
- Side Rails
- Wood Slats
- Center Support Bar(s)
- Support Legs
- LED Light Kit (LED strips, remote control, power adapter)
- Hardware Pack (screws, bolts, washers, Allen wrench)
- Assembly Instructions Manual
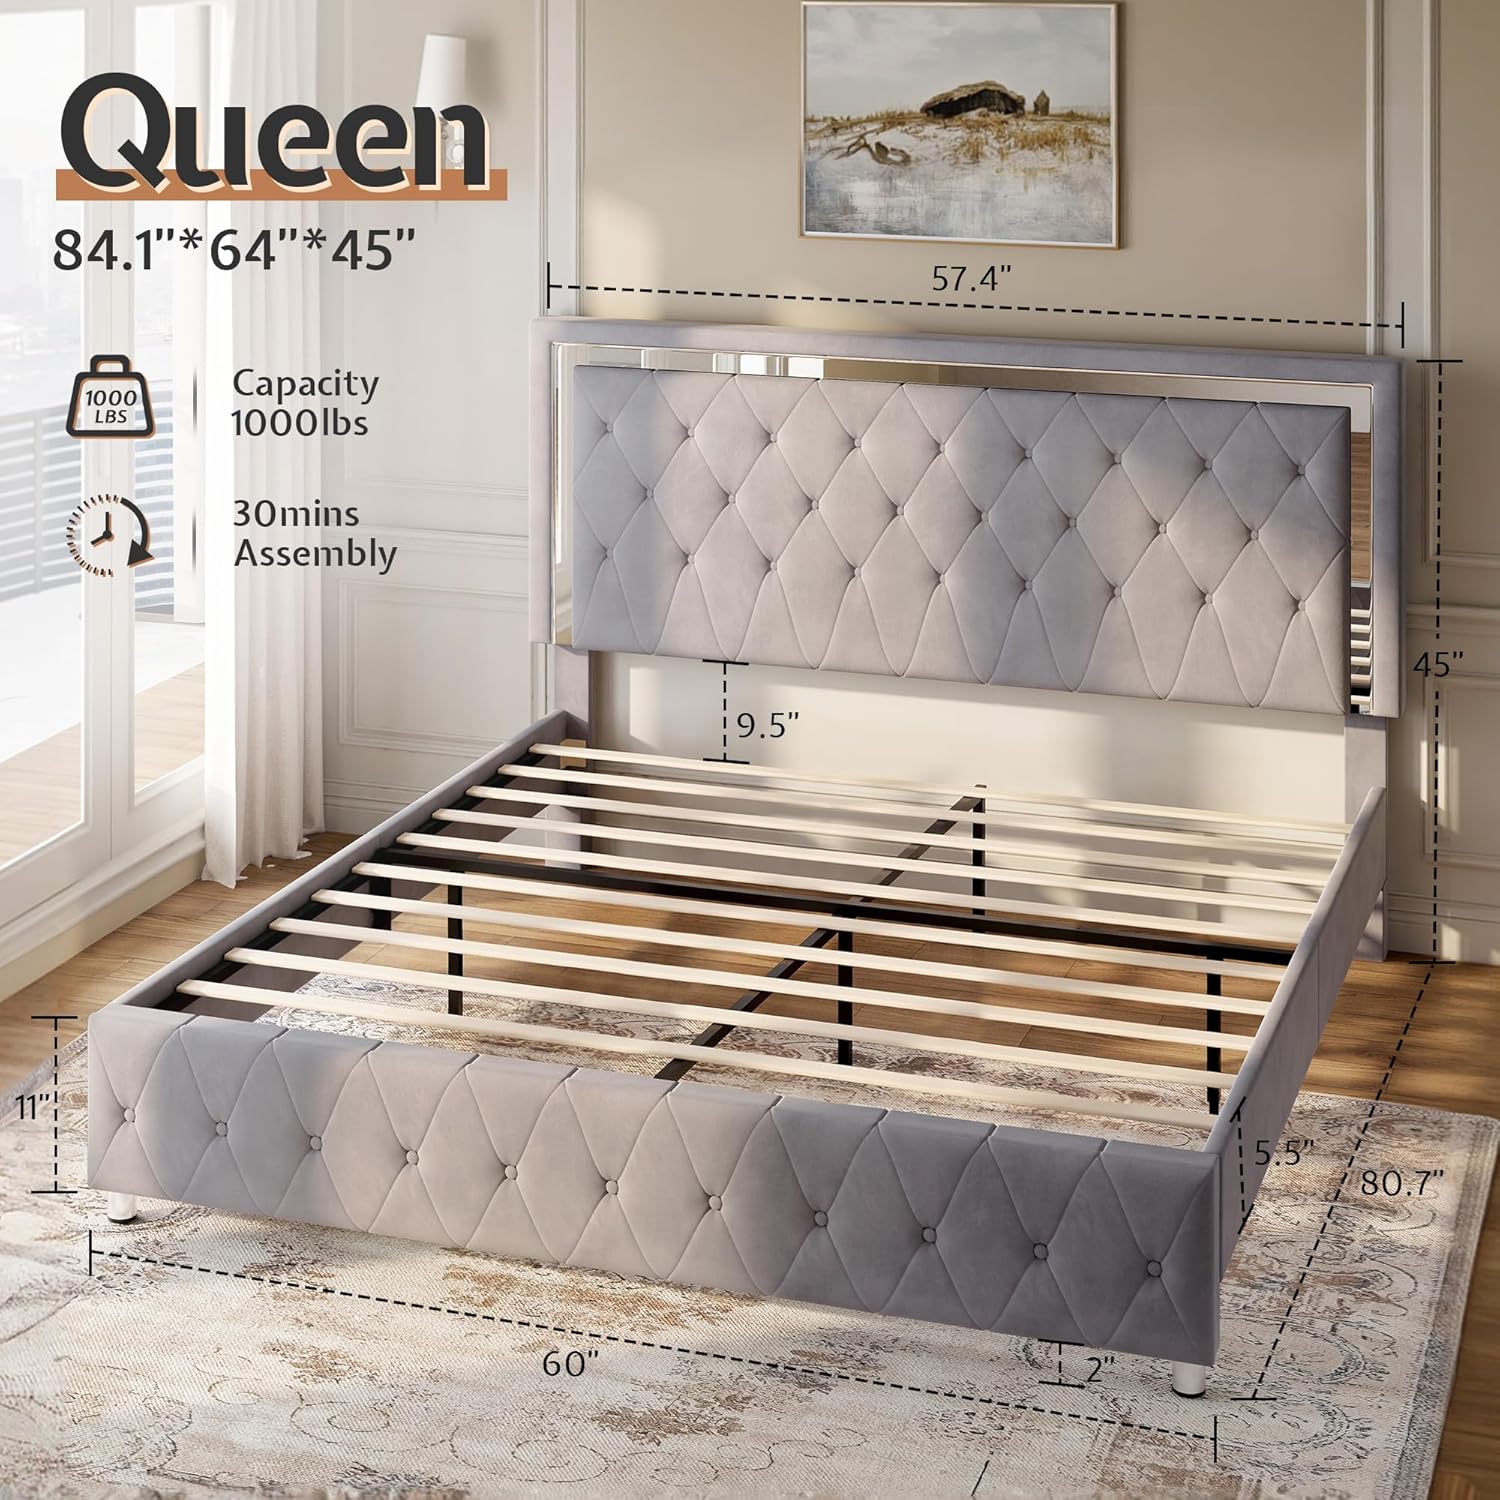
Image: All components of the Jocisland Queen Bed Frame laid out for assembly, including the headboard, footboard, side rails, and wooden slats. Key dimensions and a 1000 lbs capacity are indicated.
Assembly Instructions
Please follow these steps carefully. It is recommended to have two people for assembly. No additional tools are typically required beyond what is provided.
Step 1: Prepare the Area and Unpack
Clear a spacious area for assembly. Lay out all components on a soft, clean surface to prevent scratches. Identify all parts using the provided parts list.
Step 2: Assemble the Headboard and Footboard
Attach the headboard legs and any decorative elements as per the specific instructions in your manual. Ensure all bolts are finger-tight at this stage.

Image: A close-up of the headboard highlighting its adjustable height feature, showing it can be set between 43 and 45 inches to accommodate different mattress heights.
Step 3: Attach Side Rails
Connect the side rails to the headboard and footboard using the provided hardware. Make sure the connections are secure. Do not fully tighten all bolts until the entire frame is assembled.
Step 4: Install Center Support System
Assemble and install the center support bar(s) and support legs. These are crucial for the stability and durability of the bed frame.

Image: Detail of the bed frame's robust metal support structure with wooden slats, illustrating the stability features designed to prevent noise.
Step 5: Place Wood Slats
Evenly space and secure the wood slats across the frame. Many models include Velcro or pre-drilled holes for easy and secure attachment. Ensure all slats are firmly in place.

Image: A close-up showing a wooden slat attached to the bed frame using a Velcro strip, designed for noise reduction and secure mattress placement.
Step 6: Install LED Lights
Carefully attach the LED light strips to the designated areas on the headboard, typically along the mirrored acrylic trim. All LED parts are numbered; match and connect them according to the instructions. Connect the power adapter and remote receiver.

Image: The Jocisland Queen Bed Frame with its RGB LED lights illuminated in purple, demonstrating the various control options including a remote and a smartphone app interface.
Step 7: Final Tightening
Once all components are in place, go back and fully tighten all bolts and screws. Do not overtighten. Ensure the frame is stable and level.
Operating Instructions
Adjusting the Headboard Height
The headboard is height-adjustable to accommodate various mattress thicknesses. To adjust, loosen the securing bolts on the headboard legs, slide the headboard to the desired height (between 43-45 inches), and then securely tighten the bolts. Ensure both sides are adjusted evenly.
Image: A visual representation of the headboard's adjustable height, showing the range from 43 to 45 inches for optimal mattress fit.
Using the RGB LED Lights
The integrated RGB LED lights can be controlled via the included remote control or a smartphone application. Refer to the separate LED light kit manual for detailed instructions on pairing and using the app.
- Power On/Off: Use the power button on the remote or app.
- Color Selection: Choose from over 60,000 colors using the color wheel or preset buttons.
- Brightness Adjustment: Increase or decrease light intensity.
- Dynamic Modes: Select from various pre-programmed lighting effects (e.g., flashing, fading).
- Music Sync Function: Lights can react to music played through the app or a built-in microphone.
- Timing Function: Set schedules for the lights to turn on or off automatically.

Image: A detailed view of the LED light remote control, showing buttons for color selection, dynamic modes, and brightness adjustment.
Maintenance and Care
- Cleaning the Upholstery: The velvet upholstery should be hand washed only. Use a soft, damp cloth with mild soap for spot cleaning. Avoid harsh chemicals or abrasive cleaners.
- Cleaning the Acrylic Headboard: Wipe the mirrored acrylic with a soft, lint-free cloth. Use a non-abrasive cleaner specifically designed for acrylic or glass if necessary.
- Frame Inspection: Periodically check all bolts and screws to ensure they remain tight. Retighten as needed to maintain stability and prevent squeaks.
- LED Lights: Keep the LED strips clean and free from dust. If any lights malfunction, refer to the LED light kit manual or contact customer support. Always unplug before cleaning or inspecting electrical components.
Troubleshooting
Bed Frame Squeaks or Wobbles
- Solution: Check all bolts and screws. Tighten any loose connections. Ensure all wood slats are properly seated and secured. Verify that the center support legs are firmly on the floor and adjusted correctly.
LED Lights Not Working
- Solution:
- Ensure the power adapter is securely plugged into a working outlet and the LED controller.
- Check all connections between the LED strips and the controller.
- Replace the battery in the remote control if it's unresponsive.
- If using the app, ensure Bluetooth is enabled on your device and the app is correctly paired with the LED controller.
- Unplug the LED system for 5 minutes, then plug it back in to reset.
Headboard Adjustment Issues
- Solution: Ensure the securing bolts are sufficiently loosened before attempting to adjust the height. Do not force the headboard. If it jams, check for any obstructions or misalignments.
Specifications
| Feature | Detail |
|---|---|
| Model | Queen Bed Frame |
| Brand | Jocisland |
| Size | Queen (U.S. Standard) |
| Product Dimensions | 84"L x 63.9"W x 44.8"H |
| Headboard Height (Adjustable) | 43" - 45" |
| Material | Velvet Upholstery, Mirrored Acrylic Headboard Trim, Wood Slats, Metal Frame |
| Weight Capacity | 1000 lbs |
| Special Features | RGB LED Lights (App/Remote Control), Adjustable Headboard, Noise-Free Design, No Box Spring Needed |
| Assembly Required | Yes (2 people recommended) |
| Care Instructions | Hand Wash Only (Upholstery) |
Warranty and Support
For warranty information, please refer to the documentation included with your purchase or contact Jocisland customer support directly. If you encounter any issues not covered in this manual or require further assistance, please visit the official Jocisland website or contact their customer service department.
You can find more information and support at the Jocisland Store on Amazon.