1. Introduction
Thank you for choosing the NUGRIART Large Metal Chicken Coop. This manual provides essential instructions for the safe assembly, operation, and maintenance of your new poultry enclosure. Please read this manual thoroughly before beginning assembly or use to ensure proper setup and longevity of the product. This walk-in coop is designed to provide a secure and spacious outdoor environment for various small to medium-sized animals, including chickens, ducks, rabbits, and cats.

Image 1.1: Fully assembled NUGRIART Large Metal Chicken Coop.
2. Safety Information
Always prioritize safety during assembly and use. Failure to follow these instructions may result in injury or damage to the product.
- Adult Assembly Required: This product requires assembly by at least two adults. Do not attempt to assemble alone.
- Wear Protective Gear: During assembly, wear gloves to protect hands from sharp edges and safety glasses to protect eyes.
- Clear Work Area: Ensure your assembly area is clear of obstructions and hazards.
- Secure Installation: Always anchor the coop securely to the ground using the provided pins or additional methods to prevent tipping in strong winds.
- Regular Inspection: Periodically check all connections, mesh, and the cover for wear, damage, or loosening. Tighten or replace components as needed.
- Animal Safety: Ensure the enclosure is free from sharp objects or gaps that could harm animals or allow escape.
- Weather Conditions: While the cover is water-resistant and anti-UV, extreme weather conditions (heavy snow, strong winds) may require additional precautions or temporary disassembly.
3. Package Contents
Before beginning assembly, verify that all components listed below are present and undamaged. If any parts are missing or damaged, please contact customer support.
- Steel Frame Pipes (various lengths and shapes)
- Connectors and Joints
- PVC Coated Hexagonal Wire Mesh
- Water-Resistant and Anti-UV Cover
- Elastic Buckles/Bungee Cords for Cover
- Door Assembly with Latch
- Ground Anchoring Pins
- Zip Ties for Mesh Attachment
- Assembly Instructions
4. Setup and Assembly Instructions
Assembly typically requires two people and can be completed by following the included instructions. Carefully identify each component before connecting. Some pieces may not have labels, requiring careful comparison to the diagrams.
4.1. Frame Assembly
- Unpack Components: Lay out all frame pipes and connectors on a flat, clear surface. Group similar pieces together.
- Construct Base: Begin by assembling the base frame using the longest pipes and appropriate corner connectors. Ensure all connections are secure.
- Build Walls: Attach vertical pipes to the base, then connect them with horizontal pipes to form the side and end walls.
- Install Roof Structure: Assemble the roof frame, ensuring the correct pitch for water runoff. Connect the roof frame to the wall structure.

Image 4.1: Details of the quick-connect frame, elastic buckle for mesh, and durable base for stability.
4.2. Mesh Installation
- Unroll Mesh: Carefully unroll the PVC coated hexagonal wire mesh.
- Attach Mesh: Starting from one corner, attach the mesh to the frame using the provided zip ties. Ensure the mesh is taut and covers all open sides and the roof area not covered by the tarp.
- Secure with Elastic Buckles: Use the elastic buckles to further secure the mesh to the frame, especially around the base and corners, to prevent gaps.
4.3. Door Assembly and Installation
- Assemble Door: Follow the specific instructions for assembling the door frame and attaching the mesh.
- Install Door: Mount the assembled door into the designated opening in the frame. Ensure it swings freely and the latch mechanism operates correctly.
- Secure Latch: Use the provided steel wire ties to reinforce the lockable steel door latch for added security.
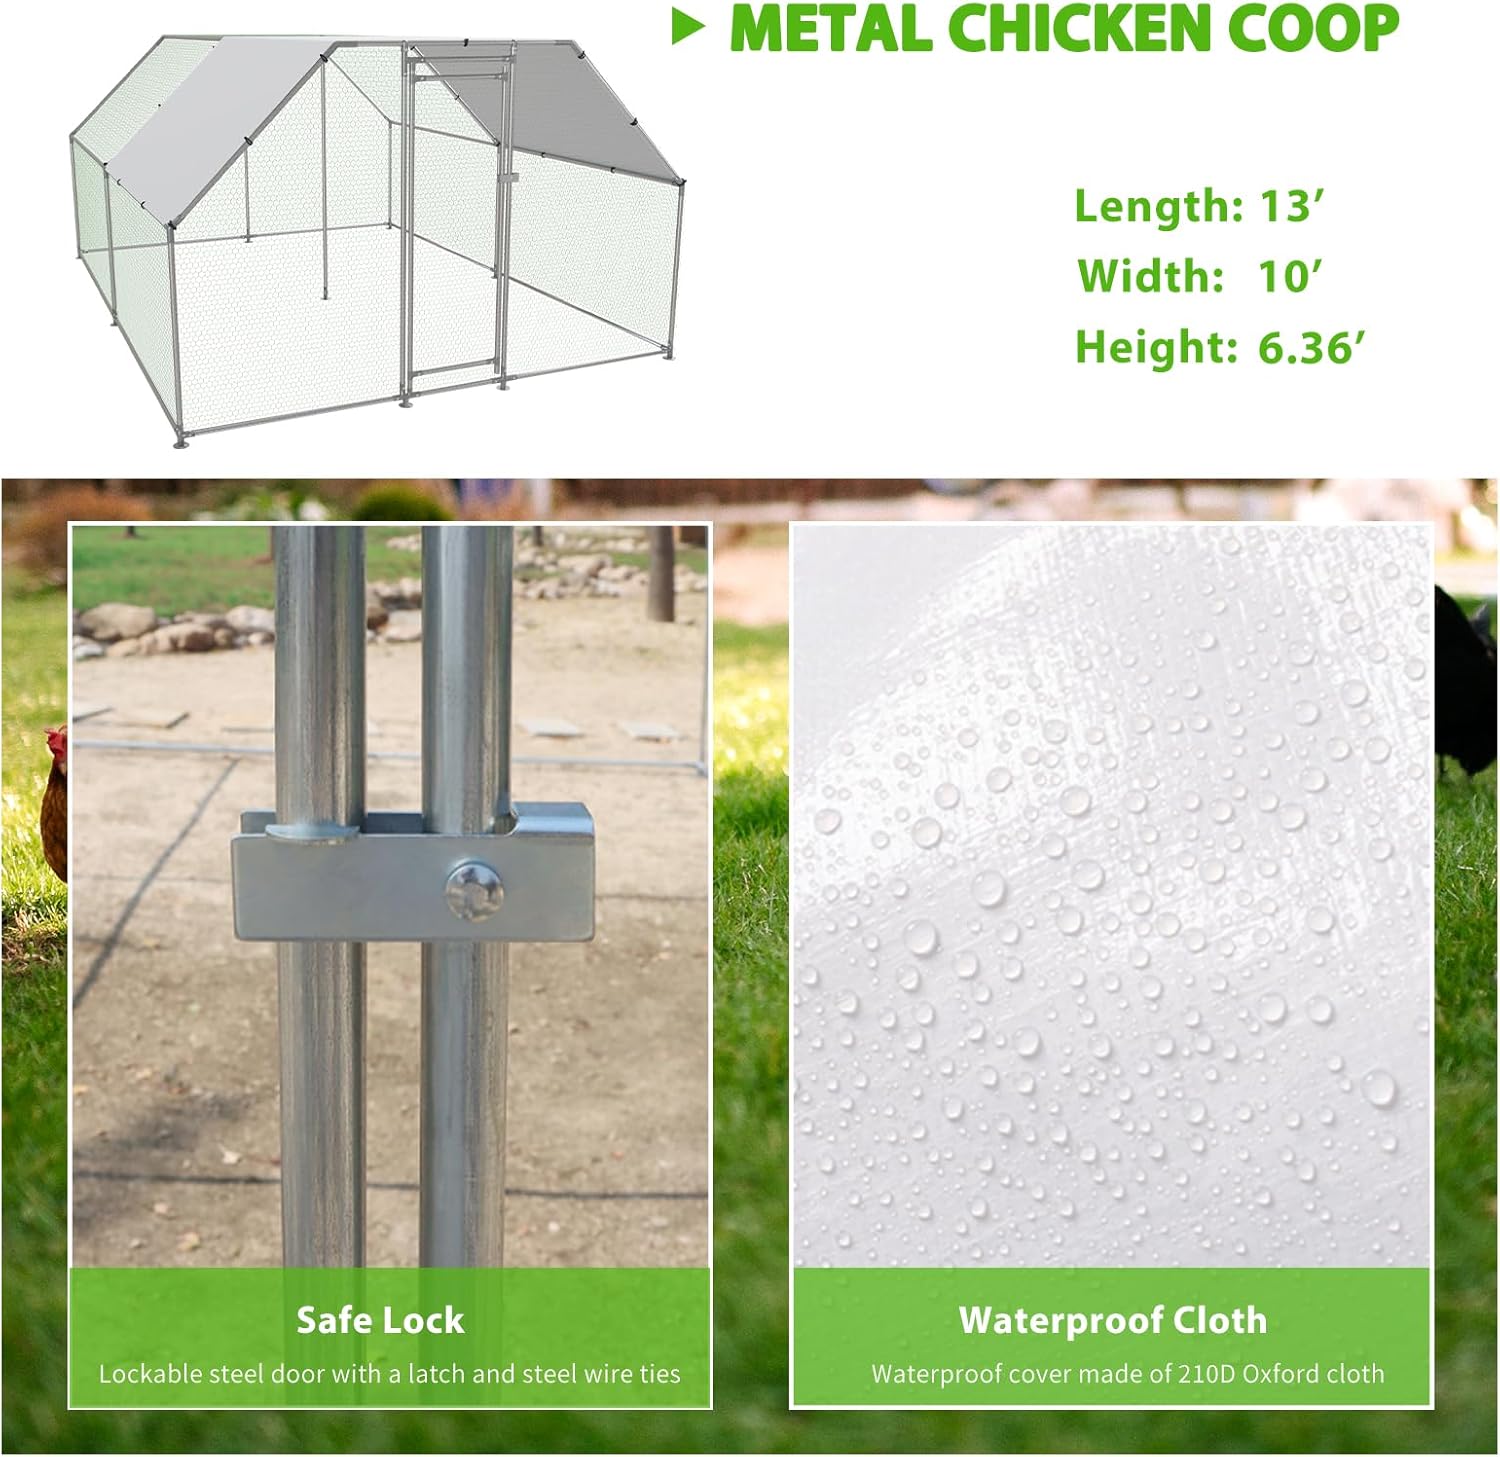
Image 4.2: Detail of the secure door latch and the waterproof cover material.
4.4. Cover Installation
- Position Cover: Drape the water-resistant and anti-UV cover over the designated roof section. The cover has a white side and a gray side; the white side can be positioned upwards to reflect sun.
- Secure Cover: Use the elastic buckles or bungee cords to firmly attach the cover to the roof frame. Ensure the cover is taut to prevent water pooling.

Image 4.3: The coop featuring its water and UV-resistant cover, designed for protection against various weather elements.
4.5. Ground Anchoring
- Insert Pins: Drive the provided ground anchoring pins through the designated loops or holes at the base of the frame into the ground.
- Verify Stability: Ensure the coop is stable and firmly anchored to prevent movement or tipping.
5. Operating Instructions
The NUGRIART Large Metal Chicken Coop is designed for straightforward use.
- Access Door: To access the enclosure, unlatch the door and open it. Always re-latch the door securely after entry or exit to prevent animals from escaping and to protect against predators.
- Cover Positioning: The cover provides shade and protection from rain and light snow. Adjust its position as needed to optimize sun exposure or shelter for your animals. Ensure it remains taut to prevent water accumulation.
- Animal Placement: This coop is suitable for various small to medium-sized animals. Ensure the number of animals housed is appropriate for the coop's dimensions to provide adequate space for movement and comfort.

Image 5.1: The coop is suitable for a variety of animals, including rabbits, chickens, geese, dogs, and ducks.
6. Maintenance
Regular maintenance will extend the life of your chicken coop and ensure a safe environment for your animals.
- Cleaning the Frame and Mesh: Periodically clean the steel frame and PVC coated mesh with mild soap and water. Rinse thoroughly and allow to air dry. Avoid harsh chemicals that could damage the coating.
- Cover Care: Clean the water-resistant cover regularly to remove dirt, leaves, and debris. Ensure the cover remains taut to prevent water pooling, which can stress the frame. If water collects, gently push it off.
- Check Connections: Routinely inspect all frame connections, zip ties, and elastic buckles. Tighten any loose bolts or replace worn zip ties/buckles.
- Ground Anchors: Verify that ground anchors remain firmly in place, especially after heavy rain or strong winds. Re-secure if necessary.
- Winter Care: In areas with heavy snowfall, it is recommended to regularly clear snow from the cover to prevent excessive weight accumulation, which can damage the frame. Consider temporary disassembly if extreme weather is anticipated.
7. Troubleshooting
Here are solutions to common issues you might encounter:
- Issue: Water pooling on the cover.
Solution: Ensure the cover is installed correctly and pulled taut across the roof frame. The roof pitch is designed for runoff, but improper tensioning can create depressions. Regularly check and clear any accumulated water. - Issue: Structure feels unstable or wobbly.
Solution: Verify that all frame connections are fully inserted and secured. Ensure ground anchoring pins are deeply driven into the soil. For additional stability, consider using heavier-duty ground stakes or securing the base to concrete blocks. - Issue: Concerns about predator protection.
Solution: While the PVC coated hexagonal wire mesh offers protection, for areas with persistent predators, consider reinforcing the lower sections of the coop with a stronger gauge hardware cloth or burying the mesh slightly into the ground to deter digging. Always ensure the door latch is fully secured. - Issue: Difficulty identifying parts during assembly.
Solution: Refer closely to the assembly diagrams in the included instruction manual. Compare the shapes and lengths of pipes to the illustrations. If labels are missing, careful visual matching is crucial.
8. Specifications
| Feature | Detail |
|---|---|
| Brand | NUGRIART |
| Model | 13’L×10’W×6.36’H |
| Product Dimensions (L x W x H) | 156 x 120 x 76 inches (13’L x 10’W x 6.36’H) |
| Material | Alloy Steel Frame, PVC Coated Hexagonal Wire Mesh |
| Cover Material | PE material (Water-Resident and Anti-UV) |
| Color | Metallic (Frame) |
| Specific Uses | Outdoor poultry and small animal enclosure |

Image 8.1: Dimensional diagram of the NUGRIART Large Metal Chicken Coop.
9. Warranty and Support
NUGRIART is committed to providing quality products. For specific warranty details, please refer to the documentation included with your purchase or contact NUGRIART customer service directly. If you have any questions, require assistance with assembly, or need to report missing/damaged parts, please reach out to the seller through your purchase platform. Our team is dedicated to assisting you.