
Cousopo K9
EasyThreed K9 3D Printer User Manual
Model: K9 | Brand: EasyThreed (by Cousopo)
1. Introduction
Welcome to the world of 3D printing with the EasyThreed K9 3D Printer! This compact and user-friendly FDM (Fused Deposition Modeling) printer is designed for beginners and children, making it an ideal tool for learning and creativity. With its one-key printing feature and quiet operation, the K9 offers a seamless printing experience for small projects and educational purposes.

Figure 1.1: The EasyThreed K9 3D printer in use by a child, highlighting its user-friendly design for young learners.
2. Product Overview
2.1 Key Features
- One-Key Printing: Simplifies the printing process, making it accessible for beginners.
- Compact and Portable: Lightweight (1kg) and small footprint (160x200x250mm) for easy transport and storage.
- Detachable Printing Platform: Facilitates easy removal of finished models.
- Ultra-Quiet Operation: Noise reduction technology ensures printing without disturbance.
- Safe and Reliable: Features a 12V safety low voltage adapter power interface.
- Print Size: 100x100x100mm build volume, suitable for small projects.
- Filament Compatibility: Optimized for PLA filament (1.75mm diameter).

Figure 2.1: Visual representation of the K9's key features, including its modular design and silent operation.

Figure 2.2: The K9 printer's low noise level, ensuring it won't disturb work or sleep.
2.2 Package Contents
Before beginning assembly, please verify that all components listed below are present in your package:

Figure 2.3: All components included in the K9 3D printer package.
- XYZ Axis Assembly (pre-assembled)
- Control Box and Print Head
- Printing Platform
- Power Adapter
- Filament Holder
- Screws and Screwdriver
- TF Card and Card Reader
- 10M PLA Sample Filament
3. Setup Guide
3.1 Assembly
- Unpack Components: Carefully remove all items from the packaging.
- Attach XYZ Axis Assembly: The main frame (XYZ Axis) is largely pre-assembled. Ensure it is securely placed on a stable surface.
- Connect Control Box and Print Head: Connect the control box and print head to the main assembly using the provided cables. Ensure all connections are firm.
- Install Printing Platform: Place the removable printing platform onto the printer's base. It is typically held in place by magnets or clips.
- Attach Filament Holder: Secure the filament holder to the designated slot on the side of the printer.
- Connect Power Adapter: Plug the power adapter into the printer's power interface and then into a wall outlet.
3.2 Filament Loading
The K9 printer uses 1.75mm PLA filament. Follow these steps to load filament:
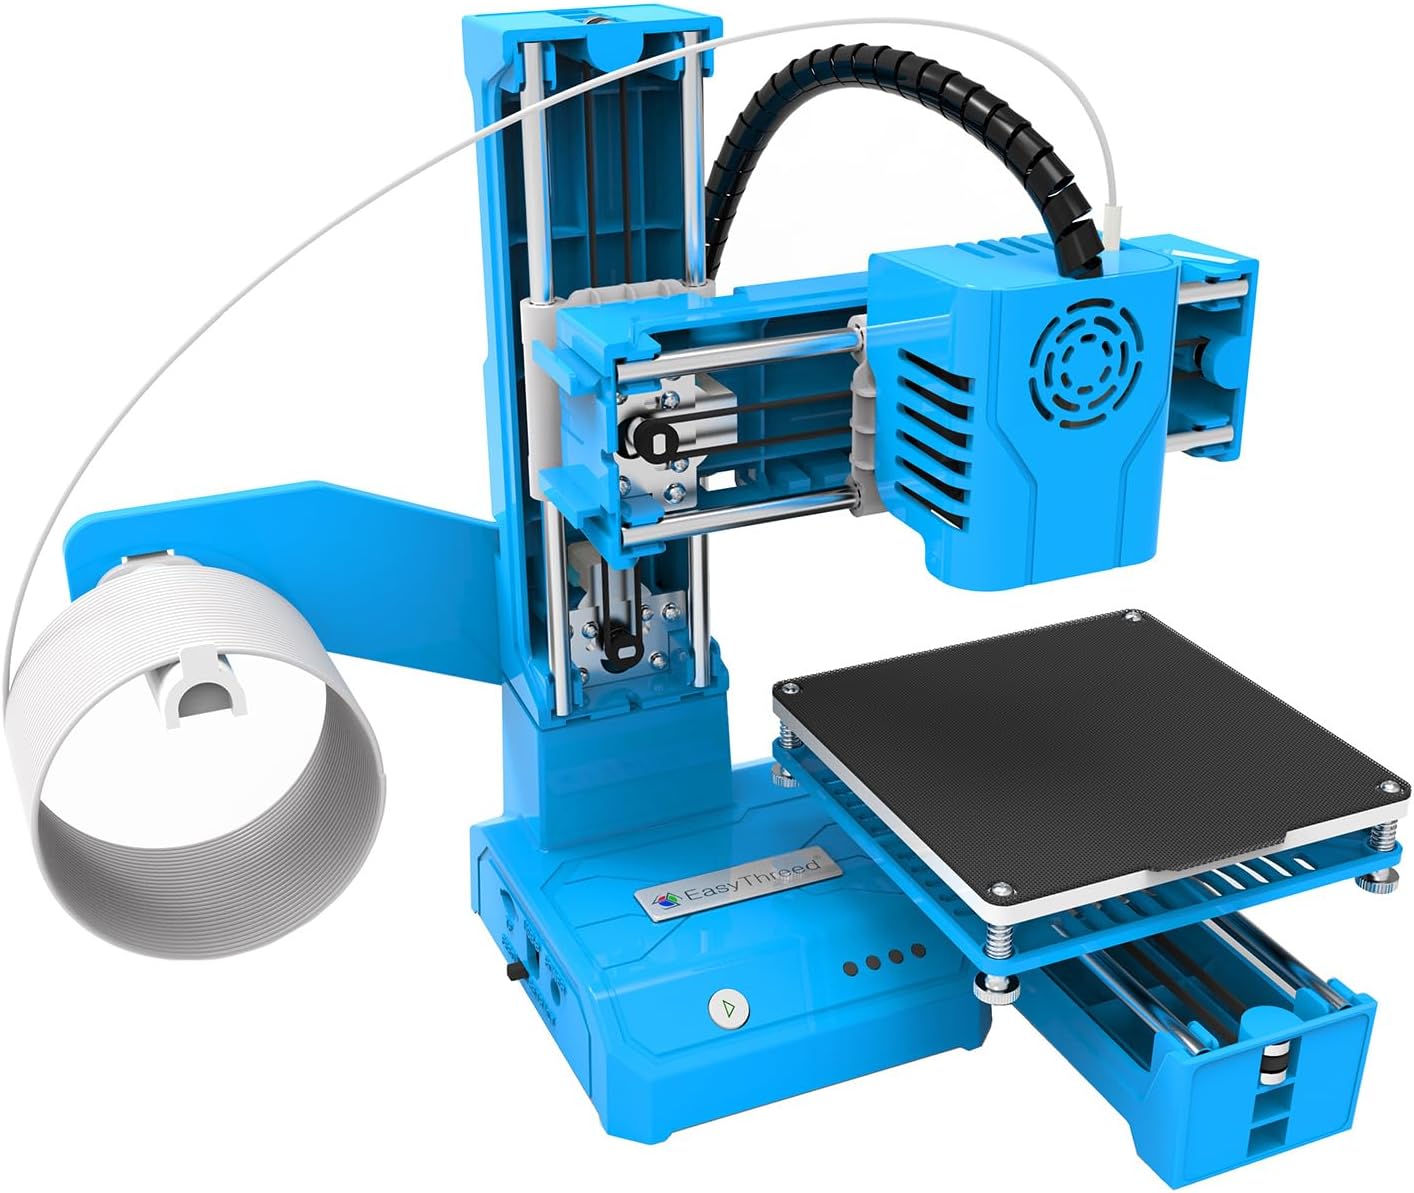
Figure 3.1: The K9 printer with filament loaded onto its holder, ready for printing.
- Place Filament Spool: Mount the PLA filament spool onto the filament holder.
- Preheat Nozzle: Turn on the printer. If available, use the printer's interface to preheat the nozzle to the recommended PLA temperature (typically 180-230℃).
- Insert Filament: Gently feed the end of the filament into the small hole on the extruder assembly until you feel resistance.
- Extrude Filament: Continue pushing until molten filament starts to come out of the nozzle. This indicates the filament is properly loaded.
3.3 Software Installation (Slicer)
The K9 printer is compatible with Easyware K9, CURA, and Simplify3D slicer software. The included TF card often contains Easyware K9. Slicer software converts 3D models (STL/OBJ) into G-code, which the printer understands.

Figure 3.2: Interfaces for Easyware K9 slicer and E3Dmagic modeling software, compatible with Windows and MAC systems.
- Insert TF Card: Insert the provided TF card into your computer's card reader.
- Install Slicer Software: Locate the installer for Easyware K9 (or your preferred slicer) on the TF card and follow the on-screen instructions to install it.
- Configure Printer Settings: Open the slicer software and add the EasyThreed K9 printer profile. Ensure the build volume (100x100x100mm), nozzle diameter (0.4mm), and filament diameter (1.75mm) are correctly set.
4. Operating Instructions
4.1 Preparing a Model for Printing
3D models are typically in STL or OBJ format. These need to be converted to G-code using slicer software.

Figure 4.1: Examples of 3D models that can be printed, emphasizing the variety available in STL and G-code formats.
- Import Model: Open your slicer software and import your desired 3D model (STL or OBJ file).
- Adjust Settings: Configure print settings such as layer thickness (0.1-0.4mm), infill density, print speed (10-40mm/s), and support structures if needed.
- Slice Model: Use the "Slice" or "Prepare" function in the software to convert the model into G-code.
- Save G-code: Save the generated G-code file to the TF card.
4.2 One-Key Printing
The K9 printer features a simplified one-key printing function for ease of use.
- Insert TF Card: Insert the TF card containing your G-code file into the printer's TF card slot.
- Power On: Ensure the printer is powered on.
- Start Print: Press the designated "One-Key Print" button on the printer. The printer will automatically begin heating up and then start the printing process.
- Monitor Print: Observe the first few layers to ensure proper adhesion to the print bed.
- Remove Print: Once printing is complete and the print bed has cooled, gently remove the finished model from the detachable platform.
5. Maintenance
Regular maintenance ensures optimal performance and longevity of your EasyThreed K9 3D Printer.
- Clean Print Platform: After each print, ensure the print platform is clean and free of any filament residue. Use a soft cloth and isopropyl alcohol if necessary.
- Clean Nozzle: Periodically check the nozzle for clogs. If a clog occurs, carefully heat the nozzle and use a thin needle or cleaning filament to clear it.
- Lubricate Moving Parts: Apply a small amount of lubricant (e.g., lithium grease) to the smooth rods and lead screws every few months to ensure smooth movement.
- Store Filament Properly: Store PLA filament in a cool, dry place, preferably in an airtight container with desiccant, to prevent moisture absorption.
- Firmware Updates: Check the EasyThreed official website for any available firmware updates to improve printer performance.
6. Troubleshooting
This section addresses common issues you might encounter with your 3D printer.
| Problem | Possible Cause | Solution |
|---|---|---|
| Filament Not Extruding | Clogged nozzle, tangled filament, incorrect temperature. | Clean the nozzle, untangle filament, verify correct extruder temperature (180-230℃). |
| Print Not Sticking to Bed | Bed not level, dirty print surface, incorrect bed temperature (if applicable), too large first layer gap. | Ensure print bed is clean, re-level the print bed, adjust first layer height in slicer. |
| Poor Print Quality (Layer Shifts, Stringing) | Loose belts, incorrect print speed, retraction settings. | Check and tighten belts, reduce print speed, adjust retraction settings in slicer. |
| Printer Not Responding | Power issue, TF card error, software crash. | Check power connection, reformat TF card (backup data first), restart printer and computer. |
7. Specifications
Detailed technical specifications for the EasyThreed K9 3D Printer.
| Model Name | K9 |
| Brand | Easythreed (Cousopo) |
| Print Technology | FDM (Fused Deposition Modeling) |
| Building Size | 100x100x100mm |
| Number of Nozzle | 1 |
| Nozzle Diameter | 0.4mm |
| Layer Thickness | 0.1-0.4mm |
| Printing Filament | PLA |
| Diameter of Filament | 1.75mm |
| Printing Accuracy | 0.1-0.2mm |
| Print Speed | 10-40mm/s |
| Slicer Software | Easyware K9, CURA, Simplify3D |
| Compatible Systems | Windows, Mac (minimum version 10.13) |
| Extruder Temperature | 180-230℃ |
| File Format (Input) | .Stl, .Obj |
| File Format (Output) | .Gcode |
| Power | 12V, 24W |
| Machine Size | 160x200x250mm (6.3"W x 7.87"D x 9.84"H) |
| Item Weight | 1 Kilogram (2.2 pounds) |
8. Warranty and Support
For professional after-sales guidance and support, please refer to the official EasyThreed resources. While specific warranty details are not provided in this manual, it is recommended to retain your proof of purchase for any warranty claims. For further assistance, including detailed instructions and video tutorials, please visit the manufacturer's support website or contact their customer service.
Note: Some images in the product listing refer to www.toy123d.com and www.easythreed.com for resources. Please check these sites for the most up-to-date support information.
Related documentsK9


Ask a question about this manual
Ask about setup, troubleshooting, compatibility, parts, safety, or missing instructions. Manuals+ will review the question and use this page’s manual context to help answer it.