1. Introduction
Welcome to the user manual for your Clouree CL105-2GEU-E Smart Home Security Alarm Kit. This comprehensive wireless security system is designed to provide reliable protection for your home or office. It features dual network connectivity (WiFi 2.4GHz and GSM/2G), allowing for flexible and robust communication. The system supports various sensors and offers multiple alert methods, including app notifications, phone calls, and SMS messages.
Key features include:
- Dual WiFi 2.4GHz and GSM/2G Network Support
- APP Push, SMS, and Phone Call Alarm Notifications
- Remote Control via Tuya/Smart Life APP
- Compatibility with Google Assistant and Amazon Alexa
- Support for up to 100 wireless detectors/RFID cards and 3 wired sensors
- Timed Arming and Disarming Functions
- 2.4-inch TFT Color Screen with Touch Keypad
- Two-Way Voice Intercom Functionality

Image: The Clouree Smart Home Security Alarm System control panel, highlighting its WiFi and GSM/2G connectivity and compatibility with smart home platforms.
2. Package Contents
Your 21-piece Clouree Smart Home Security Alarm Kit includes the following components:
- 1 x 2G + WiFi Alarm Host (Control Panel)
- 8 x Wireless Door/Window Sensors
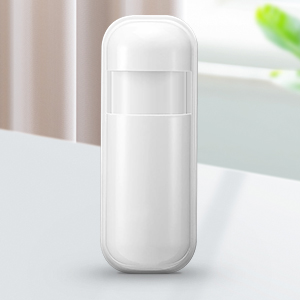
- 4 x Wireless PIR Motion Sensors
- 3 x Remote Controls
- 3 x RFID Cards
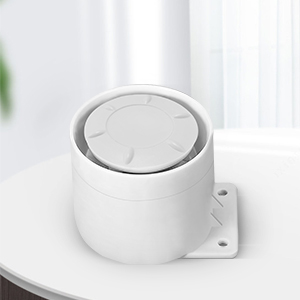
- 1 x Wired Siren
- 1 x Power Adapter
- 1 x User Manual

Alarm Host

Door Sensor
PIR Motion Sensor

Remote Control

RFID Card
Wired Siren
3. Setup
The Clouree alarm system is designed for easy DIY installation without professional assistance. Follow these steps to set up your system:
3.1 Initial Power-Up and Network Connection
- Connect Power: Plug the provided power adapter into the alarm host and a power outlet.
- Insert SIM Card (Optional): If you plan to use GSM/2G features for phone calls and SMS alerts, insert a compatible SIM card into the designated slot on the alarm host.
- WiFi Connection: On the alarm host's 2.4-inch TFT screen, navigate to the network settings. Select your 2.4GHz WiFi network and enter the password. The system does not support 5GHz WiFi.
- Download App: Download the "Tuya Smart" or "Smart Life" app from your mobile device's app store. Register an account or log in.
- Add Device: In the app, follow the instructions to add your alarm host. This typically involves scanning a QR code on the device or selecting it from a list of discoverable devices.
3.2 Pairing Sensors and Accessories
The system supports up to 99 wireless sensors/RFID cards and 3 wired sensors. Each accessory comes with screws or adhesive tape for easy installation.
- Enter Pairing Mode: On the alarm host, navigate to the 'Add Accessory' or 'Pairing' menu.
- Trigger Sensor: For wireless sensors (door/window, PIR), activate them according to their specific instructions (e.g., separate the door sensor magnets, trigger the PIR sensor by movement). The alarm host will detect and register the sensor.
- Name Sensors: In the app or on the alarm host, customize the name of each paired sensor for easy identification (e.g., "Front Door," "Living Room PIR").
- Install Sensors: Mount the door/window sensors on frames, ensuring the two parts are aligned and close together. Install PIR motion sensors in areas where intruders are likely to pass, typically at a height of 2-2.2 meters.
- Pair Remote Controls/RFID Cards: Follow the alarm host's instructions to pair remote controls and RFID cards, allowing for quick arming/disarming.

Image: The alarm control panel and the Smart Life app on a smartphone, demonstrating the ease of setup and remote management.
4. Operating Instructions
Operating your Clouree Smart Home Security Alarm Kit is intuitive, offering multiple methods for control and monitoring.
4.1 Arming and Disarming the System
You can arm or disarm your system using several methods:
- Control Panel: Use the touch keypad on the alarm host to enter your PIN code and select arm/disarm.
- Remote Control: Press the arm or disarm button on your remote control.
- RFID Card: Tap an authorized RFID card on the designated RFID reader area of the alarm host.
- Mobile App: Use the Tuya Smart or Smart Life app to remotely arm or disarm the system from anywhere.
- Timed Arm/Disarm: Set schedules for automatic arming and disarming based on your daily routine.

Image: Using an RFID card to interact with the alarm control panel.
4.2 Alarm Notifications
Upon an alarm trigger, the system will notify you through:
- Siren: The wired siren will activate, emitting a loud sound.
- App Push Notifications: Instant alerts will be sent to your smartphone via the Tuya Smart/Smart Life app.
- SMS Alerts: If a SIM card is installed, SMS messages will be sent to pre-configured numbers.
- Phone Calls: The system can automatically dial pre-configured phone numbers to alert you.

Image: The two-way voice intercom feature allows communication through the alarm panel.
4.3 Smart Home Integration
The system supports integration with popular smart home platforms:
- Amazon Alexa & Google Assistant: Control your alarm system using voice commands (e.g., "Alexa, arm my home").

Image: Voice control integration with Amazon Alexa for convenient arming and disarming.
4.4 Additional Functions
- SOS Function: Press the SOS button on the control panel or remote control to trigger an immediate emergency alarm.
- Doorbell Function: The system can function as a doorbell when a compatible button is pressed, emitting a "Dingdong" sound.

Image: The alarm system can also function as a doorbell, providing an audible alert.
5. Maintenance
Regular maintenance ensures the optimal performance and longevity of your security system.
5.1 Battery Replacement
Sensors are battery-powered and will require replacement over time. The alarm host will typically notify you when a sensor's battery is low.
- PIR Motion Sensors: These typically use 2x AAA alkaline batteries. Refer to the sensor's compartment for specific battery type and replacement instructions.
- Door/Window Sensors: These typically use CR2025 coin cell batteries. Refer to the sensor's compartment for specific battery type and replacement instructions.
- Remote Controls: These typically use CR2025 coin cell batteries.
When replacing batteries, ensure correct polarity and dispose of old batteries responsibly.
5.2 Cleaning
Wipe the alarm host and sensors with a soft, dry cloth. Avoid using abrasive cleaners or solvents, which can damage the devices.
6. Troubleshooting
If you encounter issues with your alarm system, refer to the following common troubleshooting steps:
6.1 No Network Connection (WiFi/GSM)
- WiFi: Ensure your router is broadcasting a 2.4GHz signal. Check WiFi password accuracy. Move the alarm host closer to the router if signal is weak.
- GSM/2G: Verify the SIM card is correctly inserted and has an active plan with sufficient credit. Check for network coverage in your area.
6.2 Sensor Not Triggering Alarm
- Battery: Check and replace the sensor's battery if low.
- Pairing: Ensure the sensor is correctly paired with the alarm host. Re-pair if necessary.
- Placement: For door sensors, ensure the two parts are within the recommended distance (usually less than 1 cm). For PIR sensors, ensure no obstructions block the detection area.
- Zone Settings: Verify the sensor's zone settings in the alarm host or app are configured correctly (e.g., armed in the current mode).

Image: A PIR motion sensor detecting movement, crucial for effective security.
6.3 False Alarms
- PIR Sensors: Avoid placing PIR sensors near heat sources, direct sunlight, or areas with drafts that could cause false triggers. Ensure pets are not triggering the sensor if it's not pet-immune.
- Door/Window Sensors: Ensure sensors are securely mounted and not affected by vibrations or loose frames.
- Sensitivity: Adjust sensor sensitivity settings if available.
7. Specifications
| Feature | Specification |
|---|---|
| Manufacturer | Clouree |
| Model Number | CL105-2GEU-E |
| Product Dimensions (L x W x H) | 20 x 15 x 8 cm |
| Weight | 1.09 kilograms |
| Power Source | Corded Electric |
| Voltage | 230 Volts |
| Connectivity Technology | Wi-Fi (2.4GHz), GSM/2G |
| Installation Type | DIY Wireless |
| Control Method | Application (Tuya/Smart Life), Keypad, Remote Control, RFID |
| Compatible Devices | Smartphone, Tablet |
| Included Components | Alarm Host, Door Sensors, Wireless PIR Motion Sensors, Remote Controls, RFID Cards, Wired Siren, Power Adapter, User Manual |
| Host Battery Type | 1 Lithium-polymer (requires batteries) |
| Color | White |
8. Warranty and Support
For warranty information, please refer to the documentation provided with your purchase or contact the retailer. If you require technical assistance or have questions not covered in this manual, please contact Clouree customer support through the contact information provided on their official website or through your purchase platform.