1. Product Overview
The IDEALHOUSE Queen Platform Bed Frame (Model BQ01) combines a sturdy metal frame with a vintage-style wooden headboard and tailboard. Designed for durability and ease of use, this bed frame eliminates the need for a box spring and offers practical under-bed storage space.
- Vintage & Exquisite Style: Features a blend of metal and wood for a stylish aesthetic.
- Extra Storage Space: Provides 12.6 inches of clearance for under-bed storage.
- Safe Rounded Corner Design: Corners are rounded to prevent accidental bumps.
- Strong & Durable: Constructed with heavy steel and high-quality wood panels, supporting up to 1,000 pounds.
- Easy to Assemble: Includes all necessary parts, tools, and instructions for straightforward assembly.

Image: The IDEALHOUSE Queen Platform Bed Frame, Model BQ01, shown assembled in a bedroom with a mattress and bedding.
2. Safety Information
- Ensure all bolts and fasteners are securely tightened before use and periodically check for looseness.
- Do not exceed the maximum weight capacity of 1,000 pounds.
- The bed frame features rounded corners to minimize injury risk; however, exercise caution during movement around the frame.
- Avoid jumping on the bed frame to prevent structural damage or injury.
- Keep small children away from assembly areas to prevent choking hazards from small parts.

Image: A detailed view of the rounded corner design on the bed frame's headboard, highlighting a safety feature.
3. Package Contents
Verify that all components are present before beginning assembly. The package should contain:
- Headboard (1)
- Footboard (1)
- Side Rails (2)
- Support Legs (various)
- Metal Slats (various)
- Installation Manual (1)
- Hardware Pack (bolts, nuts, washers, Allen wrench)
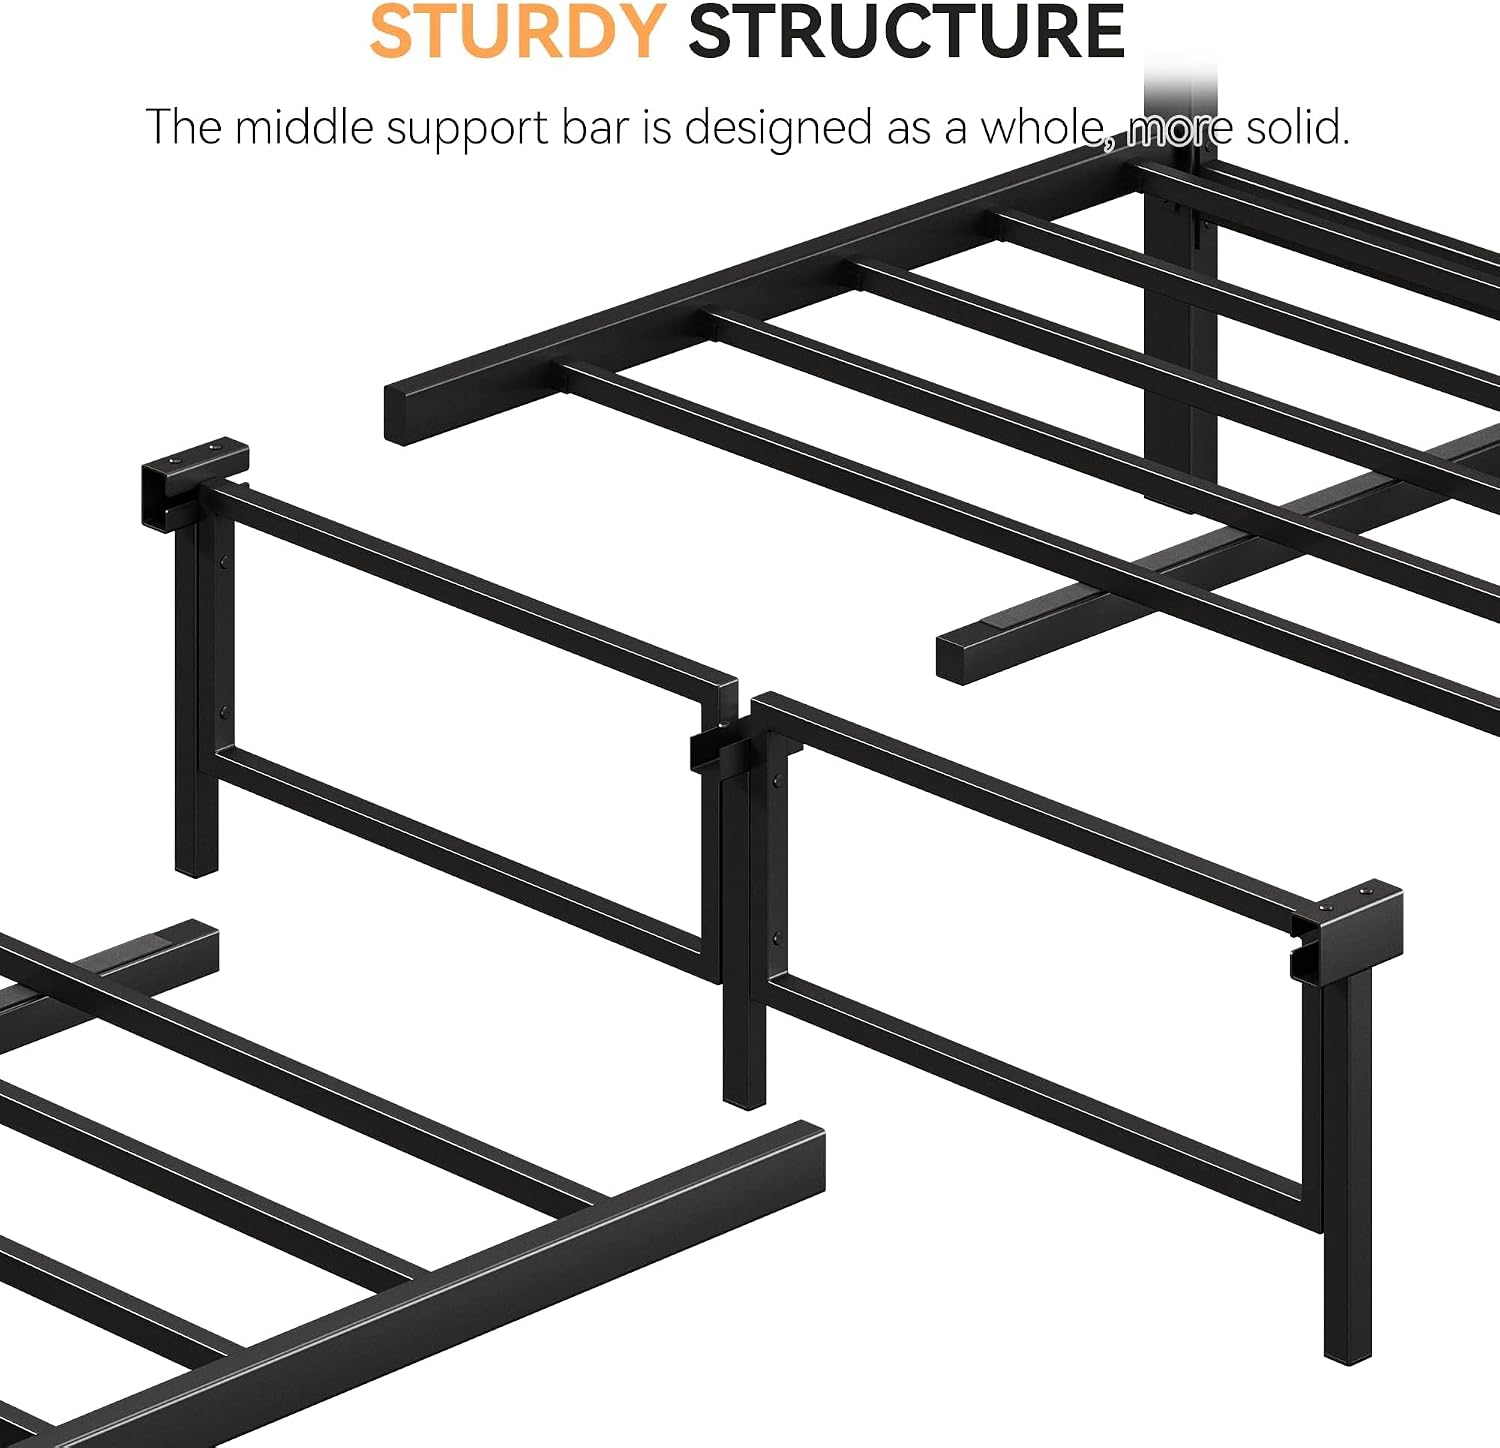
Image: An exploded diagram illustrating the sturdy structure and main components of the bed frame, including the middle support bar and slats.
4. Setup and Assembly Instructions
Assembly of the IDEALHOUSE Queen Platform Bed Frame is designed to be straightforward. All necessary tools and hardware are included. Please follow the steps below carefully.
- Unpack Components: Carefully remove all parts from the packaging and lay them out on a clean, soft surface (e.g., a rug or blanket) to prevent scratches. Verify all parts against the package contents list.
- Attach Headboard and Footboard: Connect the side rails to the headboard and footboard using the provided bolts and Allen wrench. Do not fully tighten bolts until all major components are connected.
- Install Center Support: Assemble and attach the central support bar and legs as indicated in the detailed manual. This provides crucial stability.
- Place Slats: Insert the metal slats into their designated slots on the side rails. Ensure the mute bar design elements (rubber plugs) are properly seated to prevent noise.
- Final Tightening: Once all components are in place and aligned, fully tighten all bolts and fasteners. Do not overtighten.

Image: A diagram showing the overall dimensions of the assembled Queen bed frame, including height, length, and width, and the 1000 lbs weight capacity.
5. Operating Instructions (Usage)
- Mattress Placement: Place your Queen-sized mattress directly onto the metal slats. A box spring is not required for this platform bed frame.
- Under-Bed Storage: Utilize the 12.6 inches of clearance beneath the frame for storage containers, luggage, or other items to maximize bedroom space.
- Weight Capacity: The bed frame is designed to support a maximum weight of 1,000 pounds, including the mattress and occupants.
- Anti-Slip Design: The frame incorporates an anti-slip design to help keep the mattress in place and prevent shifting.

Image: The bed frame illustrating the 12.6-inch under-bed clearance, suitable for storing boxes or luggage.

Image: A detailed view of the anti-slip design integrated into the bed frame to prevent mattress movement.
6. Maintenance
- Cleaning: Wipe the metal and wood surfaces with a soft, damp cloth. Avoid harsh chemicals or abrasive cleaners that could damage the finish.
- Fastener Check: Periodically (e.g., every 3-6 months) inspect all bolts and screws to ensure they remain tight. Re-tighten as necessary to maintain stability and prevent squeaking.
- Slat Inspection: Check the metal slats and their rubber plugs (mute bar design) to ensure they are securely in place and functioning correctly to prevent noise and support the mattress.

Image: A detailed view of the mute bar design, showing rubber strips on the metal slats intended to minimize noise.
7. Troubleshooting
| Problem | Possible Cause | Solution |
|---|---|---|
| Slats or support beams fall out/come loose. | Slats not fully seated; rubber plugs (mute bar design) dislodged or worn; fasteners loose. | Ensure each slat is fully inserted into its designated slot. Check that the rubber plugs are securely in place. Re-tighten all frame fasteners. If plugs are worn, contact customer support for replacements. |
| Bed frame is noisy/squeaks. | Loose fasteners; slats rubbing against frame; mute bar design elements not functioning. | Tighten all bolts and screws. Verify that all slats are properly seated and that the mute bar rubber strips are intact and in position. |
| Mattress slides or shifts. | Anti-slip features not effective; mattress size mismatch. | Ensure the mattress is correctly positioned within the frame's anti-slip edges. Verify that the mattress is a standard Queen size. |
| Frame feels unstable or wobbly. | Loose fasteners; improper assembly of support legs or center bar. | Re-check all connections and tighten fasteners. Review assembly instructions to ensure all support components are correctly installed. |
8. Specifications
| Feature | Detail |
|---|---|
| Model Number | BQ01 |
| Size | Queen |
| Material | Metal frame with Wooden headboard and tailboard |
| Assembled Dimensions (L x W x H) | Approximately 82.6" x 63.4" x 41.8" (Headboard Height) |
| Under-Bed Clearance | 12.6 inches |
| Maximum Weight Capacity | 1,000 pounds |
| Color | Brown (wood finish) / Black (metal frame) |
| Assembly Required | Yes |
| Box Spring Needed | No |
9. Warranty and Support
For warranty information, please refer to the documentation included with your product or contact IDEALHOUSE customer support directly. Contact details are typically provided in the assembly manual or on the manufacturer's official website.