1. Introduction
This manual provides detailed instructions for the installation, operation, and maintenance of your Vaconoff T7W Wifi Room Thermostat. This intelligent thermostat is designed for controlling water and gas boiler systems, offering convenient temperature management through its digital receiver, Tuya app compatibility, and voice control via Alexa and Google Assistant.
Package Contents
Before proceeding with installation, please verify that all components are present in the package.

Image: Package Contents. This image displays the items included in the product package: 1 Thermostat, 1 Receiver, 1 Type-C USB Cable, 1 Bracket, 1 Set of Screws, and 1 Instruction Manual.
- 1 x Thermostat
- 1 x Receiver
- 1 x USB Type-C Cable
- 1 x Bracket
- 1 x Set of Screws
- 1 x Instruction Manual
2. Setup and Installation
2.1 Power Supply for Thermostat
The thermostat can be powered in two ways: via USB or using 3 AA batteries.

Image: Thermostat Power Supply. This image illustrates the two power options for the thermostat: connecting a Type-C USB cable to the bottom port or inserting 3 AA batteries into the back compartment. Batteries are not included. To access the battery compartment, use a screwdriver to pry off the two clips on the back cover.
- USB Power Supply: Connect the provided Type-C USB cable to the thermostat and a suitable USB power adapter (not included).
- Battery Power Supply: Insert 3 AA batteries (not included) into the battery compartment located on the back of the thermostat. To open the back cover, use a screwdriver to gently pry off the two clips.
2.2 Receiver Wiring
The receiver connects to your boiler system. Ensure the main power supply is switched off before performing any wiring. This receiver is suitable for gas boilers with passive contacts.

Image: Receiver Wiring. This diagram shows the wiring terminals on the RF receiver. It includes connections for power supply (L, N) and relay for boiler (COM, NO, NC). A note indicates that if using USB power, a mounting box is required. To access the wiring terminals, unscrew the bottom screw to open the outer cover.
- Caution: Switch off the main power supply to your boiler before wiring.
- Unscrew the bottom screw of the receiver to open its outer cover.
- Connect the power supply (AC 230V, 50/60Hz) to the L and N terminals.
- Connect the boiler control wires to the COM and NO (Normally Open) terminals for typical gas boiler applications. Refer to your boiler's manual for specific wiring requirements.
- If using USB power for the receiver, a mounting box is required for proper installation.
- After wiring, secure the cover and restore power.
The radio frequency control distance between the thermostat and receiver can reach up to 30 meters indoors, and up to 200 meters in an open distance.

Image: Maximum Distance. This image shows the thermostat and receiver in a kitchen setting, with an arrow indicating a maximum wireless control distance of 200 meters in an open environment.
2.3 Thermostat Installation
The thermostat can be placed on a table using the provided bracket or mounted on a wall.

Image: Installation of Thermostat. This image displays two installation methods: placing the thermostat on a table using its stand, or mounting it on a wall. It also shows how to secure the thermostat to the base with screws and indicates a mounting hole distance of 6cm for wall installation.
- Tabletop Placement: Attach the thermostat to the provided bracket using the screws. Place the assembly on a flat surface.
- Wall Mounting: Secure the bracket to the wall using the provided screws. The mounting hole distance is 6cm. Then, attach the thermostat to the mounted bracket.
3. Operating Instructions
3.1 App Control (Tuya / Smart Life)
Control your thermostat remotely using the Tuya or Smart Life app on your smartphone.

Image: App Control. This image displays a smartphone running the Tuya app, showing the thermostat's current temperature, set temperature, and heating status. It also highlights options for Auto and Manual modes, Child Lock, Advanced Settings, and Statistics. The Google Play and App Store logos are visible, indicating app availability.
- Download the "Tuya Smart" or "Smart Life" app from Google Play Store or Apple App Store.
- Register or log in to your account.
- Add the thermostat device by following the in-app instructions. Ensure your phone and thermostat are connected to the same 2.4GHz Wi-Fi network during pairing.
- Once connected, you can control the thermostat, set temperatures, switch between Auto and Manual modes, enable Child Lock, and access advanced settings from anywhere.
- Share device control with family members through the app.
3.2 7-Day Heating Program (Auto Mode)
The thermostat supports programmable heating schedules to optimize energy consumption.
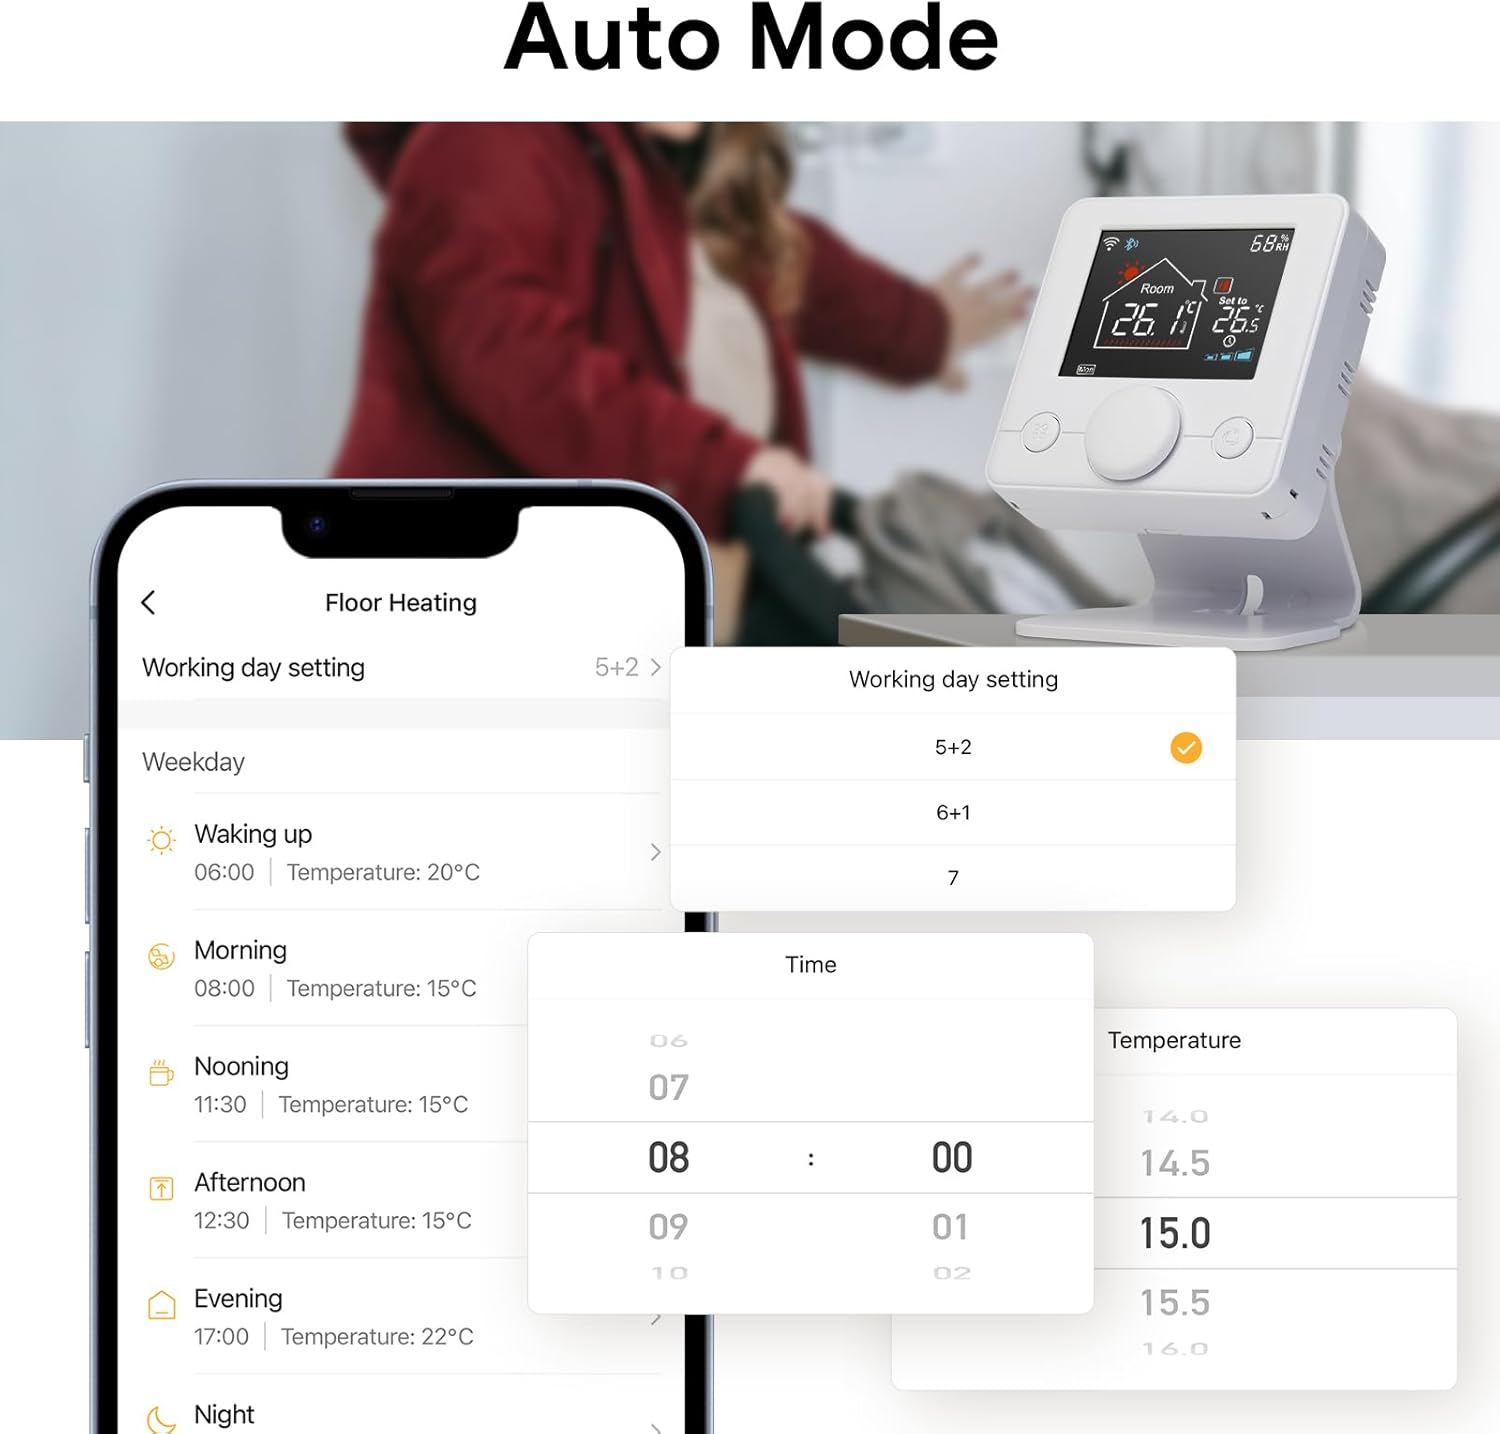
Image: Auto Mode. This image shows the app interface for setting a working day schedule, with options for 5+2, 6+1, and 7-day programming. It displays a detailed schedule for a weekday, including waking up, morning, nooning, afternoon, evening, and night periods with corresponding times and temperatures.
- Access the programming settings within the Tuya/Smart Life app.
- Choose from three programmable modes: 5+2 (weekdays + weekend), 6+1 (Monday-Saturday + Sunday), or 7 (individual days).
- Set specific heating times and temperatures for different periods of the day (e.g., waking up, morning, nooning, afternoon, evening, night) to create an energy-efficient schedule.
3.3 Voice Control
Integrate your thermostat with Amazon Alexa or Google Assistant for convenient voice commands.

Image: Voice Control. This image depicts a user interacting with the thermostat via voice command, specifically "Alexa, make the heater warmer here." It shows the thermostat display and logos for Amazon Alexa and Google Assistant, indicating compatibility.
- Ensure your thermostat is successfully connected to the Tuya/Smart Life app.
- Open the Amazon Alexa or Google Home app.
- Enable the "Tuya Smart" or "Smart Life" skill/service.
- Link your Tuya/Smart Life account with Alexa/Google Assistant.
- Discover devices. Your thermostat should now be controllable via voice commands.
- Example commands: "Alexa, set the thermostat to 22 degrees," "Hey Google, turn on the living room heater."
4. Maintenance
- Cleaning: Wipe the thermostat and receiver with a soft, dry cloth. Do not use abrasive cleaners or solvents.
- Battery Replacement: If using battery power, replace the 3 AA batteries when the low battery indicator appears on the thermostat display. Ensure correct polarity.
- Firmware Updates: Periodically check the Tuya/Smart Life app for any available firmware updates for your thermostat to ensure optimal performance and new features.
5. Troubleshooting
| Problem | Possible Cause | Solution |
|---|---|---|
| Thermostat not powering on. | No power from USB or dead batteries. | Check USB connection/power adapter. Replace AA batteries. |
| Receiver not responding to thermostat. | Out of range, interference, or not paired. | Move thermostat closer to receiver. Re-pair thermostat and receiver (refer to instruction manual for pairing steps). Ensure no strong interference sources nearby. |
| Thermostat not connecting to Wi-Fi/App. | Incorrect Wi-Fi password, 5GHz network, or poor signal. | Ensure correct 2.4GHz Wi-Fi network and password. Move thermostat closer to router. Restart router and thermostat. |
| Boiler not heating/cooling. | Incorrect wiring, boiler issue, or thermostat setting. | Verify receiver wiring. Check boiler status. Ensure thermostat is in heating mode and set temperature is above current room temperature. |
| Voice control not working. | Skill not enabled, account not linked, or incorrect commands. | Ensure "Tuya Smart" or "Smart Life" skill is enabled and accounts are linked in Alexa/Google Home app. Use correct voice commands. |
6. Specifications
- Model: T7W
- Control Type: Wifi Room Thermostat
- Compatibility: Water and Gas Boilers
- Voltage: AC100-240V, 50/60HZ (Receiver)
- Current: 3A (Receiver)
- Power Source (Thermostat): USB Type-C or 3 x AA Batteries
- Connectivity: Wi-Fi (2.4GHz), RF (Radio Frequency)
- RF Control Distance: Up to 30 meters (indoor), Up to 200 meters (open distance)
- App Compatibility: Tuya Smart, Smart Life
- Voice Assistant Compatibility: Amazon Alexa, Google Assistant
- Programmable Modes: 5+2, 6+1, 7 days per week
- Special Features: Display temperature calibration, shut-off memory function, frost protection, child lock.
- Product Dimensions: 8.6 x 8.6 x 4 cm (Thermostat)
- Item Weight: 300 g
- Material: Plastic
- Color: White
7. Warranty and Support
Vaconoff products are designed for reliability and performance. This product comes with a standard manufacturer's warranty. For specific warranty details, please refer to the warranty card included in your package or contact Vaconoff customer support.
For technical assistance, troubleshooting, or further inquiries, please visit the official Vaconoff website or contact their customer service department.