1. Introduction
This manual provides detailed instructions for the installation, operation, and maintenance of your Jingelsye Car Radio Stereo. Please read this manual thoroughly before use to ensure proper functionality and to prevent damage.

Figure 1.1: Compatibility and appearance of the car radio stereo in a Nissan Altima dashboard. Ensure your vehicle's dashboard matches the 'Fit' examples.
2. Product Features
- Operating System: Android 12 with 4 Core 2GB RAM + 32GB ROM for responsive performance.
- Connectivity: 5G WiFi and GPS navigation capabilities.
- Smartphone Integration: Wireless Carplay and Android Auto via Bluetooth connection, supporting iOS/Android phone functions like music, maps, messages, and news on a 9-inch HD screen.
- Voice Assistant: Supports Siri or Google voice assistant for hands-free calls.
- Navigation: Online and offline navigation support with real-time updates via 5G WiFi.
- Rear View Camera: AHD 1080P backup camera input for clear rear view images (1280 x 800 pixels).
- Steering Wheel Control (SWC): Supports original car steering wheel controls after correct wiring and learning.
- Audio: Bluetooth 5.0 for hands-free calls and music streaming, built-in EQ equalizer, RDS, and FM receiver.
- Display: 9-inch 1280*800 HD touchscreen for clear and vibrant visuals.
3. What's in the Box
The product package includes the following components:
- 1 x Main Head Unit
- 1 x External Microphone
- 1 x Rear Camera Input Cable
- 1 x GPS Antenna
- 2 x USB Cables
- 1 x RCA Cable Set
- 1 x CANBUS Decoder
- 1 x Crowbar (for installation)
- 1 x Power Cable
- 1 x AC Cable

Figure 3.1: All components included in the product package.
4. Setup and Installation
Before beginning installation, ensure the vehicle's power is off. Refer to your vehicle's service manual for specific dashboard removal instructions. The following steps outline the general wiring process.
4.1 Wiring Connections
- Connect the 4G Antenna (if applicable for your model) to the designated port on the head unit.
- Connect the GPS Antenna to its dedicated port. Position the antenna in a location with a clear view of the sky for optimal signal reception.
- Connect the Rear Camera Signal Wire and Camera Extension Cables. Ensure the camera is properly mounted and connected to the vehicle's reverse light power for automatic activation.
- Connect the Power Cable harness to the head unit and the vehicle's wiring harness.
- Connect the CANBUS decoder to the power cable harness and the vehicle's CANBUS system. This enables steering wheel controls and other vehicle-specific functions.
- Connect the Radio Antenna.
- Connect the 4-Pin and 6-Pin USB Cables to the head unit. Route these to a convenient location for external USB devices.
- Connect the RCA Cable set for audio output, auxiliary input, and video output as needed.
Video 4.1: Detailed wiring instructions for the Jingelsye Car Radio Stereo. This video demonstrates how to connect the various cables and components to the head unit.
5. Operating Instructions
This section covers the primary functions and operations of your car radio stereo.
5.1 Carplay and Android Auto
The unit supports wireless Carplay and Android Auto. Connect your smartphone via Bluetooth to access compatible apps and features on the head unit's display.

Figure 5.1: Carplay and Android Auto interfaces on the head unit.
5.2 GPS Navigation
Utilize the built-in GPS for navigation. Connect to WiFi for real-time updates and to download additional navigation applications.
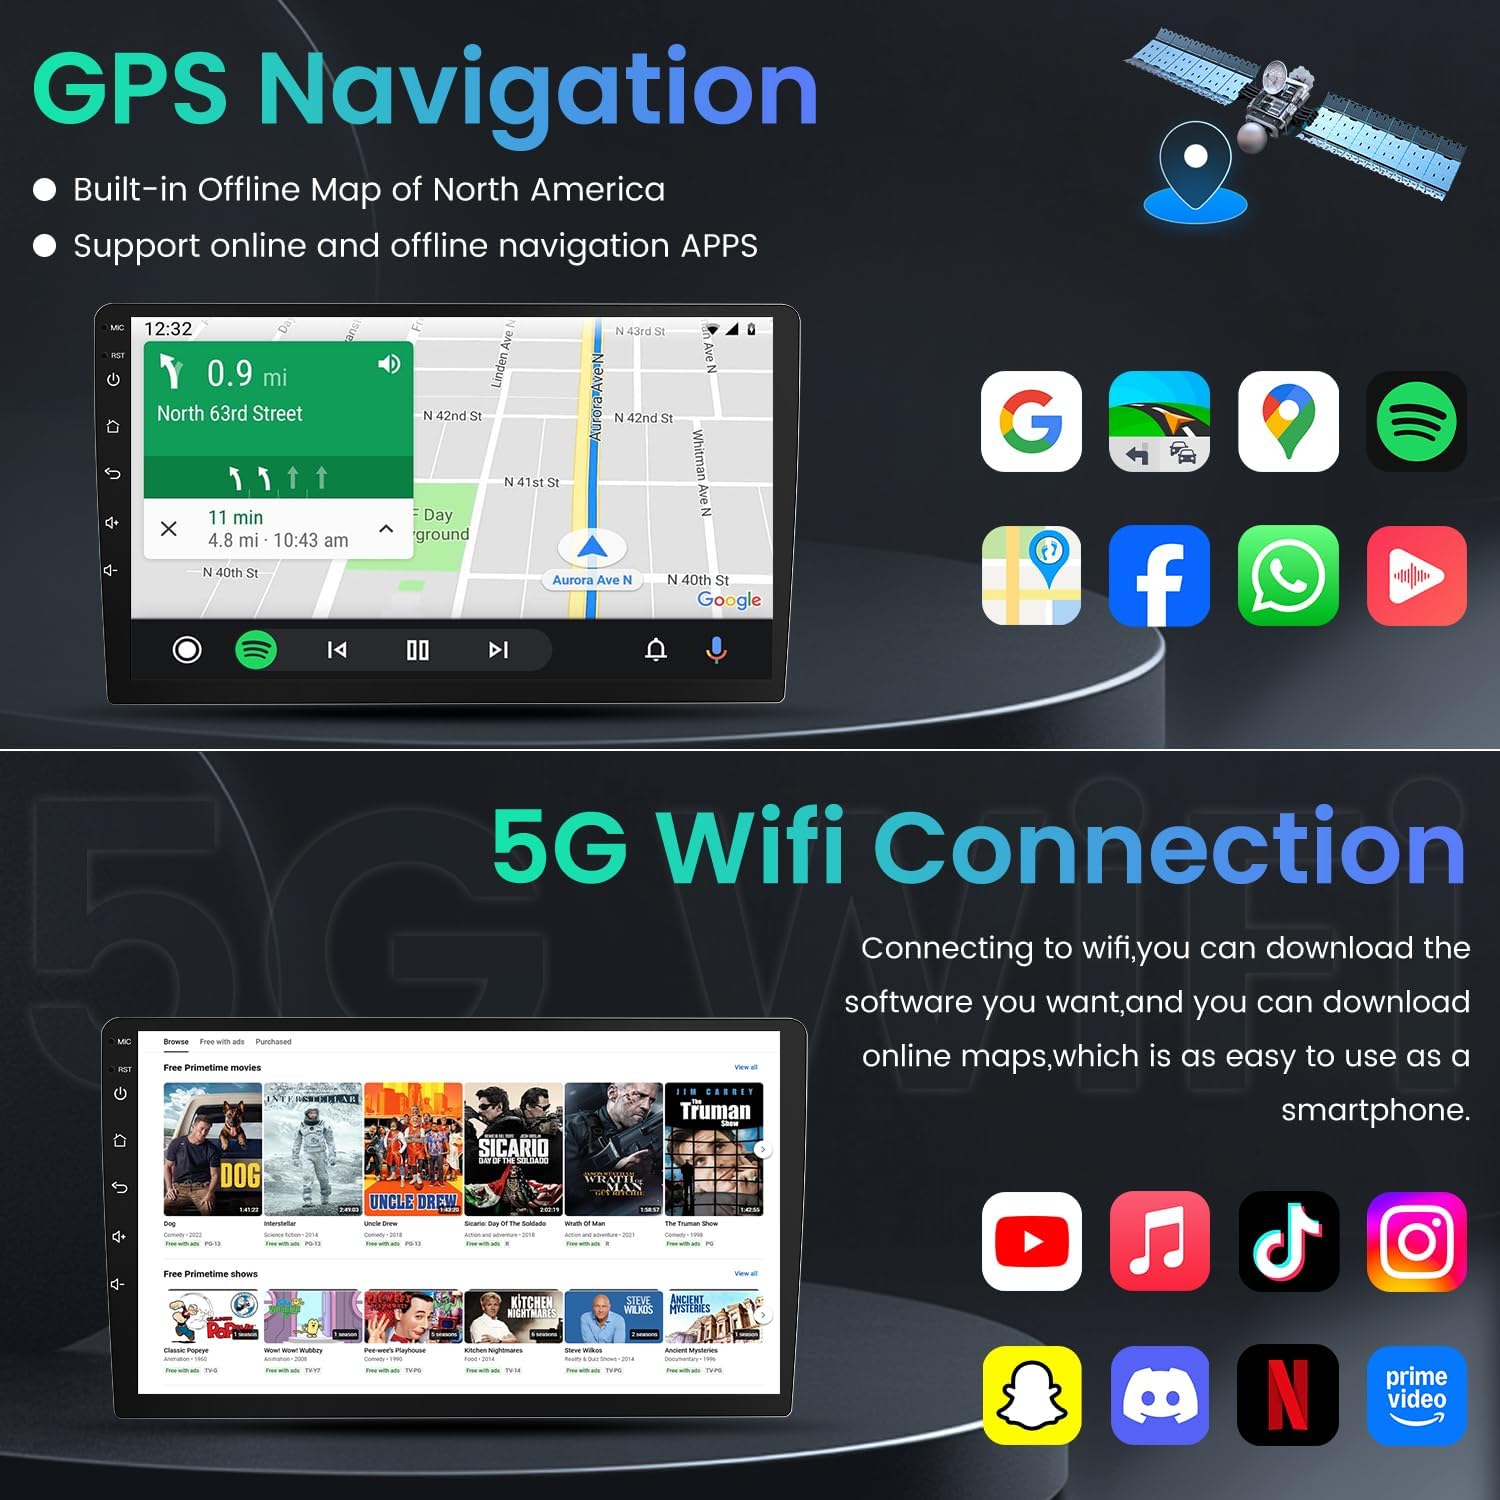
Figure 5.2: GPS Navigation and available applications.
5.3 5G WiFi Connection
Connect the unit to a WiFi network or mobile hotspot to download applications and access online services.
5.4 Bluetooth 5.0 and FM Audio
Pair your phone via Bluetooth 5.0 for hands-free calling and audio streaming. The FM receiver provides access to radio stations.

Figure 5.3: Bluetooth 5.0 and FM Radio interfaces.
5.5 Steering Wheel Control (SWC)
After proper wiring and configuration, use your vehicle's steering wheel buttons to control the car radio stereo.

Figure 5.4: Bluetooth call interface and steering wheel control functionality.
5.6 DSP Sound Settings
Adjust audio settings using the Digital Sound Processor (DSP) to customize the sound output, including equalizer, surround sound, and bass enhancement.

Figure 5.5: DSP Sound Settings interface.
5.7 UI Theme Selection
The unit offers various user interface themes. Navigate to the settings menu to select your preferred theme.
Video 5.6: Demonstration of various UI features including DSP sound settings, Carplay, GPS navigation, WiFi connection, FM radio, and UI theme selection.
5.8 Backup Camera
When the vehicle is shifted into reverse, the 1080P AHD backup camera automatically displays the rear view image on the screen.

Figure 5.7: 1080P Rear Camera display with parking guidelines.
6. Specifications
| Feature | Specification |
|---|---|
| Screen Size | 10 Inches |
| Resolution | 1280 x 800 |
| Operating System | Android 12 |
| Processor | 4 Core |
| RAM | 2GB |
| ROM | 32GB |
| Connectivity | Bluetooth 5.0, 5G Wi-Fi, USB, Wireless Carplay & Android Auto |
| Map Type | North America (pre-installed) |
| Audio Output Mode | Stereo |
| Mounting Type | Dashboard Mount |
| Item Weight | 4 pounds |
| Package Dimensions | 14.8 x 13.07 x 4.45 inches |

Figure 6.1: Display resolution and IPS screen features.
7. Maintenance
To ensure the longevity and optimal performance of your car radio stereo, follow these maintenance guidelines:
- Screen Cleaning: Use a soft, lint-free cloth to clean the touchscreen. For stubborn smudges, lightly dampen the cloth with water or a screen-safe cleaner. Avoid abrasive materials or harsh chemicals.
- Software Updates: Periodically check for and install software updates to ensure system stability and access to new features. Connect to a stable WiFi network for updates.
- Cable Connections: Ensure all cables are securely connected. Loose connections can lead to intermittent issues.
- Environmental Conditions: Avoid exposing the unit to extreme temperatures, direct sunlight for prolonged periods, or excessive moisture.
8. Troubleshooting
If you encounter issues with your car radio stereo, refer to the following common troubleshooting steps:
- No Power: Check all power cable connections. Ensure the vehicle's ignition is on. Verify the fuse in the vehicle's fuse box related to the radio.
- No Sound: Check speaker connections. Ensure the volume is not muted or set too low. Verify audio settings in the DSP menu.
- Touchscreen Unresponsive: Try restarting the unit. If the issue persists, a factory reset might be necessary (note: this will erase user data).
- GPS Signal Loss: Ensure the GPS antenna is properly connected and has a clear view of the sky. Move the vehicle to an open area if signal is weak.
- Bluetooth Connection Issues: Ensure Bluetooth is enabled on both the head unit and your smartphone. Delete previous pairings and try re-pairing.
- Steering Wheel Controls Not Working: Recheck CANBUS connections. Ensure the SWC learning function has been performed correctly in the settings menu.
- Backup Camera Not Displaying: Verify the camera's power and signal connections. Ensure the vehicle is in reverse.
If these steps do not resolve the issue, please contact customer support for further assistance.
9. Warranty and Support
Jingelsye products are designed for durability and are supported by a technical team. For any technical assistance or product inquiries, please contact Jingelsye customer support.
9.1 Protection Plans
Extended protection plans may be available for your product. These plans typically cover repairs or replacements beyond the standard warranty period. Please refer to your purchase documentation or contact your retailer for details on available 2-Year or 3-Year protection plans.