
HJC9
Instruction Manual
Replacement Remote Control for MLily Adjustable Bed Base (Model: HJC9)
Introduction
This manual provides essential information for the proper setup, operation, and maintenance of your replacement remote control for MLily Adjustable Bed Bases. Please read this manual thoroughly before use to ensure correct functionality and to avoid potential issues.
Important Compatibility Note: This remote control is specifically designed for MLily Adjustable Bed Bases that utilize a Richmat control box with model number HJC9. It is not a universal remote. Please ensure your existing remote is identical in appearance and your control box matches the specified model before attempting to pair or use this replacement.
Product Overview
The replacement remote control features an intuitive button layout for easy operation of your adjustable bed base.

Image: Front view of the remote control.
Remote Control Buttons:
- Head Up/Down: Adjusts the head section of the bed.
- Foot Up/Down: Adjusts the foot section of the bed.
- FLAT: Returns the bed to a flat position.
- M (Memory): Typically used to set or recall a favorite position. (Specific functionality may vary based on bed base model).
Setup and Pairing Instructions
Before using your new remote control, you must install batteries and pair it with your adjustable bed base's control box.
1. Battery Installation:
The remote control requires 2 AAA batteries (not included). To install:
- Locate the battery compartment on the back of the remote control.
- Slide open the battery cover.
- Insert 2 AAA batteries, ensuring correct polarity (+/-).
- Close the battery cover securely.

Image: Back of the remote control with battery compartment open.
2. Pairing the Remote Control:
This remote is designed to pair with Richmat control box model HJC9. Follow these steps carefully:
- Power Cycle the Bed: Unplug the adjustable bed base from the power outlet. Wait for 5 seconds, then plug it back in.
- Locate Control Box: Find the control box (often labeled Richmat HJC9) located under the bed base.
- Activate Pairing Mode on Control Box: Double-click the "Reset" button (or "Learn" / "Reset Coding" button) on the control box twice. The light on the control box should illuminate, indicating it's in pairing mode.
- Initiate Pairing on Remote: On the remote control, simultaneously press and hold the "Head Up" button and the "Foot Up" button for 10 seconds.
- Confirm Pairing: Once you hear beeps from the control box, it indicates that the remote is successfully synced.
Important Pairing Notes:
- Pairing must be completed within 15 seconds of activating pairing mode on the control box. If 15 seconds pass, the light on the control box will go out, and you will need to unplug the power again and restart the process from Step 1.
- Ensure the light on the control box is on when attempting to pair.
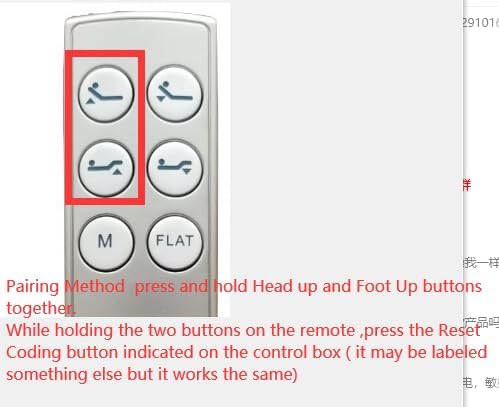
Image: Remote control pairing button combination.

Image: Diagram of the control box location and connections.
Operating Instructions
Once paired, your remote control is ready for use. Simply press the corresponding buttons to adjust your bed base:
- Press the Head Up button to raise the head section.
- Press the Head Down button to lower the head section.
- Press the Foot Up button to raise the foot section.
- Press the Foot Down button to lower the foot section.
- Press the FLAT button to return both the head and foot sections to a flat, level position.
- The M (Memory) button can be used to save or recall a preferred position. Refer to your bed base's original manual for specific instructions on setting memory positions, as this functionality is controlled by the bed base itself.
Maintenance
Battery Replacement:
Replace batteries when the remote's response becomes sluggish or stops working. Always use 2 new AAA batteries. Follow the battery installation steps outlined in the "Setup" section.
Cleaning:
Wipe the remote control with a soft, dry cloth. Do not use liquid cleaners or abrasive materials, as they may damage the remote's surface or internal components.
Troubleshooting
| Problem | Possible Cause | Solution |
|---|---|---|
| Remote not responding. | Dead or incorrectly installed batteries. | Replace batteries with new AAA batteries, ensuring correct polarity. |
| Remote not controlling the bed. | Remote is not paired with the control box, or pairing was unsuccessful. | Perform the pairing procedure again, ensuring all steps are followed within the 15-second window. Verify your control box is Richmat HJC9. |
| Bed base not responding after power cycle. | Control box not fully reset or powered. | Ensure the bed is unplugged for at least 5 seconds before plugging back in. Double-check all power connections. |
| Remote buttons feel sticky or unresponsive. | Dirt or debris under buttons. | Clean the remote surface with a soft, dry cloth. Avoid liquid cleaners. |
Specifications
| Feature | Detail |
|---|---|
| Product Model | HJC9 (Remote Control) |
| Compatible Control Box | Richmat HJC9 (e.g., HJC25Z-0-0 NLP200 127780C250059) |
| Power Source | 2 x AAA Batteries (not included) |
| Color | White / Light Gray |
| Max Supported Devices | 1 (Adjustable Bed Base) |
| Manufacturer | SZHKHXD |
| Country of Origin | China |
Support
If you encounter issues not covered in this manual or require further assistance, please contact the seller or manufacturer directly. Provide your product model number (HJC9) and a detailed description of the problem for faster support.
Note: This remote is not universal. If your control box is not Richmat HJC9, this remote will not be compatible. It is recommended to verify your control box model before purchasing or seeking support.
Related documentsHJC9


Ask a question about this manual
Ask about setup, troubleshooting, compatibility, parts, safety, or missing instructions. Manuals+ will review the question and use this page’s manual context to help answer it.