Evjuicion EV-IEC-AC16-PV
EVJUICION 5M EV Charger Cable User Manual
Model: EV-IEC-AC16-PV
1. Introduction
Thank you for choosing the EVJUICION 5M EV Charger Cable. This portable charging solution is designed for efficient and safe charging of your electric vehicle. It features a Type 2 connector for your vehicle and a 3-pin plug for standard household outlets, delivering up to 2.3kW of power. This manual provides essential information for the proper installation, operation, and maintenance of your charger.
Please read this manual thoroughly before using the product to ensure safe and optimal performance. Keep this manual for future reference.
2. Safety Information
Always adhere to the following safety precautions to prevent injury or damage to the product and vehicle:
- Do not use the charger if the cable, plug, or control box is damaged.
- Ensure the power outlet is properly grounded and rated for the charger's specifications (minimum 13A for 10A charging).
- Do not immerse the control box or plugs in water. The Type 2 plug is IP67 rated when connected, and the control box is IP65 rated.
- Avoid placing the control box in direct sunlight or extreme temperatures during charging.
- Keep children and pets away from the charging area.
- Do not attempt to disassemble or repair the charger. Contact qualified personnel for service.
- Always unplug the charger from the power source before disconnecting from the vehicle.

Figure 2.1: Socket Safety Instructions. This image illustrates the correct and incorrect types of UK 3-pin sockets to use with the 13A EV charger. It shows that sockets rated 13A or higher are suitable, while those rated less than 13A are not.
3. Product Overview
The EVJUICION EV Charger Cable consists of the following main components:
- Type 2 Connector: Plugs into your electric vehicle's charging port.
- Control Box: Contains the intelligent charging circuitry and LED indicators.
- 3-Pin UK Plug: Connects to a standard household power outlet.
- Charging Cable: Connects the components, made of durable TPU material.

Figure 3.1: Product Components. This image displays the complete EVJUICION 5M EV Charger Cable, including the Type 2 connector, the central control box with LED indicators, the UK 3-pin plug, the charging cable, and the included carry bag and expansion screws.

Figure 3.2: Package Contents. This image shows the items included in the product package: (1) EV Charger, (2) Portable Bag, (3) User Manual, and (4) Expansion Screws for mounting.
4. Specifications
| Feature | Specification |
|---|---|
| Model Number | EV-IEC-AC16-PV |
| Input Plug Type | UK 3-Pin Plug |
| Output Connector Type | Type 2 (IEC 62196-2) |
| Rated Current | 10A |
| Maximum Power | 2.3kW |
| Cable Length | 5M (available in 6/8/10/15M variants) |
| Waterproof Rating (Type 2 plug) | IP67 (when plugged in) |
| Waterproof Rating (Control Box) | IP65 |
| Operating Temperature | -30°C to 50°C |
| Certifications | CE, TUV, UL, UKCA, RoHS |
| Weight | 2.43 kg |
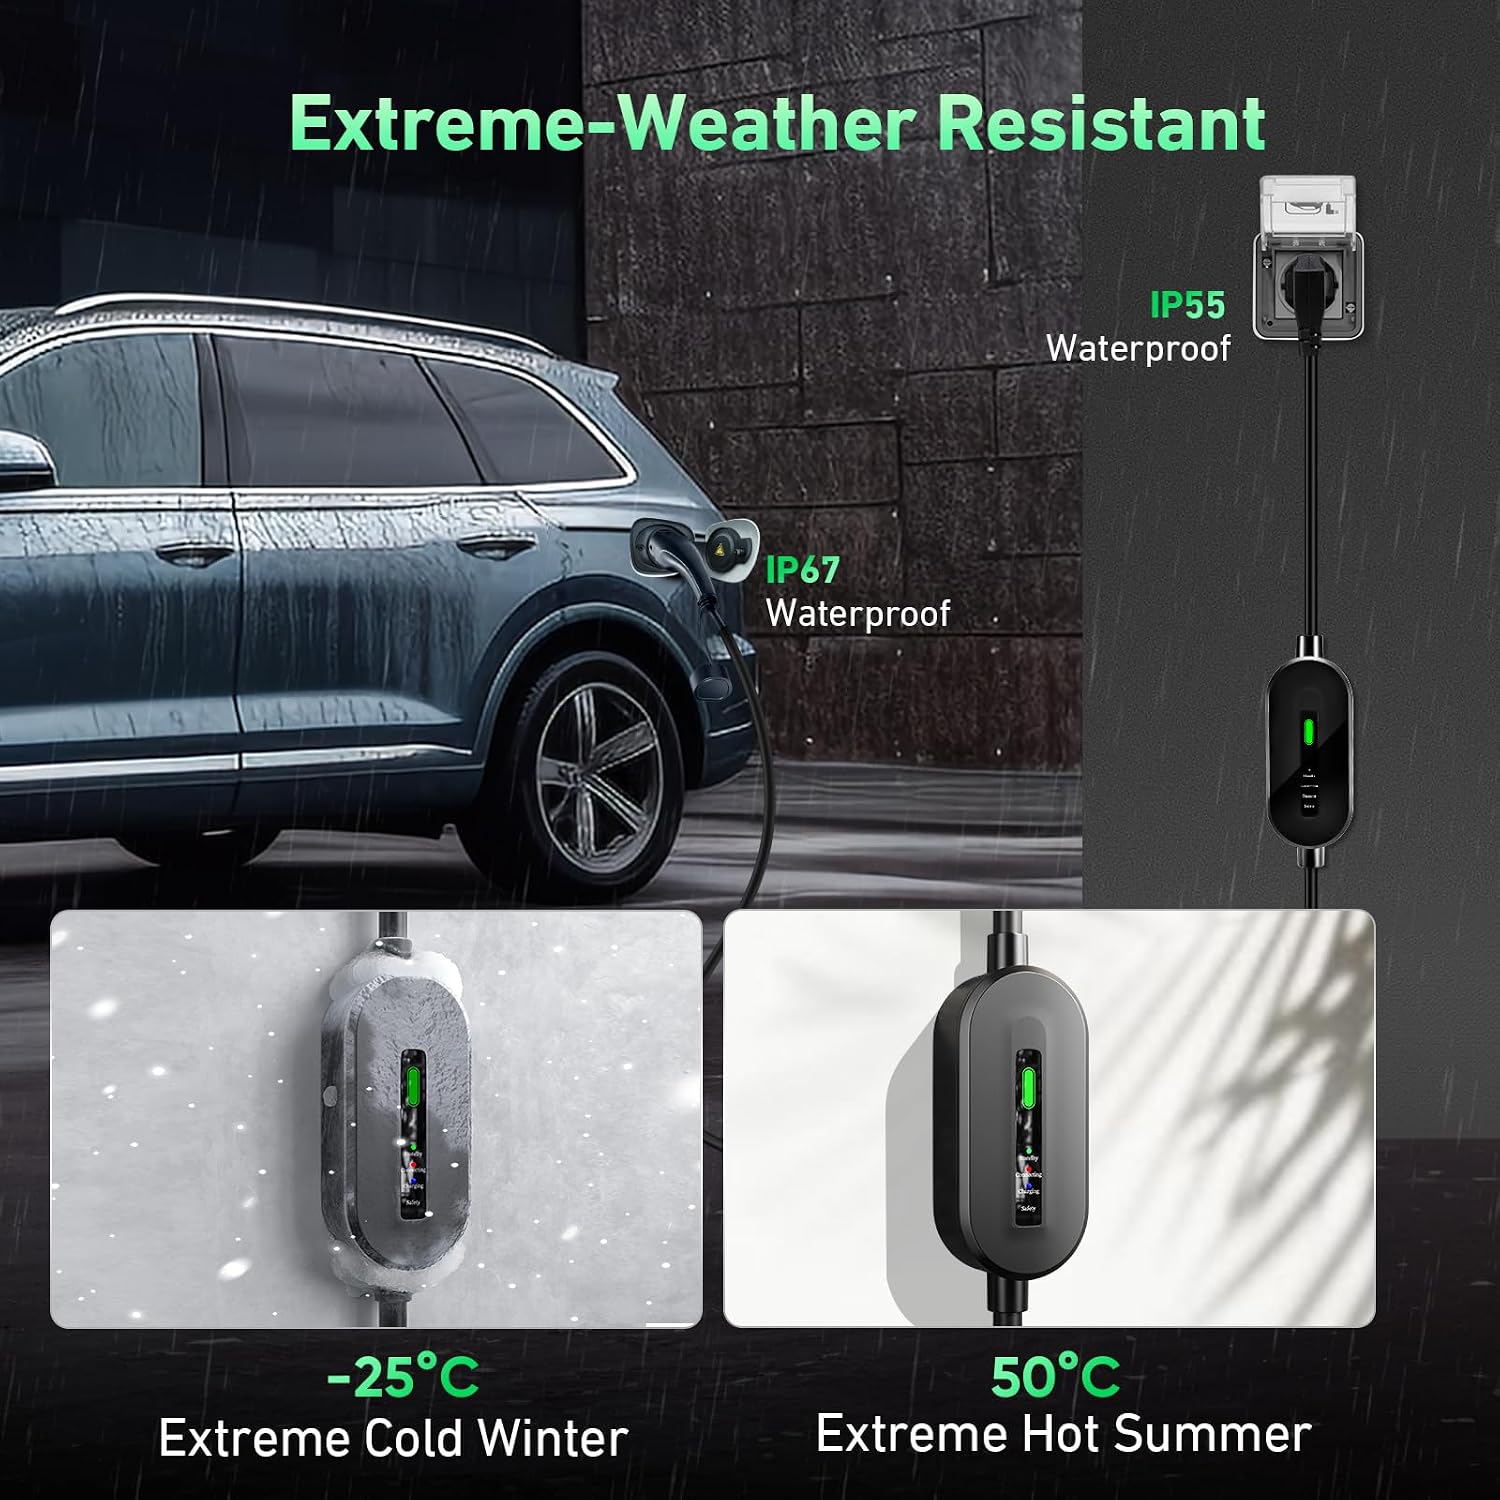
Figure 4.1: Extreme Weather Resistance. This image demonstrates the charger's ability to withstand extreme temperatures, from -25°C (cold winter) to 50°C (hot summer), highlighting its IP67 (plug) and IP65 (control box) waterproof ratings.
5. Setup and Installation
The EVJUICION EV Charger is designed for portable use. For optimal convenience and cable management, you may choose to mount the control box.
5.1 Initial Setup
- Unpack the charger and inspect all components for any signs of damage.
- Ensure the charging cable is fully uncoiled and free from kinks or knots.
- Locate a suitable power outlet that meets the safety requirements (minimum 13A).
5.2 Mounting the Control Box (Optional)
The control box features a hanging hole design for stable mounting. Use the provided expansion screws for installation:
- Choose a suitable location near your charging spot, ensuring it's within reach of both the power outlet and your vehicle.
- Drill a hole in the wall at the desired height.
- Insert the mounting screw into the drilled hole, leaving enough of the screw head exposed to hang the control box.
- Hang the control box securely onto the screw.

Figure 5.1: Hanging Hole Design & Expansion Screws. This image illustrates the process of mounting the charger's control box to a wall using the provided expansion screws, ensuring stronger stability and proper cable management compared to leaving it unmounted.
6. Operating Instructions
The EVJUICION EV Charger is designed for simple plug-and-play operation.
6.1 Charging Process
- Ensure your vehicle is turned off and the charging port is accessible.
- Plug the 3-pin UK plug into a suitable household power outlet. The control box will illuminate to indicate standby mode.
- Insert the Type 2 connector firmly into your vehicle's charging port. You should hear a click indicating it's securely locked.
- The charger will automatically initiate the charging process. Monitor the LED indicators on the control box for status.
- Once charging is complete, the charger will automatically stop.
- First, unplug the 3-pin UK plug from the power outlet.
- Then, press the release button on the Type 2 connector (if applicable to your vehicle) and carefully remove it from the vehicle's charging port.
6.2 LED Indicator Status
The control box features LED indicators to provide real-time charging status:
- Solid Green Light: Standby mode. The charger is powered on and ready to charge.
- Solid Orange Light: Connecting. The charger is establishing communication with the vehicle.
- Flashing Blue Light: Charging. Power is being delivered to the vehicle.
- Solid Blue Light: Charging Finished. The vehicle battery is full, and charging has stopped.
- Flashing Red Light: Safety Precaution/Fault. Indicates an error or safety issue. Refer to the Troubleshooting section.
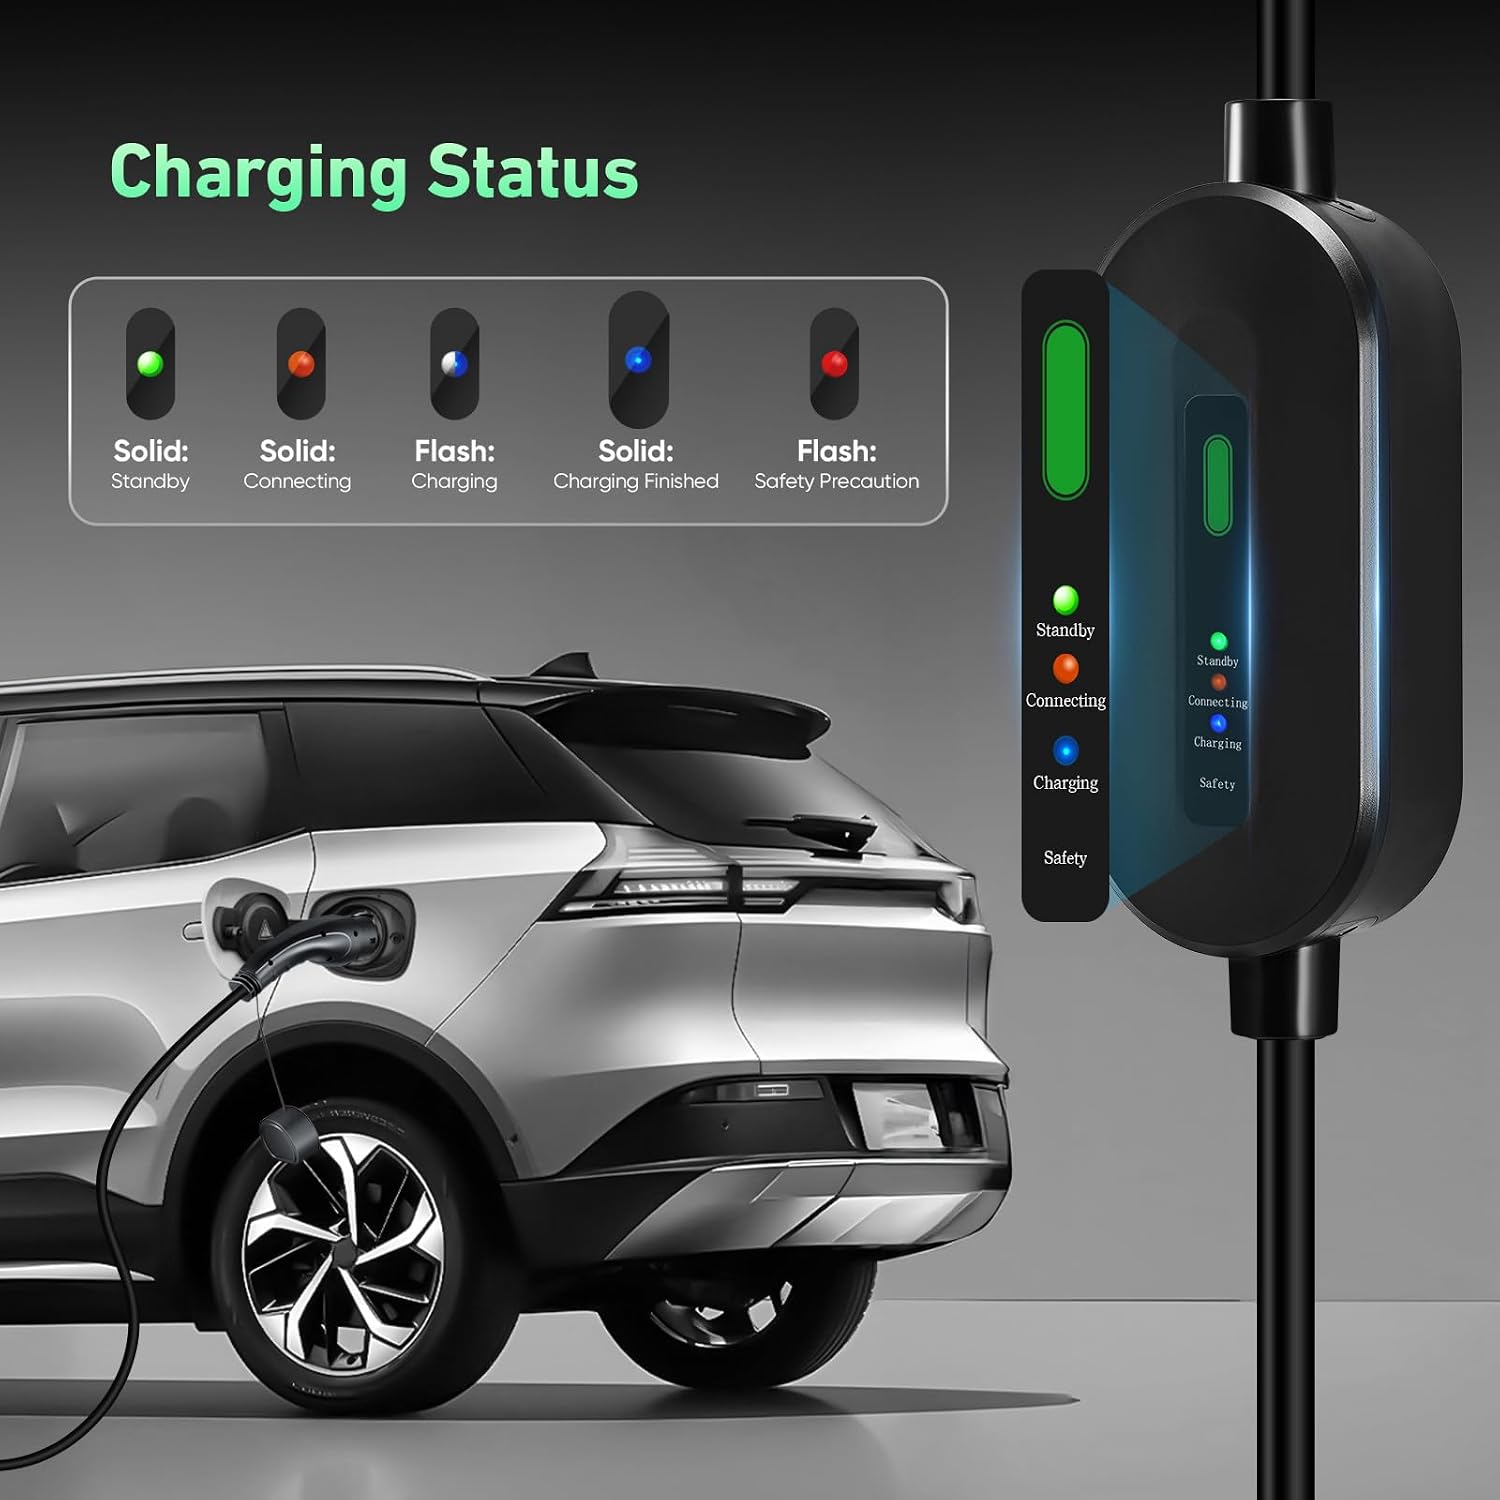
Figure 6.1: Charging Status Indicators. This image provides a visual guide to the LED indicator lights on the charger's control box, explaining what each color and state (solid or flashing) signifies: Standby, Connecting, Charging, Charging Finished, and Safety Precaution.

Figure 6.2: Charging Performance. This image illustrates the charging capability of the EVJUICION 10A charger, showing its 2.3kW output and how it can relieve 'low-battery anxiety' by providing a stable charge, ideal for overnight use.
7. Maintenance
Proper maintenance ensures the longevity and safe operation of your EVJUICION charger:
- Cleaning: Wipe the charger and cables with a soft, dry cloth. Do not use abrasive cleaners or solvents. Ensure the charger is unplugged before cleaning.
- Storage: When not in use, store the charger in the provided carry bag in a dry, cool place, away from direct sunlight and extreme temperatures. Avoid coiling the cable too tightly.
- Inspection: Regularly inspect the cable, plugs, and control box for any signs of wear, cuts, cracks, or damage. If any damage is found, discontinue use immediately and contact support.
- Cable Management: Avoid driving over the cable or placing heavy objects on it.

Figure 7.1: Superior Material and Durability. This image highlights the robust construction of the charger, showcasing its 20,000 bending test rating for the TPU cable, 2 tons pressure resistance for the control box, and 15,000 plug/unplug cycles for the Type 2 connector, ensuring long-term reliability.
8. Troubleshooting
If you encounter issues with your EVJUICION charger, refer to the following common problems and solutions:
| Problem | Possible Cause | Solution |
|---|---|---|
| Charger not turning on (no LED lights) | No power from outlet; Faulty outlet; Damaged charger. | Check the power outlet with another appliance. Try a different outlet. Inspect the charger for visible damage. |
| Flashing Red Light | Overcurrent, overheating, leakage, overvoltage, undervoltage, or other fault. | Unplug the charger from both the vehicle and the power outlet. Wait 5 minutes, then reconnect. Ensure the outlet is stable. If the issue persists, contact customer support. |
| Charging not starting (Solid Green/Orange) | Type 2 connector not fully inserted; Vehicle not ready to charge; Communication error. | Ensure the Type 2 connector is fully and securely inserted into the vehicle's port. Check vehicle's charging settings. Disconnect and reconnect the charger. |
| Slow charging | Vehicle's battery management system limiting charge; High ambient temperature. | This charger provides 2.3kW (10A) which is suitable for overnight charging. Ensure vehicle settings allow for full charge rate. Charge in a cooler environment if overheating is suspected. |
If the problem persists after attempting these solutions, please contact EVJUICION customer support.
9. Compatibility
The EVJUICION EV Charger Cable with a Type 2 connector is compatible with most Electric Vehicles (EVs) and Plug-in Hybrid Electric Vehicles (PHEVs) that comply with the IEC 62196-2 standard.
Common compatible brands include (but are not limited to): Audi, BMW, Ford, Mercedes-Benz, Kia, Tesla (with Type 2 inlet), Volvo, Honda, and many others using the Type 2 or CCS2 connector.

Figure 9.1: Wide Application for Type 2 EVs & PHEVs. This image illustrates the broad compatibility of the EVJUICION charger with various electric vehicle brands that utilize the Type 2 (IEC 62196-2) or CCS2 connector, such as Audi, BMW, Ford, Mercedes-Benz, Kia, Tesla, Volvo, and Honda.
10. Warranty and Support
EVJUICION products are manufactured to high-quality standards and undergo rigorous testing. For warranty information and customer support, please refer to the contact details provided with your purchase or visit the official Evjuicion store on Amazon.
Please retain your proof of purchase for warranty claims.
Ask a question about this manual
Ask about setup, troubleshooting, compatibility, parts, safety, or missing instructions. Manuals+ will review the question and use this page’s manual context to help answer it.