1. Introduction
This manual provides essential instructions for the safe and effective use of your Topyond Pneumatic Spray Gun, Model B0CQMVG8PX. This tool is designed for applying plaster, cement, lime slurry, waterproof mortar, and other thin materials to internal and external walls. Please read this manual thoroughly before operation and retain it for future reference.
Important Safety Notice: Always prioritize safety. Wear appropriate personal protective equipment (PPE) and follow all local safety regulations when operating pneumatic tools.
2. Product Overview and Components
The Topyond Pneumatic Spray Gun is constructed from stainless steel and brass, ensuring durability and efficient performance. Familiarize yourself with the main components before assembly and operation.

Figure 2.1: Disassembled view of the Topyond Pneumatic Spray Gun, showing the bucket, handle, valve port, extension, barb, screws, nuts, and washer.
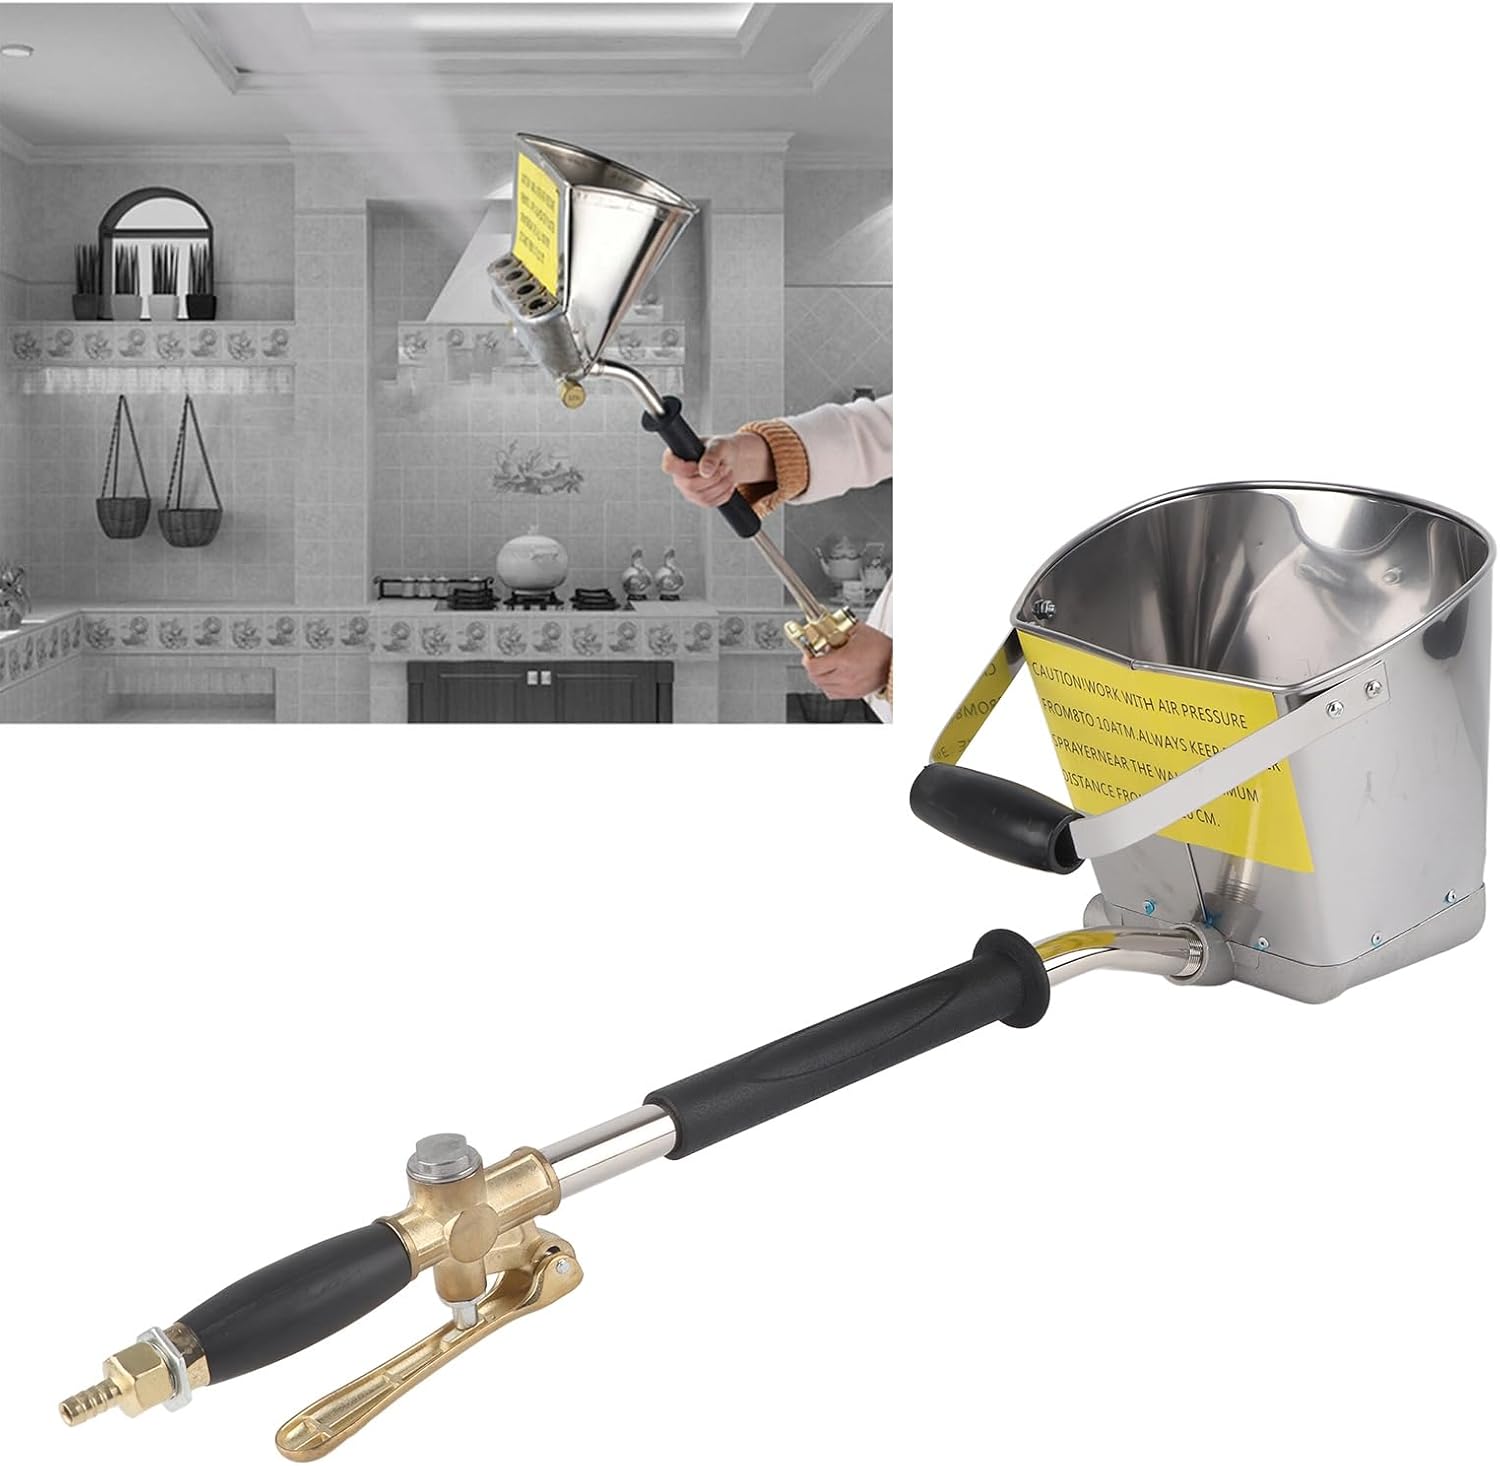
Figure 2.2: Assembled Topyond Pneumatic Spray Gun, highlighting the caution label on the bucket regarding air pressure and spraying distance.
Key Components:
- Spray Gun Body: Stainless steel bucket with four spray holes.
- Handle: Ergonomic handle for control during operation.
- Valve Port: Includes NPT 1/2in female thread rotation, 1/4in air plug, and NPT 3/8in male thread for air connection.
- Extension: Connects the handle to the spray gun body.
- Barb: For hose connection.
- Reserve Bucket: The main container for spraying material.
3. Specifications
Refer to the table below for detailed technical specifications of the Topyond Pneumatic Spray Gun.
| Specification | Value |
|---|---|
| Product Material | Stainless steel + Brass |
| Valve Connections | NPT 1/2in female thread rotation, 1/4in air plug, NPT 3/8in male thread |
| Valve Pressure (Max) | 120 PSI |
| Airflow (Max) | 100 CFM |
| Number of Spray Holes | 4 |
| Spray Hole Size | Approx. 18mm / 0.7in |
| Working Pressure (Recommended) | 4 to 6 ATM (approximately 58 to 87 PSI) |
| Recommended Spray Distance | Approx. 50 ~ 100mm / 2 ~ 3.9in from wall |
| Item Weight | 4.18 pounds |
4. Setup
Proper setup is crucial for safe and effective operation. Follow these steps before using the spray gun:
- Unpack Components: Carefully remove all items from the packaging and verify against the "Package Contents" section.
- Assemble the Spray Gun:
- Attach the handle to the extension.
- Connect the extension to the spray gun bucket assembly.
- Ensure all connections are secure.
- Connect Air Supply:
- Connect a suitable air hose to the 1/4in air plug on the valve port.
- Ensure the air compressor is capable of providing the required working pressure (4 to 6 ATM or 58 to 87 PSI) and airflow (up to 100 CFM).
- Use an air pressure regulator to set the correct working pressure.
- Prepare Material:
- Mix plaster, cement, lime slurry, or waterproof mortar according to the manufacturer's instructions to achieve a consistent, sprayable consistency.
- Ensure the material is free of lumps or foreign objects that could clog the spray holes.
- Pour the prepared material into the spray gun's reserve bucket.
- Initial Check: Before spraying on your final surface, perform a test spray on a scrap piece of material to ensure proper function and consistency.
5. Operating Instructions
The Topyond Pneumatic Spray Gun is designed for simple operation, allowing for efficient application of materials. Follow these guidelines for optimal results:

Figure 5.1: An individual demonstrating the use of the Topyond Pneumatic Spray Gun for wall application.
- Wear PPE: Always wear safety glasses, gloves, and a dust mask or respirator. Hearing protection is also recommended.
- Hold the Gun Correctly: Grip the handle firmly with both hands for stability and control.
- Maintain Spray Distance: Keep the spray gun at a consistent distance of approximately 50 to 100mm (2 to 3.9 inches) from the wall surface. Maintaining this distance helps achieve an even coat and prevents material waste.
- Apply Material:
- Press the trigger to begin spraying.
- Move the gun in smooth, even strokes across the surface.
- Overlap each pass slightly to ensure full coverage.
- The design of this gun aims to save water and materials, contributing to efficiency.
- Adjust Air Pressure: If necessary, adjust the air pressure within the recommended range (4 to 6 ATM) to achieve the desired spray pattern and material flow.
- Work Efficiently: This tool is designed to enhance work efficiency compared to traditional application methods, making it suitable for both home decoration and larger construction sites.
6. Maintenance
Regular cleaning and maintenance will extend the life of your Topyond Pneumatic Spray Gun and ensure consistent performance.
- Immediate Cleaning After Use:
- Empty any remaining material from the bucket.
- Rinse the bucket thoroughly with water.
- Connect the gun to an air supply and spray clean water through it until all material residue is cleared from the spray holes and internal passages.
- Disassemble the gun if necessary for a more thorough cleaning of stubborn residue.
- Inspect Components: Regularly check all parts for wear, damage, or blockages. Pay close attention to the spray holes and air connections.
- Lubrication: Periodically apply a few drops of pneumatic tool oil to the air inlet to lubricate internal components.
- Storage: Store the clean and dry spray gun in a cool, dry place, away from direct sunlight and extreme temperatures.
7. Troubleshooting
If you encounter issues during operation, refer to the following common problems and solutions:
| Problem | Possible Cause | Solution |
|---|---|---|
| No material spraying or weak spray |
|
|
| Inconsistent spray pattern |
|
|
| Air leaks |
|
|
8. Safety Information
Operating pneumatic tools requires adherence to strict safety protocols to prevent injury. Always follow these safety guidelines:
- Personal Protective Equipment (PPE): Always wear safety glasses or goggles, hearing protection, gloves, and a dust mask or respirator suitable for the materials being sprayed.
- Air Pressure: The valve can handle pressures up to 120 PSI. The recommended working pressure is 4 to 6 ATM (approximately 58 to 87 PSI). CAUTION: The product label mentions working with air pressure from 8 to 10 ATM (approximately 117 to 147 PSI). However, ensure that the operating pressure NEVER EXCEEDS 120 PSI to prevent damage to the valve and ensure safe operation. Always use an air pressure regulator to set and monitor the pressure.
- Maintain Distance: ALWAYS KEEP PLASTER SPRAYER NEAR THE WALL, MAXIMUM DISTANCE FROM 5 TO 10 CM (2 to 3.9 inches). This prevents overspray and ensures proper material application.
- Ventilation: Use the spray gun in a well-ventilated area to avoid inhaling fumes or dust from the materials.
- Secure Connections: Ensure all air hose connections are secure and free of leaks before operating.
- Material Safety Data Sheets (MSDS): Refer to the MSDS for the specific materials you are spraying for additional safety precautions.
- Children and Bystanders: Keep children and bystanders away from the work area.
- Electrical Safety: Be aware of any electrical outlets or wiring in the work area, especially when working with water-based materials.
9. Package Contents
The following items are included in your Topyond Pneumatic Spray Gun package:
- 5 x Screw
- 5 x Nut
- 1 x Barb
- 1 x Washer
- 1 x Valve Port
- 1 x Extension
- 1 x Reserve Bucket
- 1 x Bucket Handle