1. Product Overview
The Faria GF6016A is an oversized multifunction gauge designed for marine applications. This gauge integrates multiple readings including fuel level, pressure, trim position, and voltage into a single unit. It features a clear halogen illuminated display with a gray face, pewter bezel, red needles, and white graphics for optimal readability. This unit is specifically set up for OMC Johnson Evinrude engines.
2. Safety Information
Please read and understand all instructions before installing or operating this gauge. Improper installation or use can result in damage to the product, vessel, or personal injury.
- Always disconnect the vessel's battery before performing any electrical work.
- Ensure all wiring connections are secure and properly insulated to prevent short circuits.
- Consult a qualified marine technician if you are unsure about any installation steps.
- Do not operate the gauge if it appears damaged.
3. Package Contents
Verify that all components are present before beginning installation.
- Faria GF6016A Multifunction Gauge
- Mounting Bracket
Note: A pigtail connector/harness and additional mounting hardware are not included and must be sourced separately.
4. Installation
This section outlines the general steps for installing the Faria GF6016A multifunction gauge.
- Prepare Mounting Location: The gauge requires an approximate 4 1/4 inch (10.8 cm) diameter cutout for flush mounting. Ensure sufficient depth (approximately 3 1/2 inches or 8.9 cm) behind the mounting surface for the gauge body and wiring connections.
- Secure the Gauge: Insert the gauge into the prepared cutout. Use the provided mounting bracket and appropriate hardware (not included) to secure the gauge firmly in place.
- Connect Wiring: The gauge features four (4) threaded bolt connections on the rear for electrical hookup. Refer to the wiring section for detailed connection information. This gauge is set up for OMC Johnson Evinrude engines.
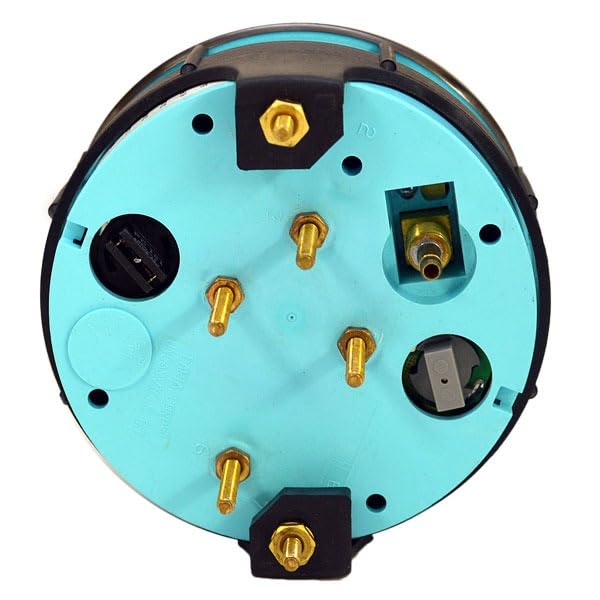
Figure 1: Rear view of the Faria GF6016A multifunction boat gauge. This image displays the four threaded bolt connections for electrical wiring, along with other ports and components on the back of the unit, essential for installation.
5. Wiring Connections
The Faria GF6016A gauge utilizes four threaded bolt connections for power, ground, and sensor inputs. While a specific wiring diagram is not provided with this manual, standard marine gauge wiring practices should be followed.
- Power (Ignition): Connect to a switched 12V DC power source.
- Ground: Connect to a reliable vessel ground.
- Sensor Inputs: Connect the appropriate wires from your fuel level sender, pressure sender, and trim sender to the designated terminals on the gauge. Consult your engine's service manual or a marine electrical guide for specific sender wire identification.
- Illumination: The gauge features halogen illumination. Connect the illumination wire to your vessel's navigation light circuit or a separate dimmer switch for adjustable brightness.
Important: Ensure all connections are tight and protected from moisture. Incorrect wiring can damage the gauge or other electrical components.
6. Operation
Once properly installed and wired, the Faria GF6016A multifunction gauge will display the following information when the vessel's ignition is on:
- Fuel Level: Indicates the amount of fuel remaining in the tank.
- Pressure: Displays engine oil pressure or water pressure, depending on the sender connected.
- Trim Position: Shows the angle of the engine's trim.
- Voltage: Monitors the vessel's electrical system voltage.
The halogen illumination will activate with your vessel's lighting system, providing visibility in low-light conditions.
7. Maintenance
The Faria GF6016A gauge is designed for durability in a marine environment. Regular maintenance will ensure its longevity and accurate performance.
- Cleaning: Clean the gauge face with a soft, damp cloth. Avoid abrasive cleaners or solvents that could damage the lens or bezel.
- Inspection: Periodically check all wiring connections for corrosion or looseness. Ensure the mounting bracket remains secure.
- Moisture Protection: While designed for marine use, minimize direct exposure to harsh elements when possible. Ensure all seals and connections are intact.
8. Troubleshooting
If the gauge is not functioning correctly, perform the following basic checks:
- No Power/No Illumination:
- Check the vessel's battery connection and ensure it is charged.
- Verify the ignition switch is on.
- Inspect the power and ground wiring connections at the back of the gauge for looseness or corrosion.
- Check any inline fuses in the power circuit.
- Inaccurate Readings:
- Ensure the correct senders are installed and properly connected to the gauge.
- Check the wiring from the senders to the gauge for damage or corrosion.
- Verify the senders themselves are functioning correctly.
- Gauge Fogging:
- Minor fogging can occur due to temperature changes. If persistent, check for proper sealing around the gauge and ensure no moisture is entering the housing.
If troubleshooting steps do not resolve the issue, contact a qualified marine technician.
9. Specifications
| Feature | Detail |
|---|---|
| Part Manufacturer | Faria |
| Part Number | GF6016A |
| Gauge Type | Multifunction (Fuel, Pressure, Trim, Volt) |
| Overall Dimensions | 4 3/4" Dia. x 3 1/2" D (12.1 cm Dia. x 8.9 cm D) |
| Cutout Diameter | 4 1/4" (10.8 cm) |
| Connections | (4) Threaded Bolt Connections |
| Engine Compatibility | OMC Johnson Evinrude engines |
| Illumination | Halogen |
| Face Color | Gray |
| Bezel Color | Pewter |
| Needle Color | Red |
| Item Weight | 1 Pound (0.45 kg) |
10. Warranty and Support
For information regarding warranty coverage, technical support, or replacement parts, please contact the manufacturer, Faria, or your authorized dealer. Keep your purchase receipt as proof of purchase.