1. Product Overview
The Cuifati H310 LGA 1151 DDR4 Motherboard is designed to support 8th and 9th generation Intel Core processors. It features a Micro ATX form factor, dual-channel DDR4 memory support, and a range of expansion options including M.2 NVMe, PCIe slots, and multiple I/O ports for versatile connectivity.
Key features include:
- Wide CPU Compatibility: Supports 8th and 9th generation Intel Core processors (LGA 1151 socket).
- Dual Channel DDR4 Memory: Supports up to 32GB DDR4 RAM across two DIMM slots, with frequencies up to 2666MHz.
- Stable Power Supply: Features a three-phase power supply with solid capacitors and 24+8 pin power sockets for reliable operation.
- High-Speed H310 Chipset: Provides stable and efficient performance for various computing tasks.
- Integrated Graphics: Equipped with an integrated graphics processor and multiple display outputs (DVI, HDMI, VGA) for multi-monitor setups.
- Rich Expansion Ports: Includes SATA 6Gb/s, NVME M.2, PCIe X16, PCIe X1, USB 3.0, USB 2.0, PS/2, RJ45, and audio ports.

Figure 1: Top-down view of the Cuifati H310 LGA 1151 DDR4 Motherboard, showing CPU socket, RAM slots, and various connectors.
2. Setup and Installation
This section provides instructions for installing the Cuifati H310 motherboard and its components into a computer case.
2.1 Safety Precautions
- Always disconnect the power supply from the wall outlet before installing or removing any components.
- Wear an anti-static wrist strap or frequently touch a grounded metal object to prevent electrostatic discharge (ESD).
- Handle the motherboard by its edges to avoid touching sensitive components.
2.2 CPU Installation
- Locate the LGA 1151 CPU socket on the motherboard.
- Gently push down the load lever and pull it to the side to open the CPU socket cover.
- Align the triangular mark on the CPU with the corresponding mark on the socket. Carefully place the CPU into the socket without forcing it.
- Close the socket cover and push the load lever back into place until it clicks.
- Apply thermal paste to the CPU and install the CPU cooler according to its manufacturer's instructions.
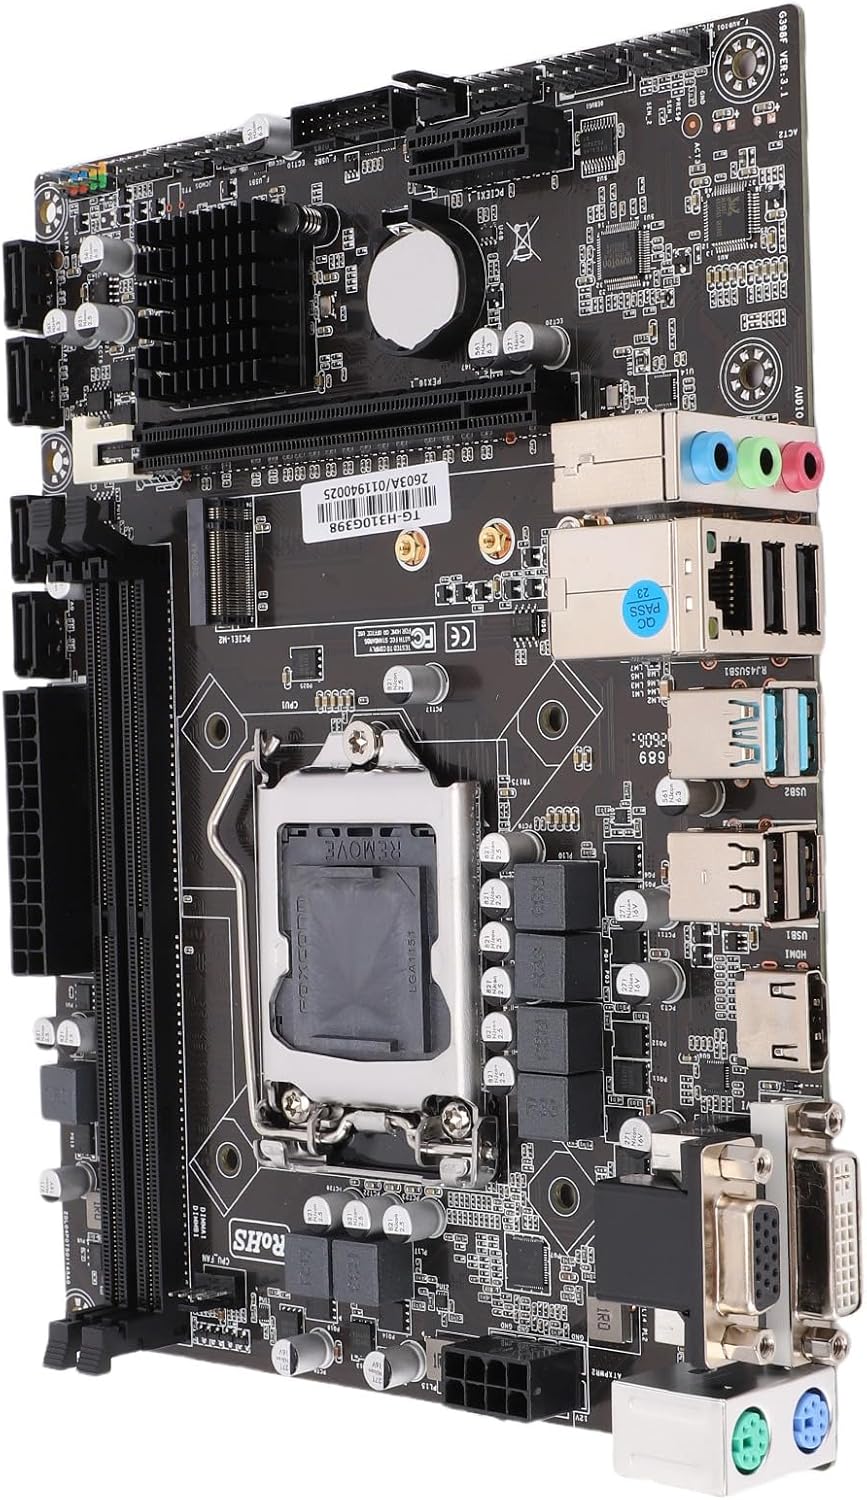
Figure 2: Angled view of the motherboard, highlighting the LGA 1151 CPU socket and surrounding components.
2.3 RAM Installation
- Open the clips at both ends of the DDR4 DIMM slots.
- Align the notch on the DDR4 memory module with the key in the DIMM slot.
- Insert the memory module firmly into the slot until the clips snap into place. Ensure both clips are closed.
- For dual-channel operation, install memory modules in matching slots as indicated in the motherboard manual (typically alternating slots).
2.4 Storage Device Installation (M.2 NVMe / SATA)
2.4.1 M.2 NVMe SSD
- Locate the M.2 slot on the motherboard.
- Remove the M.2 standoff screw.
- Insert the M.2 NVMe SSD into the slot at a 30-degree angle.
- Gently push down the SSD and secure it with the standoff screw.
2.4.2 SATA Drives
- Connect one end of a SATA data cable to a SATA 6Gb/s port on the motherboard.
- Connect the other end of the SATA data cable to your SATA hard drive or SSD.
- Connect a SATA power cable from your power supply unit (PSU) to the SATA drive.
2.5 Power Connections
- Connect the 24-pin ATX main power connector from your PSU to the corresponding socket on the motherboard.
- Connect the 8-pin ATX 12V CPU power connector from your PSU to the socket near the CPU.
2.6 Front Panel and I/O Connections
- Connect the front panel headers (Power LED, HDD LED, Power Switch, Reset Switch) to the designated pins on the motherboard. Refer to the motherboard's silkscreen labels for correct orientation.
- Connect USB 2.0 and USB 3.0 front panel headers.
- Connect the front panel audio header.
- Install the I/O shield into the computer case opening before installing the motherboard.

Figure 3: Rear I/O panel of the motherboard, showing ports for USB, DVI, VGA, HDMI, RJ45, and audio.
2.7 Expansion Card Installation (PCIe)
- Locate the PCIe X16 slot for a graphics card or other PCIe X1 slots for expansion cards.
- Remove the corresponding slot cover from your computer case.
- Align the expansion card with the slot and press it firmly until it is seated correctly.
- Secure the card with a screw to the case.
3. Operating Instructions
After successful installation, follow these steps for initial system operation.
3.1 Initial Power On
- Ensure all components are securely connected and the power supply is plugged into a wall outlet.
- Press the power button on your computer case.
- The system should power on, and you should see a display on your monitor.
3.2 BIOS/UEFI Setup
- During startup, repeatedly press the DEL or F2 key (common keys, may vary) to enter the BIOS/UEFI setup utility.
- In the BIOS/UEFI, you can configure boot order, system time, CPU settings, memory settings, and other hardware parameters.
- Save changes and exit to continue booting into your operating system installer or existing OS.
3.3 Driver Installation
- After installing your operating system, install the necessary drivers for the motherboard chipset, integrated graphics, audio, and LAN.
- Drivers are typically provided on a support CD/DVD or can be downloaded from the manufacturer's website.
4. Maintenance
Proper maintenance ensures the longevity and optimal performance of your motherboard and system.
4.1 Cleaning
- Regularly clean dust from inside your computer case, especially around fans and heatsinks, using compressed air.
- Ensure the system is powered off and unplugged before cleaning.
- Avoid using liquid cleaners directly on components.
4.2 BIOS/UEFI Updates
- Check the manufacturer's website periodically for BIOS/UEFI updates.
- Updates can improve compatibility, stability, and performance.
- Follow the update instructions carefully to avoid system damage.
5. Troubleshooting
This section addresses common issues you might encounter and provides potential solutions.
5.1 No Power / System Does Not Turn On
- Check Power Connections: Ensure the 24-pin ATX and 8-pin CPU power connectors are securely seated.
- Power Supply: Verify the PSU switch is in the 'ON' position and the power cable is firmly connected to both the PSU and the wall outlet.
- Front Panel Headers: Confirm the power switch header is correctly connected to the motherboard.
5.2 No Display on Monitor (No POST)
- Monitor Connection: Ensure the monitor is connected to the correct display output (DVI, HDMI, or VGA) on the motherboard or graphics card and is powered on.
- RAM: Reseat the RAM modules. Try booting with only one RAM module installed.
- CPU: Verify the CPU is correctly installed and the CPU cooler is properly seated.
- Graphics Card: If using a dedicated graphics card, ensure it is properly seated in the PCIe slot and has adequate power. Try removing it and using the integrated graphics.
5.3 Peripheral Not Detected
- Check Connections: Ensure the peripheral (e.g., USB device, SATA drive) is correctly connected.
- Drivers: Install or update the necessary drivers for the peripheral.
- BIOS/UEFI Settings: Check if the port or device is enabled in the BIOS/UEFI settings.
6. Specifications
Detailed technical specifications for the Cuifati H310 LGA 1151 DDR4 Motherboard.
| Feature | Detail |
|---|---|
| Model Name | H310 LGA 1151 DDR4 |
| Manufacturer | Cuifati |
| CPU Socket | LGA 1151 |
| Compatible CPUs | 8th and 9th Generation Intel Core Processors (e.g., Intel Core i7-8700K, Intel Core i9-9900K) |
| Chipset | Intel H310 |
| Memory Technology | DDR4 Dual Channel |
| Memory Slots | 2 x DIMM slots |
| Max RAM Capacity | 32 GB (2 x 16 GB) |
| Memory Clock Speed | 2133 MHz, 2400 MHz, 2666 MHz |
| Graphics Interface | Integrated, PCI-Express x16 |
| Display Outputs | 1 x VGA, 1 x DVI, 1 x HDMI |
| Expansion Slots | 1 x PCI Express X16, 1 x PCI Express X1 |
| Storage Ports | 4 x SATA 6Gb/s, 1 x NVME M.2 connector |
| USB Ports | 2 x USB 3.0 (rear), 4 x USB 2.0 (rear), 1 x USB 3.0 header (supports 2 ports), 1 x USB 2.0 header (supports 2 ports) |
| LAN | Realtek 100/1000 Mbps Ethernet |
| Audio | Realtek ALC662 6-channel HD Audio |
| Power Connector | 24+8 Pin ATX Power |
| Form Factor | Micro ATX (Approx. 21.5 x 17 cm / 8.5 x 6.7 inches) |
| Battery | CR2032 (integrated) |
7. Warranty Information
The Cuifati H310 LGA 1151 DDR4 Motherboard comes with a 1 Year Warranty Against Manufacturer Defects. This warranty covers defects in materials and workmanship under normal use during the warranty period.
The warranty does not cover:
- Damage caused by accident, abuse, misuse, flood, fire, earthquake, or other external causes.
- Damage caused by operating the product outside the permitted or intended uses described by Cuifati.
- Damage caused by service (including upgrades and expansions) performed by anyone who is not a representative of Cuifati or an authorized Cuifati Service Provider.
- Products or parts that have been modified to alter functionality or capability without the written permission of Cuifati.
For warranty claims, please contact Cuifati customer support with your proof of purchase.
8. Customer Support
If you encounter any issues not covered in this manual or require further assistance, please contact Cuifati customer support.
- Online Support: Visit the official Cuifati website for FAQs, driver downloads, and support resources.
- Contact Information: Refer to your product packaging or the Cuifati website for the most current contact details.
When contacting support, please have your product model (H310 LGA 1151 DDR4) and purchase information ready.