Hikity
Hikity 6.9 Inch Single DIN Wireless Apple CarPlay Car Stereo
Model: 6866C
1. Introduction
This user manual provides detailed instructions for the installation, operation, and maintenance of your Hikity 6.9 Inch Single DIN Wireless Apple CarPlay Car Stereo. Please read this manual thoroughly before using the product to ensure proper functionality and safety.
This car stereo offers advanced features including wireless and wired Apple CarPlay and Android Auto, Bluetooth 5.0 for hands-free calling and audio streaming, FM/RDS radio, Mirror Link functionality, and support for a backup camera.
2. Safety Information
- Do not operate the device in a manner that distracts you from driving. Always prioritize road safety.
- Ensure all wiring connections are secure and properly insulated to prevent short circuits and electrical hazards.
- Avoid exposing the unit to extreme temperatures, direct sunlight for prolonged periods, or excessive moisture.
- Do not attempt to disassemble or modify the unit. Refer all servicing to qualified personnel.
- Keep the volume at a level that allows you to hear outside traffic sounds.
3. Package Contents
Verify that all items are present in the package:
- Car Stereo Unit
- Backup Camera
- Steering Wheel Remote Control
- External Microphone (3.5mm MIC)
- Power Cable
- Antenna
- User Manual (this document)

Figure 3.1: Included components and their approximate dimensions.
4. Installation
Professional installation is recommended for optimal performance and safety. Ensure the vehicle's battery is disconnected before beginning installation.
4.1 Wiring Diagram
Refer to the detailed wiring diagram provided with your unit for specific connections. Common connections include power (ACC, B+, GND), speaker outputs, antenna, backup camera input, and auxiliary inputs/outputs.
4.2 Mounting the Unit
This unit is designed for a single DIN slot. Ensure sufficient space behind the dashboard for wiring and proper ventilation. The screen protrudes above the DIN opening, so verify it does not obstruct other vehicle controls or vents.

Figure 4.1: Visual comparison of the dashboard before and after the stereo installation.
5. Setup and Initial Configuration
5.1 Initial Power-On
After installation, reconnect the vehicle's battery. The unit should power on automatically or by pressing the power button. Follow any on-screen prompts for initial setup.
5.2 Bluetooth Pairing
To pair your smartphone via Bluetooth:
- On the car stereo, navigate to the Bluetooth settings.
- Enable Bluetooth on your smartphone and search for available devices.
- Select the car stereo's Bluetooth name (e.g., "Car BT") from your phone's list.
- Confirm the pairing code on both devices if prompted.

Figure 5.1: Bluetooth pairing interface on the car stereo and a smartphone.
5.3 Wireless CarPlay & Android Auto Connection
For wireless connection, ensure your phone's Bluetooth and Wi-Fi are enabled.
- Pair your phone with the car stereo via Bluetooth (as described in 5.2).
- Once paired, the system will automatically prompt you to enable CarPlay or Android Auto. Confirm the connection.
- Your phone's interface will now be displayed on the car stereo screen.

Figure 5.2: Wireless CarPlay and Android Auto interfaces on the stereo.
5.4 Wired CarPlay & Android Auto Connection
To use wired CarPlay or Android Auto, connect your smartphone to the stereo's USB port using a compatible USB cable. The system will automatically detect and launch the respective interface.
Video 5.1: Demonstration of Hikity Car Radio Functions, including wireless and wired CarPlay/Android Auto connections, hands-free calling, navigation, and music playback.
6. Operating Instructions
6.1 Basic Controls and Touchscreen Operation
The unit features a responsive touchscreen for most operations. Physical buttons and a rotary knob are provided for essential functions like volume control, power, and mode selection.
6.2 FM/RDS Radio
Access the radio function from the main menu. Use the scan or tune buttons to find stations. The RDS (Radio Data System) feature displays station information where available.
6.3 EQ Settings
Customize your audio experience using the Equalizer (EQ) settings. Select from preset modes (Jazz, Classic, Pop, Rock, Flat) or adjust individual frequency bands to achieve your preferred sound profile.

Figure 6.1: FM/RDS Radio and EQ Settings interfaces.
6.4 Mirror Link Function
The Mirror Link feature allows you to display your smartphone's screen directly onto the car stereo. Connect your phone via USB cable. This function supports most Android and iPhone devices, excluding some Huawei and Samsung models.
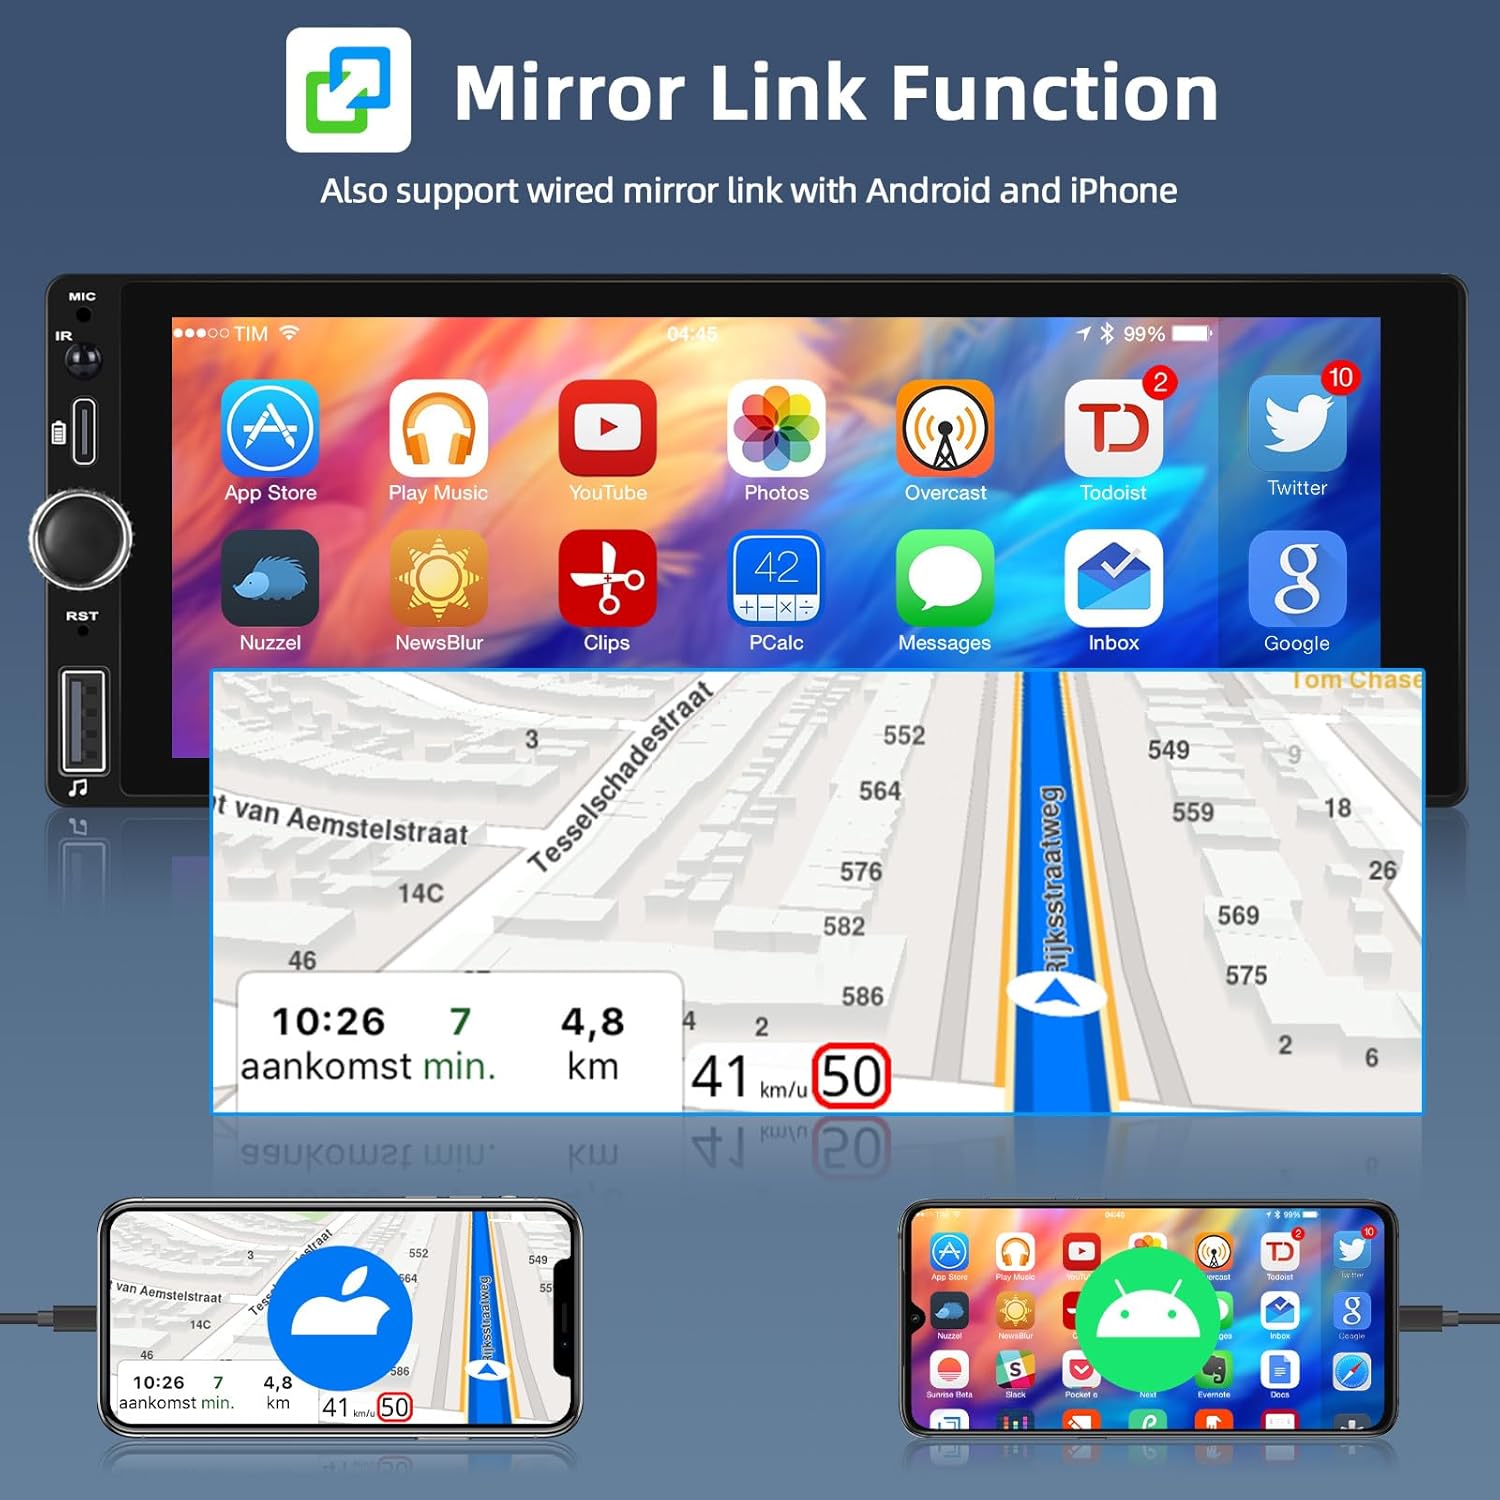
Figure 6.2: Mirror Link functionality showing a phone screen mirrored on the stereo.
6.5 USB/Type-C Playback and Charging
The unit supports USB playback for music, videos, and photos from a U disk or removable hard drive. The USB and Type-C ports also provide mobile phone charging capabilities.

Figure 6.3: USB and Type-C port functions for charging and media playback.
6.6 Steering Wheel Control (SWC) Learning
The unit supports learning functions for your vehicle's steering wheel controls. This allows you to map common functions (e.g., volume, track skip, mode) to your existing steering wheel buttons for convenient operation.

Figure 6.4: Bluetooth music playback and steering wheel control setup.
6.7 Backup Camera Operation
When the vehicle is shifted into reverse, the stereo automatically displays the feed from the connected backup camera, providing parking assistance with guidelines.
7. Maintenance
- Cleaning: Use a soft, dry cloth to clean the screen and unit. For stubborn marks, a slightly damp cloth with mild, non-abrasive cleaner can be used, but avoid spraying liquids directly onto the unit.
- General Care: Avoid placing heavy objects on the unit. Do not block ventilation openings.
8. Troubleshooting
| Problem | Possible Cause | Solution |
|---|---|---|
| No power | Incorrect wiring; Blown fuse; Vehicle battery issue. | Check power connections (ACC, B+, GND). Inspect vehicle fuses. Ensure battery is charged. |
| No sound | Speaker wires disconnected; Volume too low; Mute enabled. | Verify speaker connections. Increase volume. Check if mute is active. |
| Bluetooth/CarPlay/Android Auto not connecting | Bluetooth/Wi-Fi off on phone; Incorrect pairing; Software glitch. | Ensure phone's Bluetooth/Wi-Fi is on. Delete previous pairings and re-pair. Restart both devices. Try wired connection. |
| Backup camera not displaying | Camera not connected; Reverse trigger wire issue; Faulty camera. | Check camera input connection (CAMIN). Verify reverse trigger wire is correctly connected to vehicle's reverse light. |
9. Specifications
| Feature | Specification |
|---|---|
| Screen Size | 6.9 Inch |
| Connectivity Technology | Bluetooth, USB |
| Bluetooth Version | 5.0 |
| Special Features | Touchscreen, Equalizer, Wireless/Wired CarPlay & Android Auto, Mirror Link, FM/RDS Radio, Backup Camera Support, Steering Wheel Control |
| Compatible Devices | Smartphone, Camera |
| Audio Output Mode | Mono |
| Surround Sound Channel Configuration | 4.0 |
| Video Encoding | RM/RMVB/AVI/MP4/MKV/3GP |
| Item Weight | 1.54 pounds (700 Grams) |
| Package Dimensions | 10.43 x 9.06 x 4.69 inches |
| Model Number | 6866C |
10. Warranty and Support
Hikity provides a 1-year quality assurance for this product. For any technical assistance, troubleshooting, or warranty claims, please contact Hikity customer support.
Customer Support: Hikity Tech aims to provide 24-hour customer support. Please refer to the contact information provided with your purchase or visit the official Hikity website for support details.
Return Policy: This product is typically eligible for a 30-day return policy. Please consult your retailer's specific return guidelines.
Protection Plans: Extended protection plans may be available for purchase. Inquire with your retailer for options such as 2-Year or 3-Year protection plans.
Ask a question about this manual
Ask about setup, troubleshooting, compatibility, parts, safety, or missing instructions. Manuals+ will review the question and use this page’s manual context to help answer it.