
Introduction
Thank you for purchasing the VASAGLE Shoe Bench. This versatile furniture piece combines a comfortable seating area with practical storage solutions for your entryway, living room, or bedroom. Featuring a spacious compartment under the lid, varied height shoe shelves, and convenient PU side pockets, it helps keep your space organized and tidy. This manual provides detailed instructions for assembly, operation, maintenance, and troubleshooting to ensure safe and effective use of your new shoe bench.
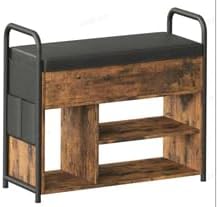
Image: The VASAGLE Shoe Bench, showcasing its rustic brown particle board and black steel frame, with the padded seat and side pockets visible. This bench provides both seating and storage for shoes and small items.
Safety Instructions
- Read all instructions carefully before assembly and use.
- Keep all packaging materials away from children and pets.
- Assemble the product on a soft, clean surface to prevent scratches.
- Ensure all screws and fasteners are securely tightened before use. Periodically check and re-tighten as needed.
- Do not exceed the maximum weight capacity of 200 lbs (90.7 kg) for the bench.
- Do not stand on the bench or allow children to climb on it.
- Use the product only for its intended purpose as a shoe bench and storage unit.
- Be cautious of finger pinching when opening and closing the lid. The secure lid hinges are designed to hold it open safely.
- If any parts are missing, damaged, or defective, do not attempt to assemble or use the product. Contact customer support immediately.
Parts List
Before beginning assembly, verify that all parts listed below are present and undamaged. If any parts are missing or damaged, please contact customer service.
| Part No. | Description | Quantity |
|---|---|---|
| A | Left Steel Frame | 1 |
| B | Right Steel Frame | 1 |
| C | Top Panel (with padded seat) | 1 |
| D | Front Panel | 1 |
| E | Bottom Shelf | 1 |
| F | Middle Vertical Divider | 1 |
| G | Adjustable Shelf | 1 |
| H | Back Panel | 1 |
| I | PU Side Pockets | 2 |
Hardware List:
- M6x30mm Screws (x12)
- M4x15mm Screws (x8)
- Shelf Pins (x4)
- L-shaped Hex Key (x1)
- Adjustable Feet (pre-installed on steel frames)
- Lid Support Hinges (pre-installed on Top Panel)
Setup (Assembly Instructions)
Follow these steps carefully to assemble your VASAGLE Shoe Bench. It is recommended to have two people for assembly.
- Step 1: Attach Steel Frames to Bottom Shelf.
Place the Bottom Shelf (E) on a soft, flat surface. Attach the Left Steel Frame (A) and Right Steel Frame (B) to the ends of the Bottom Shelf (E) using M6x30mm Screws. Ensure the pre-drilled holes align. Do not fully tighten screws yet.
Image: Illustration showing the initial attachment of the steel frames (A and B) to the bottom shelf (E), with screws partially inserted. This image serves as a general visual guide for assembly steps.
- Step 2: Install Middle Vertical Divider.
Insert the Middle Vertical Divider (F) into the designated slots on the Bottom Shelf (E). Secure it to the Bottom Shelf (E) and the Front Panel (D) using M6x30mm Screws. Ensure the divider is oriented correctly to allow for shelf placement.
- Step 3: Attach Front Panel.
Connect the Front Panel (D) to the assembled steel frames (A, B) and the Middle Vertical Divider (F) using M6x30mm Screws. Ensure all connections are snug. Now, you can gently tighten all M6x30mm screws from Steps 1, 2, and 3.
- Step 4: Insert Adjustable Shelf.
Insert the Shelf Pins into the desired height holes on the Middle Vertical Divider (F) and the Right Steel Frame (B). Carefully place the Adjustable Shelf (G) onto the shelf pins.
- Step 5: Attach Back Panel.
Align the Back Panel (H) with the rear edges of the steel frames (A, B) and the Middle Vertical Divider (F). Secure it using M4x15mm Screws. This step adds stability to the structure.
- Step 6: Attach Top Panel (with padded seat).
Carefully place the Top Panel (C) onto the assembled frame. The pre-installed lid support hinges should align with the pre-drilled holes on the back of the steel frames. Secure the Top Panel (C) to the steel frames (A, B) using the remaining M6x30mm Screws. Ensure the lid opens and closes smoothly and the hinges function correctly.
- Step 7: Attach PU Side Pockets.
Attach the PU Side Pockets (I) to the designated hooks or attachment points on the exterior of the steel frames (A and B). These pockets are designed to hang securely.
- Step 8: Final Check.
Once assembly is complete, gently shake the bench to ensure it is stable. Adjust the pre-installed adjustable feet on the bottom of the steel frames if the bench wobbles on uneven floors. Double-check that all screws are fully tightened.
Operating Instructions
- Seating: The padded top provides a comfortable surface for sitting while putting on or taking off shoes. Ensure the lid is fully closed before sitting.
- Top Compartment Storage: Lift the padded lid to access the spacious interior compartment. The lid will stay open at any angle thanks to the secure lid hinges, allowing for easy access to items like gloves, scarves, or small bags. Close the lid gently to avoid pinching.
- Shoe Rack Storage: Utilize the bottom shelves to organize your footwear. The adjustable shelf allows you to customize the height for different shoe types, from flats to boots.
- PU Side Pockets: Use the two practical PU side pockets for storing smaller items such as shoe horns, keys, or pet leashes, keeping them readily accessible.
Maintenance
- Cleaning:
- For the particle board and steel frame, wipe with a soft, damp cloth. Avoid harsh chemicals or abrasive cleaners.
- For the PU padded seat and side pockets, wipe with a damp cloth and mild soap if necessary. Dry thoroughly.
- Regular Checks: Periodically check all screws and fasteners to ensure they remain tight. Re-tighten as needed to maintain stability and safety.
- Placement: Avoid placing the bench in direct sunlight or near heat sources to prevent material degradation.
- Spills: Clean up spills immediately to prevent staining or damage to the wood and fabric surfaces.
Troubleshooting
| Problem | Possible Cause | Solution |
|---|---|---|
| Bench wobbles after assembly. | Screws are not fully tightened; uneven floor; adjustable feet not properly set. | Ensure all screws are fully tightened. Adjust the leveling feet on the bottom of the steel frames to stabilize the bench on uneven surfaces. |
| Lid does not close properly or is difficult to open. | Hinges misaligned or damaged; obstruction in the compartment. | Check for any obstructions in the compartment. Verify that the lid hinges are correctly installed and not bent. If damaged, contact customer support for replacement parts. |
| Parts do not fit together during assembly. | Incorrect orientation of parts; wrong screws used; manufacturing defect. | Review the assembly instructions carefully to ensure parts are oriented correctly. Verify you are using the correct screws for each step. If parts are defective, contact customer support. |
| Missing hardware or parts. | Packaging error. | Do not proceed with assembly. Contact customer support immediately with your product model and a list of missing items. |
Specifications
- Product Dimensions: 11.81 x 39.61 x 24.61 inches (30 x 100.6 x 62.5 cm)
- Item Weight: 38.3 pounds (17.37 kg)
- Material: Particle Board, Steel, PU (Polyurethane)
- Color: Rustic Brown + Black Ink
- Max. Static Load Capacity of Bench: 200 lbs (90.7 kg)
- Model Number: LSB152K01
- UPC: 194343156880
- Manufacturer: VASAGLE
Warranty and Support
VASAGLE products are designed for quality and durability. This product comes with a standard manufacturer's warranty covering defects in materials and workmanship under normal use. Please refer to your purchase documentation for specific warranty terms and duration.
For technical support, missing parts, or warranty claims, please contact our customer service team with your purchase details and product model number (LSB152K01).
Customer Service Contact:
- Website: www.vasagle.com/support (Example link, actual link may vary)
- Email: support@vasagle.com (Example email, actual email may vary)
- Phone: 1-800-XXX-XXXX (Example number, actual number may vary)
Please have your purchase receipt and product information ready when contacting support.


