Xtahdge RM113D
RICHMETERS RM113D NCV Digital Multimeter Instruction Manual
Model: RM113D | Brand: Xtahdge
Introduction
The RICHMETERS RM113D is a versatile digital multimeter designed for accurate measurement of various electrical parameters. It features auto-ranging capabilities, a large backlit display, NCV (Non-Contact Voltage) detection, and a magnetic suction function for convenient use. This manual provides essential information for safe and effective operation of your device.
Safety Information
Always adhere to the following safety precautions to prevent personal injury or damage to the multimeter or the equipment under test.
- Read and understand all instructions before using the multimeter.
- Do not exceed the maximum input values specified for each measurement range.
- Ensure the test leads are in good condition, without any damage to the insulation.
- Never measure voltage on circuits with power exceeding 600V AC/DC.
- Exercise extreme caution when working with live circuits.
- Replace batteries when the low battery indicator appears to ensure accurate readings.
- Do not operate the multimeter if it appears damaged or is not functioning properly.
- Avoid using the device in wet environments or during electrical storms.
Package Contents
Verify that all items are present in your package:
- 1 x RM113D Digital Multimeter
- 1 x Pair of Electronic Test Probes
- 1 x Thermocouple (Max 400 degrees Celsius)
- 1 x English User Manual
- Note: 3 x AAA batteries are NOT included and must be purchased separately.

Image: Included thermocouple for temperature measurements. This probe is designed for measuring temperatures up to 400 degrees Celsius.
Product Overview
Familiarize yourself with the components of your RM113D Digital Multimeter.

Image: Front view of the RM113D multimeter, highlighting key components such as the LCD display, function knob, input terminals, NCV sensor, and control buttons.
- LCD Display: Shows measurement readings, units, and function indicators.
- Function Knob: Used to select the desired measurement mode (e.g., Voltage, Current, Resistance, Temperature).
- Input Terminals: Connect test leads for various measurements.
- HOLD Button: Freezes the current display reading.
- FUNC/Hz Button: Toggles between functions within a mode (e.g., AC/DC, Frequency) or activates frequency measurement.
- Backlight/Flashlight Button: Activates the display backlight and the integrated flashlight.
- NCV Sensor: Detects non-contact voltage.
- Magnetic Suction: Located on the back for hands-free operation on metal surfaces.
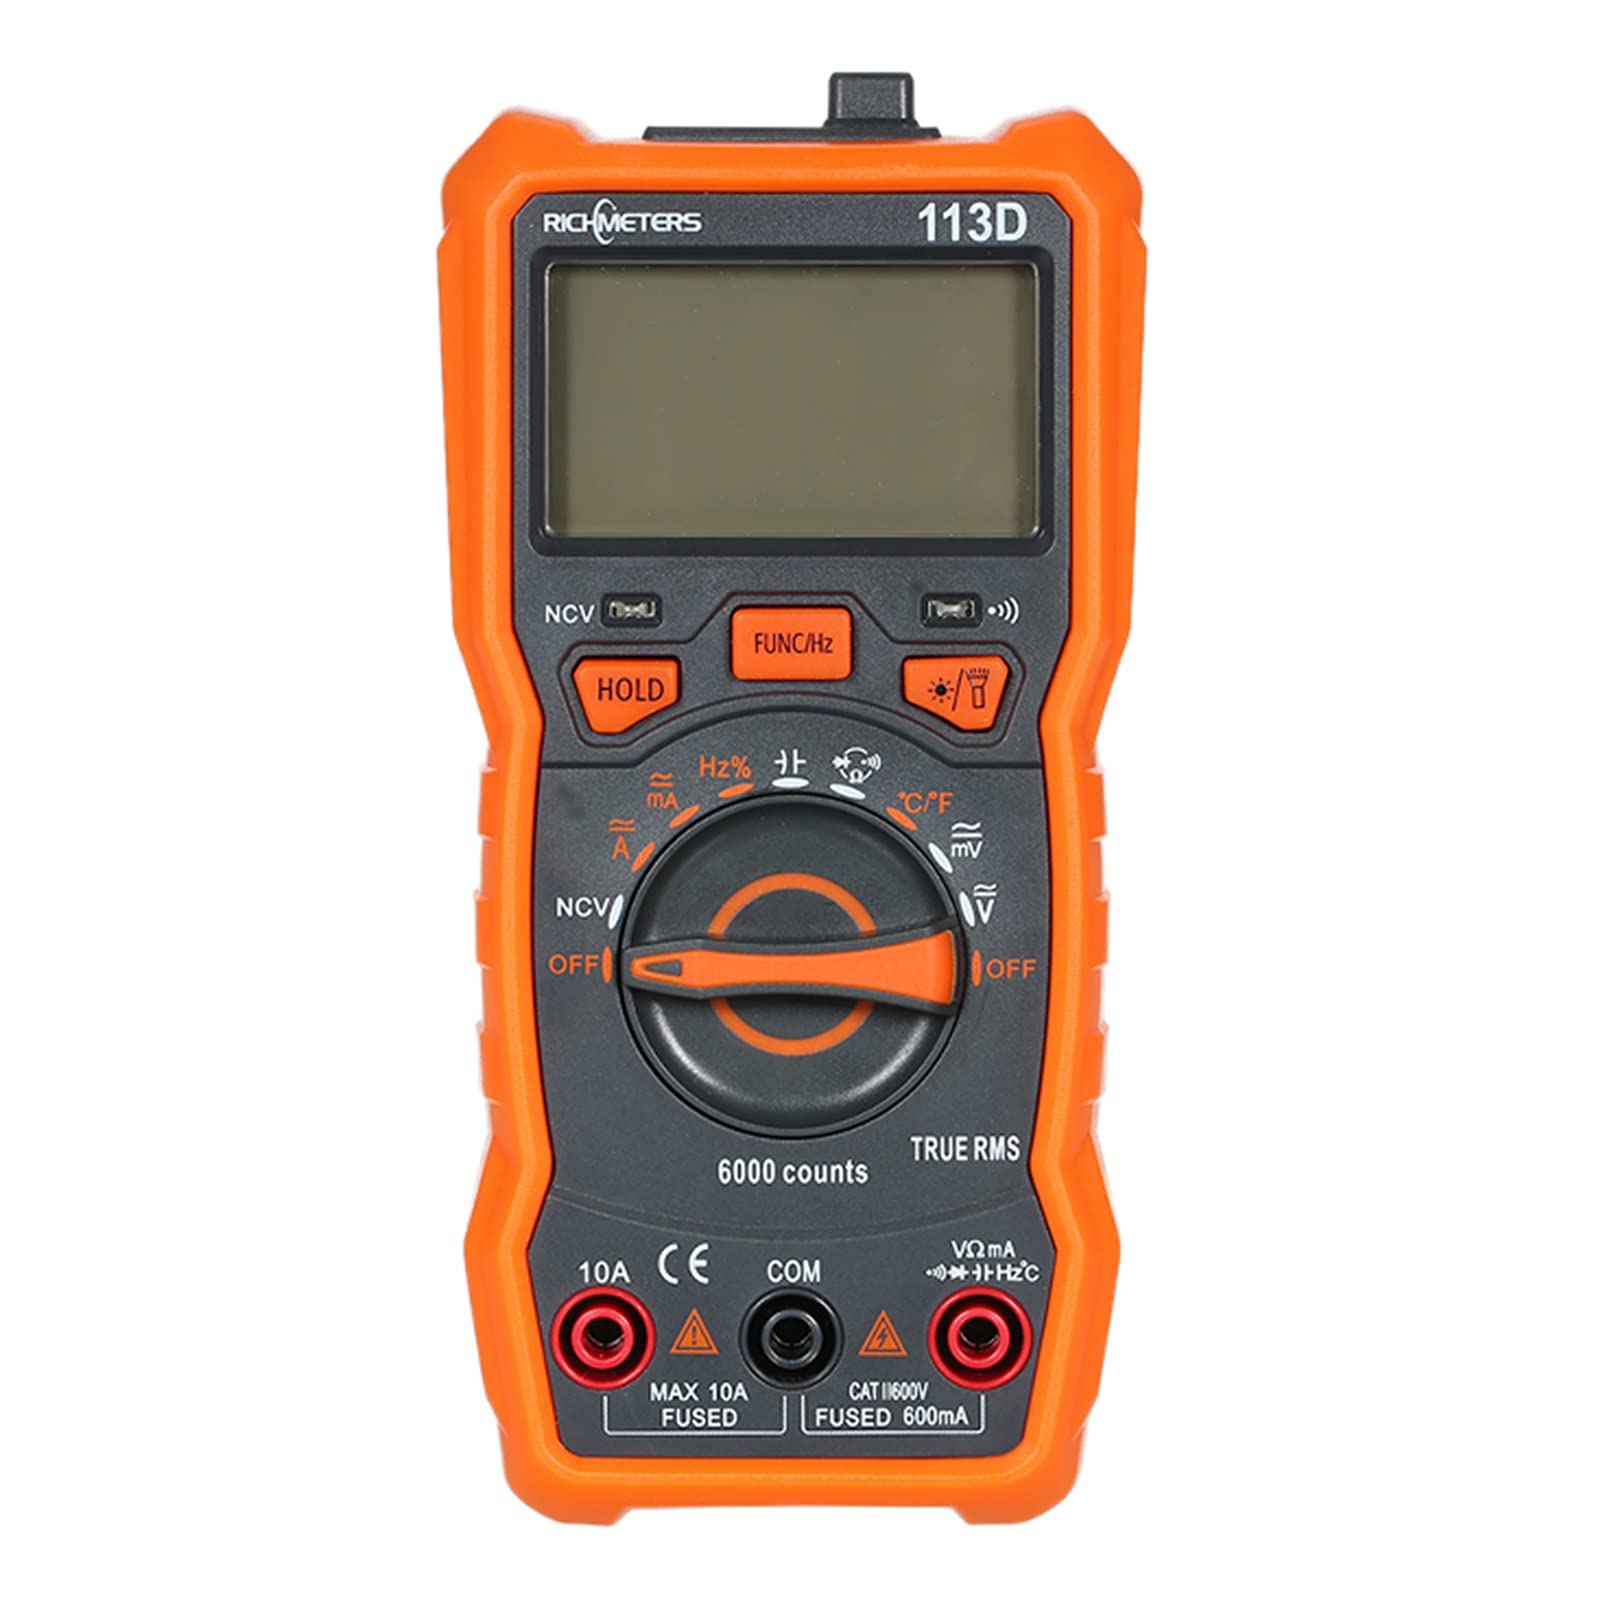
Image: Close-up views of the RM113D multimeter, showing the integrated lamp (flashlight), the magnetic suction feature on the back, and the clear LCD display.
Setup
1. Battery Installation
The RM113D requires three AAA batteries (not included).
- Ensure the multimeter is turned OFF.
- Locate the battery compartment cover on the back of the device.
- Use a screwdriver to open the battery compartment.
- Insert three AAA batteries, observing the correct polarity (+/-).
- Replace the battery compartment cover and secure it with the screw.

Image: Rear view of the RM113D multimeter, showing the battery compartment cover and the magnetic suction feature for hands-free use.
2. Connecting Test Leads
Connect the test leads to the appropriate input terminals based on the desired measurement.
- Insert the black test lead into the COM (Common) terminal.
- For most voltage, resistance, capacitance, frequency, and temperature measurements, insert the red test lead into the VΩmAHz terminal.
- For current measurements up to 600mA, keep the red lead in the VΩmAHz terminal.
- For current measurements up to 10A, insert the red test lead into the 10A terminal.

Image: The RM113D multimeter with red and black test leads properly connected to the input terminals, ready for measurement.
Operating Instructions
This section details how to perform various measurements with your RM113D multimeter.
General Operation
- Turn the function knob to the desired measurement mode.
- Press the FUNC/Hz button to switch between AC/DC or other sub-functions if available in the selected mode.
- Press the HOLD button to freeze the current reading on the display. Press again to release.
- Press the Backlight/Flashlight button to activate the display backlight or the flashlight.
- The multimeter features an auto-power-off function to conserve battery life after several minutes of inactivity.

Image: The RM113D multimeter displaying icons for its various functions, including Data Hold, Continuity, Diode, AC/DC Voltage, Capacitance, AC/DC Current, Auto Power Off, Flashlight, Frequency, Temperature, Duty Cycle, Resistance, and Backlight.
Measuring AC/DC Voltage
- Connect the black lead to COM and the red lead to VΩmAHz.
- Turn the function knob to the V~ (AC Voltage) or V- (DC Voltage) position. The multimeter will auto-range.
- Touch the test probes to the circuit points where you want to measure voltage.
- Read the voltage value on the LCD display.
Measuring AC/DC Current
Caution: To measure current, the multimeter must be connected in series with the circuit. Never connect it in parallel across a voltage source when in current mode, as this can blow the fuse or damage the meter.
- Turn off power to the circuit.
- Connect the black lead to COM.
- For current up to 600mA, connect the red lead to VΩmAHz. For current up to 10A, connect the red lead to 10A.
- Break the circuit and connect the test probes in series with the load.
- Turn the function knob to the A~ (AC Current) or A- (DC Current) position.
- Restore power to the circuit.
- Read the current value on the LCD display.
- After measurement, turn off power, disconnect the multimeter, and restore the circuit.
Measuring Resistance
- Ensure the circuit is de-energized and any capacitors are discharged.
- Connect the black lead to COM and the red lead to VΩmAHz.
- Turn the function knob to the Ω (Resistance) position.
- Touch the test probes across the component or circuit where you want to measure resistance.
- Read the resistance value on the LCD display.
Measuring Capacitance
- Ensure the capacitor is fully discharged before measurement to prevent damage to the meter.
- Connect the black lead to COM and the red lead to VΩmAHz.
- Turn the function knob to the Capacitance position (often shared with other functions, use FUNC/Hz to select).
- Touch the test probes across the capacitor terminals.
- Read the capacitance value on the LCD display.
Measuring Frequency
- Connect the black lead to COM and the red lead to VΩmAHz.
- Turn the function knob to the Hz (Frequency) position (often shared with other functions, use FUNC/Hz to select).
- Touch the test probes to the circuit points where you want to measure frequency.
- Read the frequency value on the LCD display.
Measuring Temperature
- Ensure the multimeter is OFF.
- Connect the thermocouple to the VΩmAHz (red) and COM (black) terminals, observing polarity.
- Turn the function knob to the °C/°F (Temperature) position.
- Place the thermocouple tip on or near the object whose temperature you wish to measure.
- Read the temperature value on the LCD display. Use the FUNC/Hz button to switch between Celsius and Fahrenheit.
Non-Contact Voltage (NCV) Detection
- Turn the function knob to the NCV position.
- Move the NCV sensor (top of the meter) close to the conductor you suspect has AC voltage.
- The meter will emit an audible beep and the NCV indicator will light up, with increasing frequency as it gets closer to a live voltage source.
Continuity Test
- Ensure the circuit is de-energized.
- Connect the black lead to COM and the red lead to VΩmAHz.
- Turn the function knob to the Continuity position (often shared with Diode/Resistance, use FUNC/Hz to select).
- Touch the test probes across the component or circuit path.
- If there is continuity (low resistance), the meter will emit an audible beep.
Diode Test
- Ensure the diode is disconnected from the circuit.
- Connect the black lead to COM and the red lead to VΩmAHz.
- Turn the function knob to the Diode position (often shared with Continuity/Resistance, use FUNC/Hz to select).
- Touch the red probe to the anode and the black probe to the cathode of the diode. A forward voltage drop (e.g., 0.5V to 0.8V for silicon diodes) will be displayed.
- Reverse the probes. The display should show "OL" (Open Loop) for a good diode.
Maintenance
Battery Replacement
When the low battery indicator appears on the display, replace the batteries promptly to ensure accurate measurements. Refer to the "Battery Installation" section under Setup for instructions.
Cleaning
Wipe the meter casing with a damp cloth and a mild detergent. Do not use abrasives or solvents. Ensure the meter is completely dry before use.
Storage
If the meter is not used for an extended period, remove the batteries to prevent leakage. Store the device in a cool, dry place, away from direct sunlight and extreme temperatures.
Troubleshooting
| Problem | Possible Cause | Solution |
|---|---|---|
| Meter does not power on. | Dead or incorrectly installed batteries. | Check battery polarity; replace batteries. |
| "OL" (Overload) displayed. | Measurement exceeds selected range or meter's maximum capacity. | Select a higher range (if not auto-ranging) or ensure the value is within the meter's specifications. |
| Inaccurate readings. | Low battery; damaged test leads; incorrect measurement mode. | Replace batteries; inspect and replace test leads if damaged; verify correct function knob setting. |
| No continuity beep. | Open circuit; meter not in continuity mode. | Check the circuit for breaks; ensure the function knob is set to continuity. |
| Current measurement fuse blown. | Attempted to measure current in parallel; current exceeded fuse rating. | Replace the fuse (refer to specifications for fuse type); always connect in series for current measurement. |
Specifications
| Parameter | Range / Value |
|---|---|
| DC Voltage Range | 600mV / 6V / 60V / 600V |
| AC Voltage Range (True RMS) | 600mV / 6V / 60V / 600V |
| DC Current Range | 60mA / 600mA / 10A |
| AC Current Range | 60mA / 600mA / 10A |
| Resistance Range | 600Ω / 6KΩ / 60KΩ / 600KΩ / 6MΩ / 60MΩ |
| Frequency Range | 9.999Hz / 99.99Hz / 999.9Hz / 9.999KHz / 999.9KHz / 9.999MHz |
| Capacitance Range | 6nF / 60nF / 600nF / 6uF / 60uF / 600uF / 6mF / 100mF |
| Temperature Range | -20~1000°C / -4~1832°F |
| Display | 6000 Counts |
| Power Source | 3 x AAA Batteries (not included) |
| Item Weight | 220g / 7.75 ounces |
| Item Dimensions (L x W x H) | 147 x 71 x 45 mm / 5.79 x 2.80 x 1.77 inches |
Warranty and Support
For warranty information and technical support, please refer to the documentation provided with your purchase or contact the manufacturer directly. Keep your purchase receipt as proof of purchase.
Ask a question about this manual
Ask about setup, troubleshooting, compatibility, parts, safety, or missing instructions. Manuals+ will review the question and use this page’s manual context to help answer it.