1. Introduction
This manual provides essential instructions for the proper installation, calibration, and maintenance of your YINMIK YK-S01E Soil pH Meter Replacement Probe. This probe is specifically designed as a replacement for the YINMIK YK-S01E Blue Soil pH Tester, ensuring continued accurate measurement of soil pH levels.
Please read this manual thoroughly before replacing the probe to ensure correct usage and to prolong the lifespan of your device.

Figure 1.1: The YINMIK Soil pH Meter with the probe inserted into soil, demonstrating its primary application.
2. Product Overview
The YINMIK YK-S01E replacement probe is a crucial component for maintaining the accuracy of your YK-S01E soil pH meter. It consists of the electrode body and a protective cap.
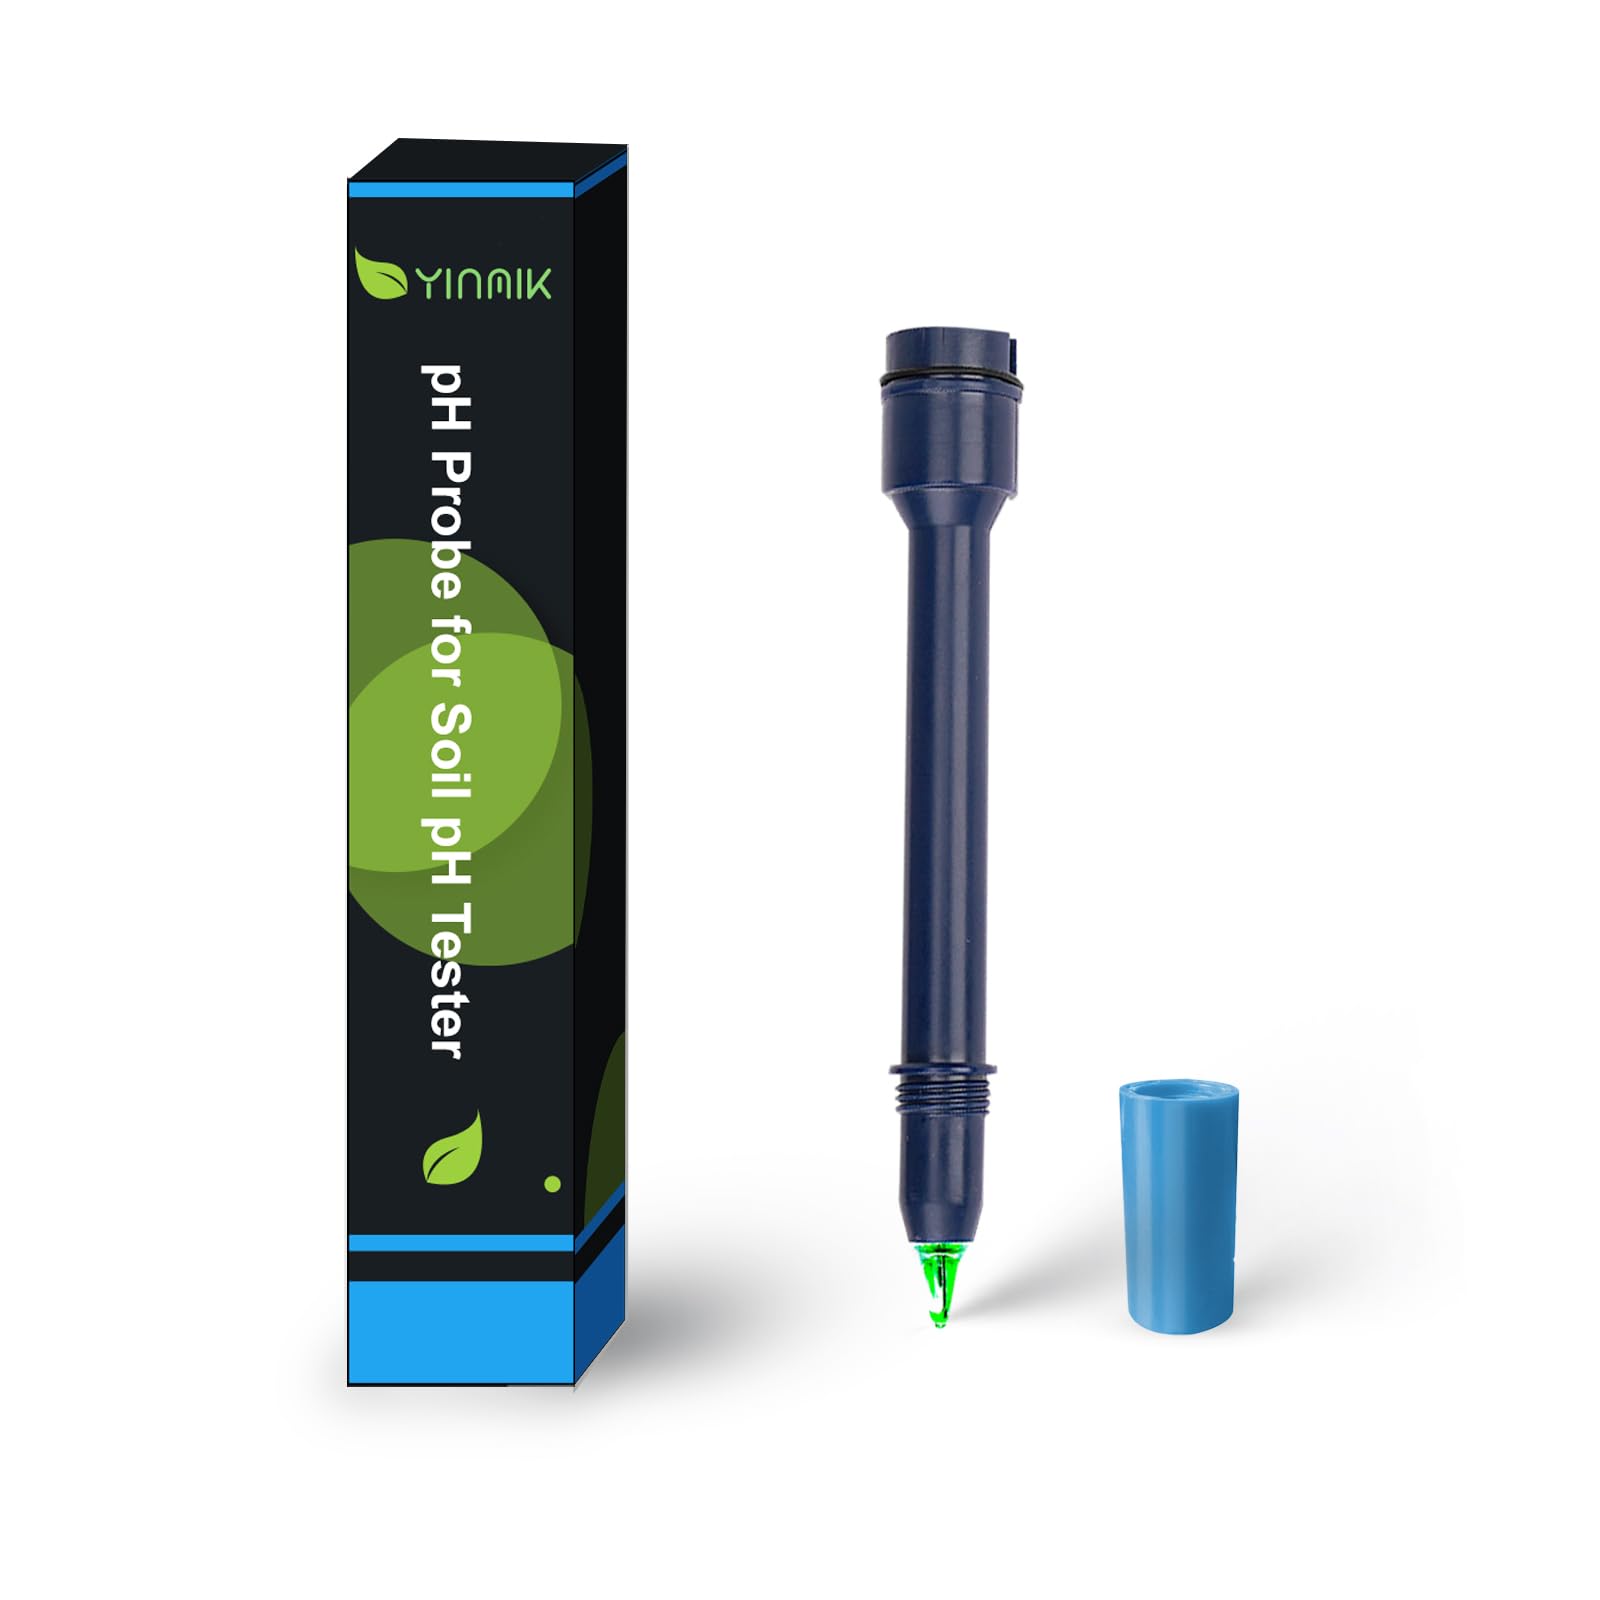
Figure 2.1: The YINMIK YK-S01E Soil pH Meter with the blue replacement probe installed. The meter features a digital display and control buttons.

Figure 2.2: A detailed view of the YINMIK YK-S01E replacement soil pH electrode, showing its robust design for soil measurements.
3. Setup: Replacing the Probe
Follow these steps to correctly replace the old electrode with the new YINMIK YK-S01E replacement probe:
- Remove the Old Electrode: Gently turn the protective cap of the pH meter counter-clockwise (to the left) to loosen and remove it. Then, carefully pull out the old electrode from the meter body.
- Install the New Electrode: Insert the new YINMIK YK-S01E replacement electrode into the meter body. Ensure it is properly seated and aligned. Pay close attention to its positioning to avoid damage to the connection pins.
- Secure the Electrode: Once the new electrode is in place, tighten the electrode collar by turning it clockwise (to the right) until it is secure. Do not overtighten.

Figure 3.1: Illustration of the probe replacement process. The image shows a hand holding the meter and another hand inserting the new probe, emphasizing the correct alignment and securing of the electrode.
Important: After replacing the electrode, it is essential to recalibrate the pH meter to ensure accurate readings. Refer to the "Operating Instructions" section for calibration details.
4. Operating Instructions: Calibration
Recalibration is mandatory after replacing the electrode to maintain measurement accuracy. Refer to your YINMIK YK-S01E Soil pH Meter's main instruction manual for detailed calibration procedures. Generally, calibration involves using standard pH buffer solutions (e.g., pH 4.00, pH 7.00, pH 10.01).

Figure 4.1: The YINMIK YK-S01E Soil pH Meter displayed alongside pH buffer powders (pH 4.00, pH 7.00, pH 10.01) used for recalibration after electrode replacement.
Ensure you have fresh calibration solutions or powders available. These can be purchased separately from the YINMIK store.
5. Maintenance
Proper maintenance of the electrode ensures its longevity and accuracy.
5.1 Keeping the Sponge Moist
The protective cap of the electrode contains a sponge that must be kept moist with electrode protective solution. This prevents the electrode from drying out, which can significantly affect its performance and lifespan.
- Always ensure the sponge inside the protective cap is moist.
- If the sponge appears dry, add approximately three drops of electrode protective solution to re-moisten it. Do not use distilled water for this purpose, as it can deplete the electrode's internal electrolyte.
- Store the electrode with the protective cap securely in place when not in use.
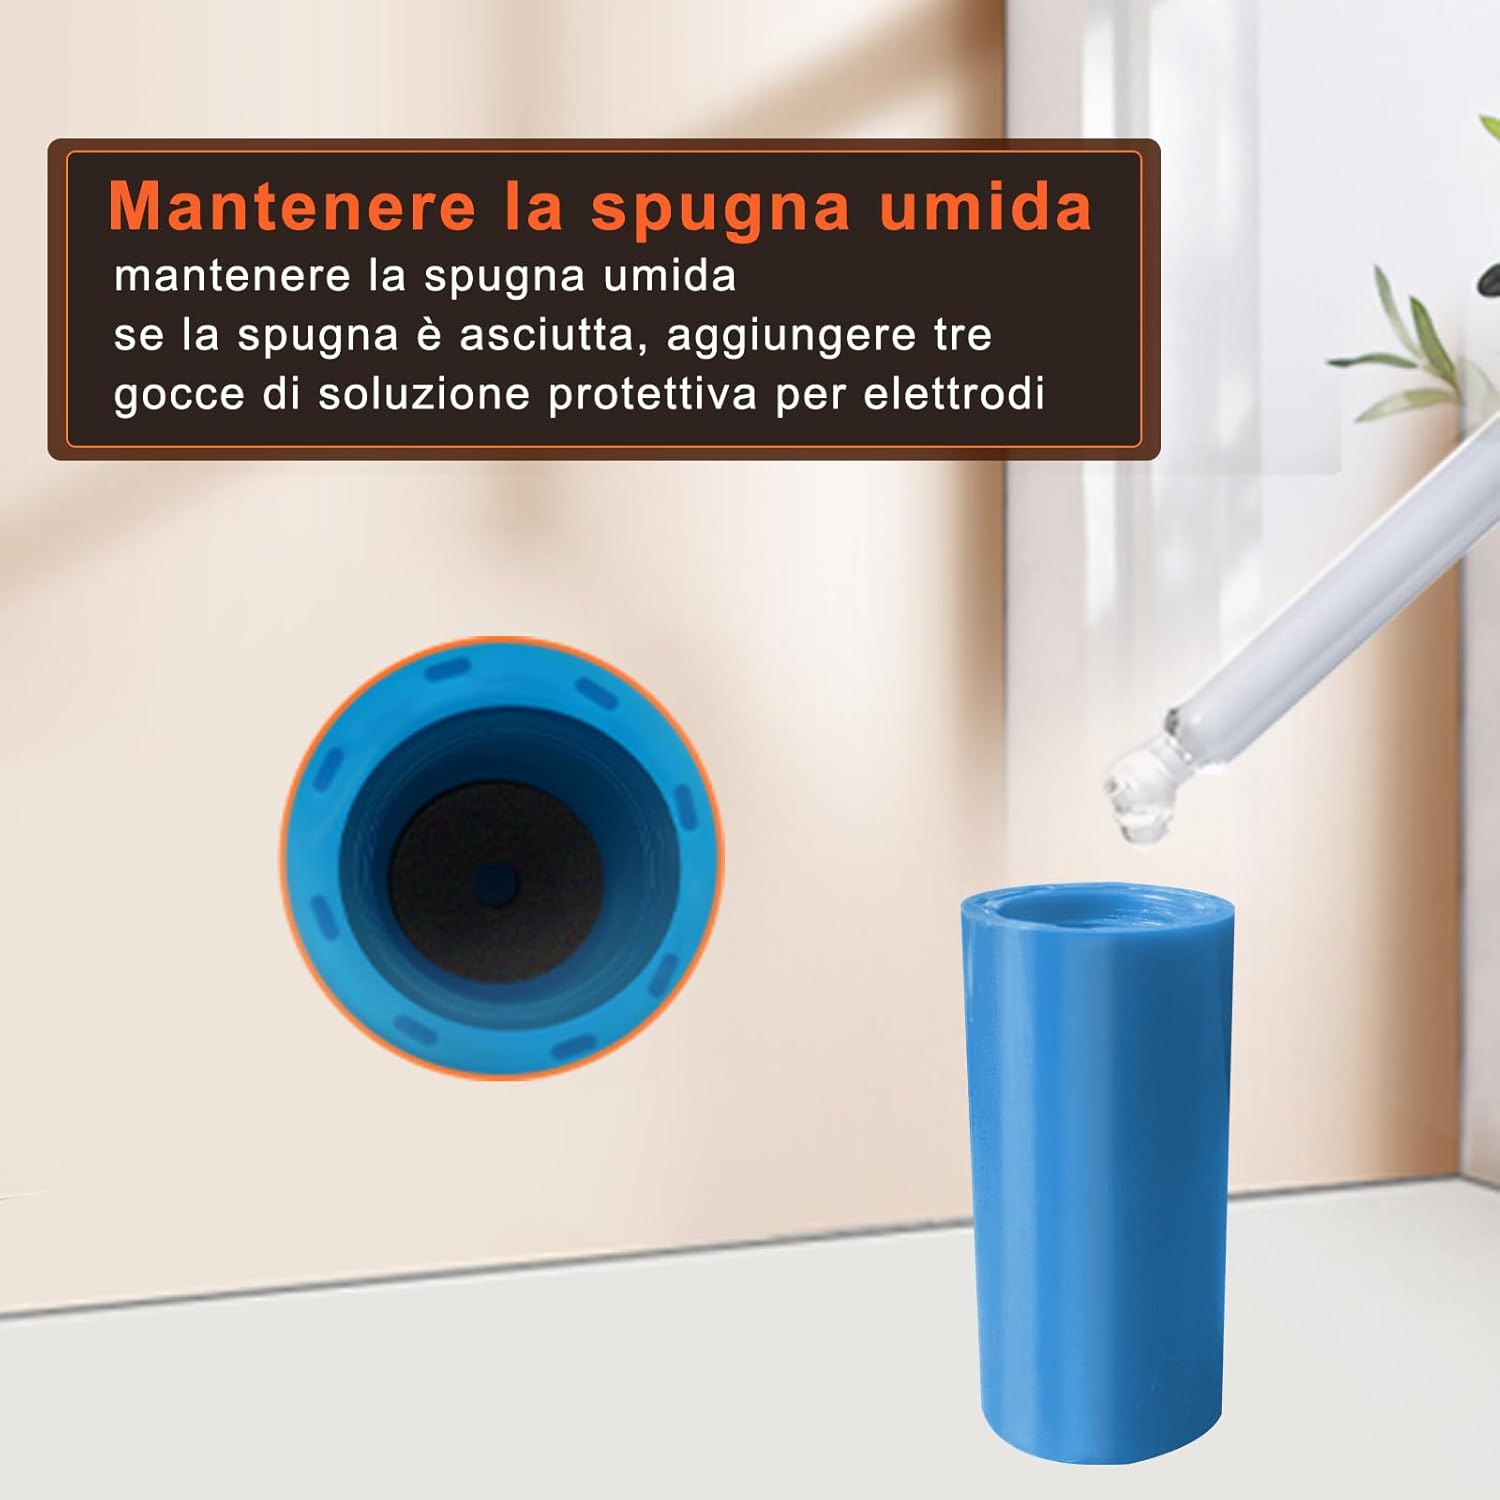
Figure 5.1: The protective cap of the electrode, showing the sponge and a dropper applying electrode protective solution to keep it moist.
5.2 Cleaning the Electrode
After each use, rinse the electrode tip with distilled water to remove any soil particles or residues. Avoid wiping the glass bulb, as this can cause static charges and damage the sensitive membrane.
6. Troubleshooting
If you encounter issues after replacing the probe, consider the following:
- Inaccurate Readings: Ensure the meter has been properly recalibrated after probe replacement. Check if the calibration solutions are fresh and correctly prepared.
- Slow Response: The electrode might be dry. Ensure the sponge in the protective cap is moist with electrode protective solution.
- No Reading/Error Message: Verify that the new electrode is securely installed and properly connected to the meter body. Check for any visible damage to the electrode.
For further assistance, please refer to the main YINMIK YK-S01E Soil pH Meter manual or contact YINMIK customer support.
7. Specifications
| Feature | Detail |
|---|---|
| Model Number | YK-S01E (Probe-S01EEU) |
| Product Type | Replacement Soil pH Electrode |
| Measurement Accuracy | ±0.1 pH |
| Dimensions (L x W x H) | 18 x 3 x 3 cm |
| Weight | 25 grams |
| Manufacturer | JiNan Huiquan Electronic Co.,Ltd |
| Items in Package | 1 (YK-S01E pH probe) |
| Batteries Required/Included | No (for the probe itself) |
8. Support and Accessories
For any questions, technical support, or to purchase additional accessories, please contact YINMIK customer service or visit the official YINMIK store.
You can find a complete range of accessories, including electrode protective solution, calibration solutions, and calibration powders, on the YINMIK store to ensure optimal performance of your pH meter.
Note: Warranty information for replacement parts may vary. Please refer to your original product documentation or contact YINMIK directly for specific warranty details.