
1. Introduction
This manual provides comprehensive instructions for the proper installation, operation, and maintenance of your Dalouguan Ceiling Fan Remote Control (Model DLG-YKQ01). This remote is compatible with Dalouguan ceiling fan models DLG-FSD22, DLG-FSD23, DLG-FSD24, DLG-FSD25, DLG-FSD28, DLG-FSD36, and DLG-FSD37. Please read this manual thoroughly before use to ensure safe and efficient operation.
2. Product Overview: Remote Control Layout
Familiarize yourself with the buttons and functions of your remote control:
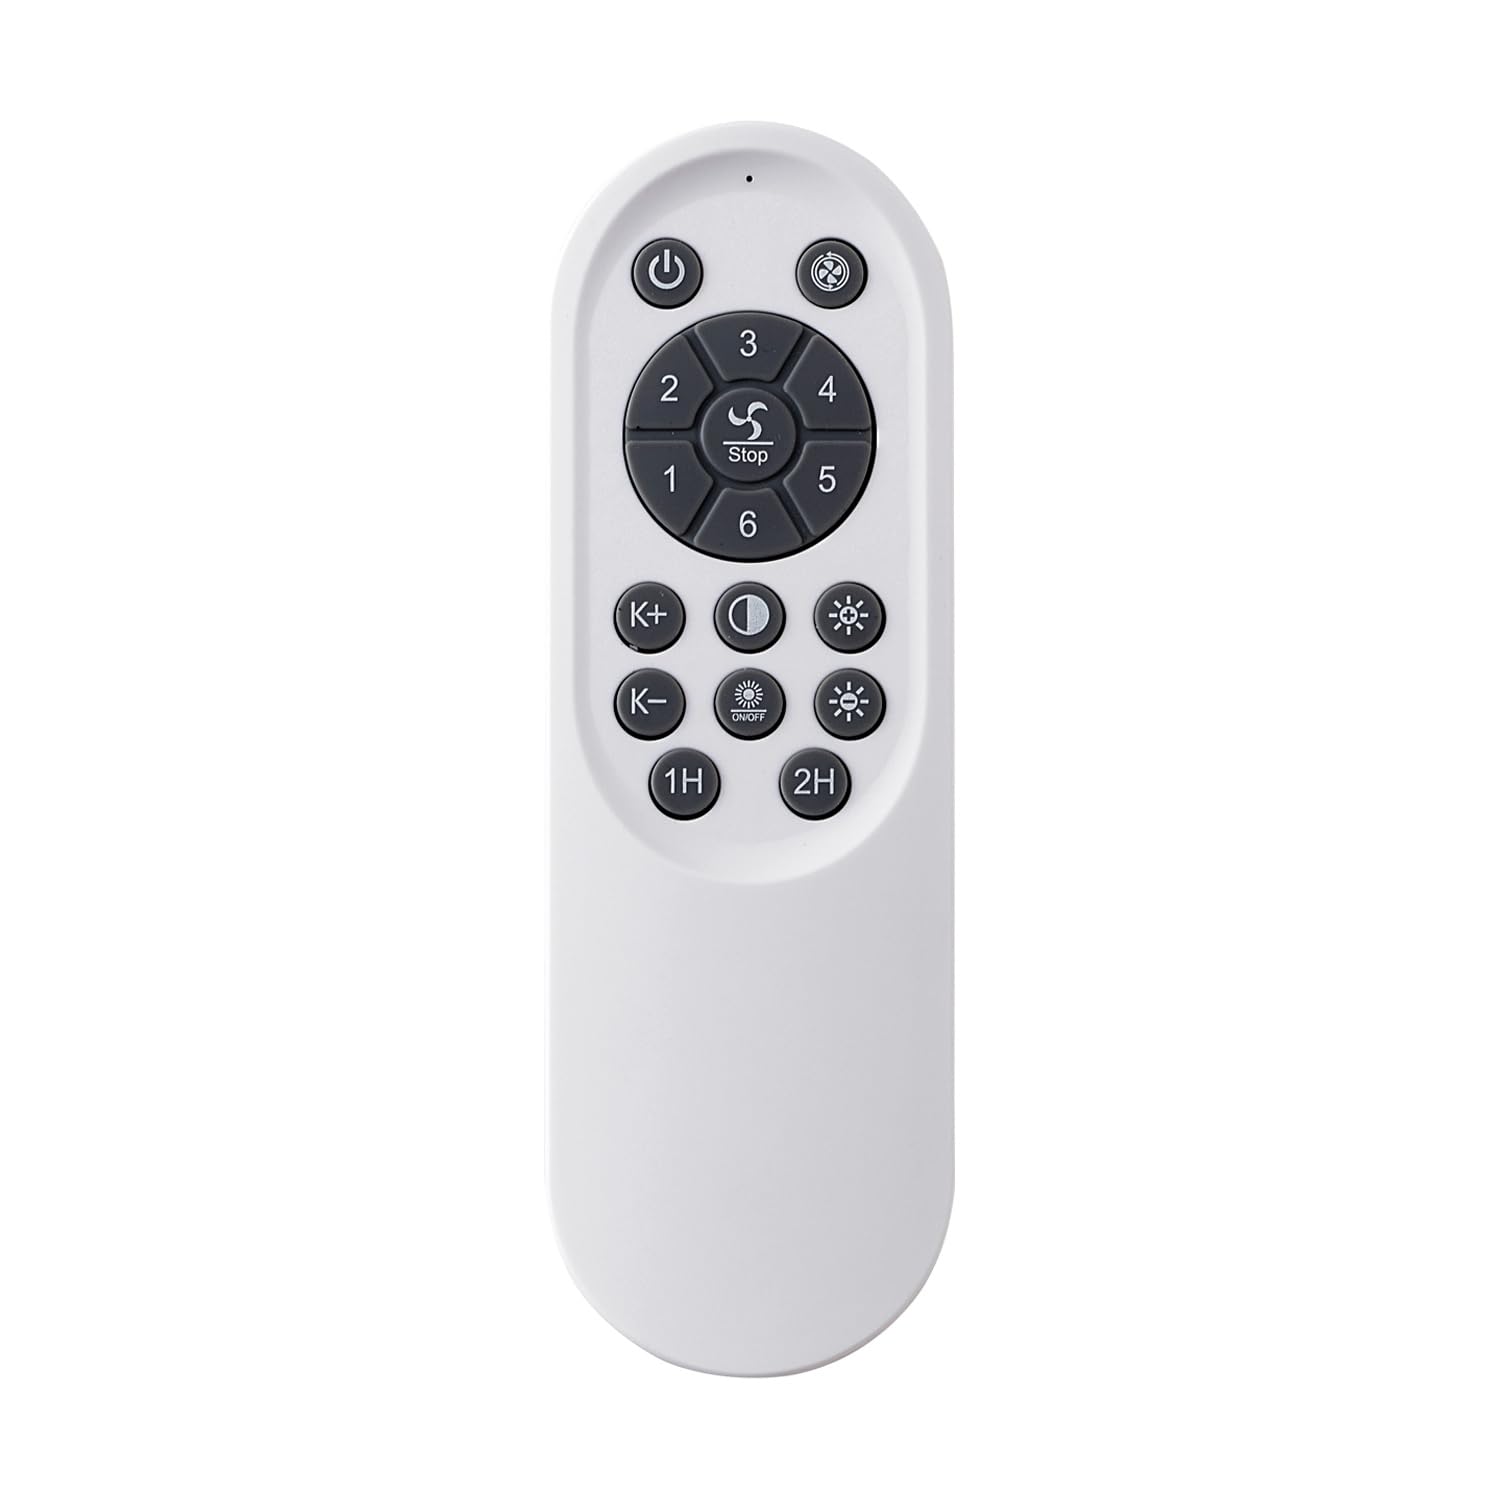
Image: Dalouguan Ceiling Fan Remote Control. This image displays the remote control with various buttons labeled for their respective functions, including fan speed, light control, and timing.
- Wind Guide Wheel Switch: Controls the oscillation or direction of the fan's airflow.
- Positive and Negative: Likely controls the fan's rotation direction (forward/reverse).
- Fan 1-6 gears: Adjusts the fan speed from level 1 (lowest) to level 6 (highest).
- Fan stopped + (clear code): Stops the fan and can be used to clear pairing codes.
- Segmentation + (pair code): Used for pairing the remote control with the fan unit.
- Color temperature+: Increases the color temperature of the light (e.g., warmer to cooler white).
- Color temperature-: Decreases the color temperature of the light (e.g., cooler to warmer white).
- Brightness+: Increases the brightness of the light.
- Brightness-: Decreases the brightness of the light.
- Light switch (ON/OFF): Turns the light on or off.
- Timing 1 hour (1H): Sets the fan/light to turn off automatically after 1 hour.
- Timing 2 hour (2H): Sets the fan/light to turn off automatically after 2 hours.
3. Setup
3.1 Battery Installation
The remote control requires two (2) AAA 1.5V batteries (not included).
- Locate the battery compartment cover on the back of the remote control.
- Slide or unclip the cover to open the compartment.
- Insert two AAA batteries, ensuring the positive (+) and negative (-) terminals align correctly with the markings inside the compartment.
- Replace the battery compartment cover securely.
3.2 Remote Control Pairing
If the remote control does not operate the fan or light, it may need to be paired. Follow these steps to pair the remote control with your ceiling fan:
- Ensure the ceiling fan's main power supply is OFF at the wall switch.
- Press and hold the Segmentation + (pair code) key on the remote control.
- While still holding the Segmentation + (pair code) key, turn ON the wall switch to restore power to the fan.
- The fan light will flash a few times, or you may hear a beep, indicating successful pairing.
Note: If you need to pair the remote control a second time, wait approximately 30 seconds after turning off the power before repeating the pairing operation.
4. Operating Instructions
4.1 Fan Operation
- Fan 1-6 gears: Press the numbered buttons (1-6) to select the desired fan speed. '1' is the lowest speed, and '6' is the highest.
- Fan stopped + (clear code): Press this button to turn off the fan.
- Wind Guide Wheel Switch: Press this button to activate or deactivate the fan's wind guide or oscillation feature.
- Positive and Negative: Press this button to change the direction of the fan blades (e.g., for summer downdraft or winter updraft).
4.2 Light Operation
- Light switch (ON/OFF): Press this button to turn the fan light on or off.
- Brightness+ / Brightness-: Use these buttons to increase or decrease the light's intensity.
- Color temperature+ / Color temperature-: Use these buttons to adjust the light's color temperature, from warm white to cool white.
4.3 Timing Function
- Timing 1 hour (1H): Press this button to set the fan and/or light to automatically turn off after 1 hour.
- Timing 2 hour (2H): Press this button to set the fan and/or light to automatically turn off after 2 hours.
5. Troubleshooting
If your remote control is not functioning as expected, consider the following:
- Remote Not Responding:
- Check if the batteries are correctly installed and not depleted. Replace with new AAA batteries if necessary.
- Ensure there are no obstructions between the remote control and the fan receiver.
- Verify that the fan's main power supply is on.
- Fan/Light Not Pairing:
- Repeat the pairing procedure as described in Section 3.2. Ensure you turn off the main power for at least 30 seconds before attempting to re-pair.
- Confirm that you are pressing and holding the correct pairing button (Segmentation + (pair code)).
- Intermittent Operation:
- Weak batteries can cause intermittent operation. Replace them.
- Ensure the remote is within the effective operating range of the fan.
6. Specifications
| Brand | Dalouguan |
| Model Number | DLG-YKQ01 |
| Compatible Fan Models | DLG-FSD22, DLG-FSD23, DLG-FSD24, DLG-FSD25, DLG-FSD28, DLG-FSD36, DLG-FSD37 |
| Product Dimensions | 4 x 2 x 1 inches |
| Item Weight | 2.08 ounces |
| Color | White |
| Special Feature | Remote Control |
| Max Number of Supported Devices | 1 |
| Compatible Devices | Fan |
| Battery Type | 2 x AAA 1.5V (not included) |
7. Warranty and Support
This manual does not contain specific warranty information. For details regarding warranty coverage, please refer to the product packaging or contact the seller directly. For technical support or further assistance, please reach out to the manufacturer, DALOUGUAN, or your point of purchase.