1. Introduction
This manual provides detailed instructions for the safe and efficient use of your YiLaie LED Wall Light (Model EL-FQL-2-1). Please read this manual thoroughly before installation and operation, and retain it for future reference.

Image: The YiLaie LED Wall Light installed in different indoor environments, showcasing its adaptable design.
2. Product Overview
2.1 Key Features
- Battery Powered: Built-in 4000 mAh battery for wireless operation.
- Dimmable Touch Control: Stepless dimming from 10% to 100% brightness with memory function.
- 360° Rotatable: Magnetic ball mount allows for flexible light direction adjustment.
- Easy Installation: Can be installed without drilling using adhesive pads or with screws for rough surfaces.
- Portable Design: Light unit is removable from its magnetic base for portable use.

Image: Features comparison, emphasizing the 4000mAh battery capacity, rectangular design, and eye-protection of the YiLaie LED Wall Light.
2.2 Package Contents
Ensure all items are present in the package:
- LED Lamp
- Magnetic Swivel Head Base
- Type-C Charging Cable
- Double-sided Adhesive Pads
- Expansion Screws (for alternative mounting)
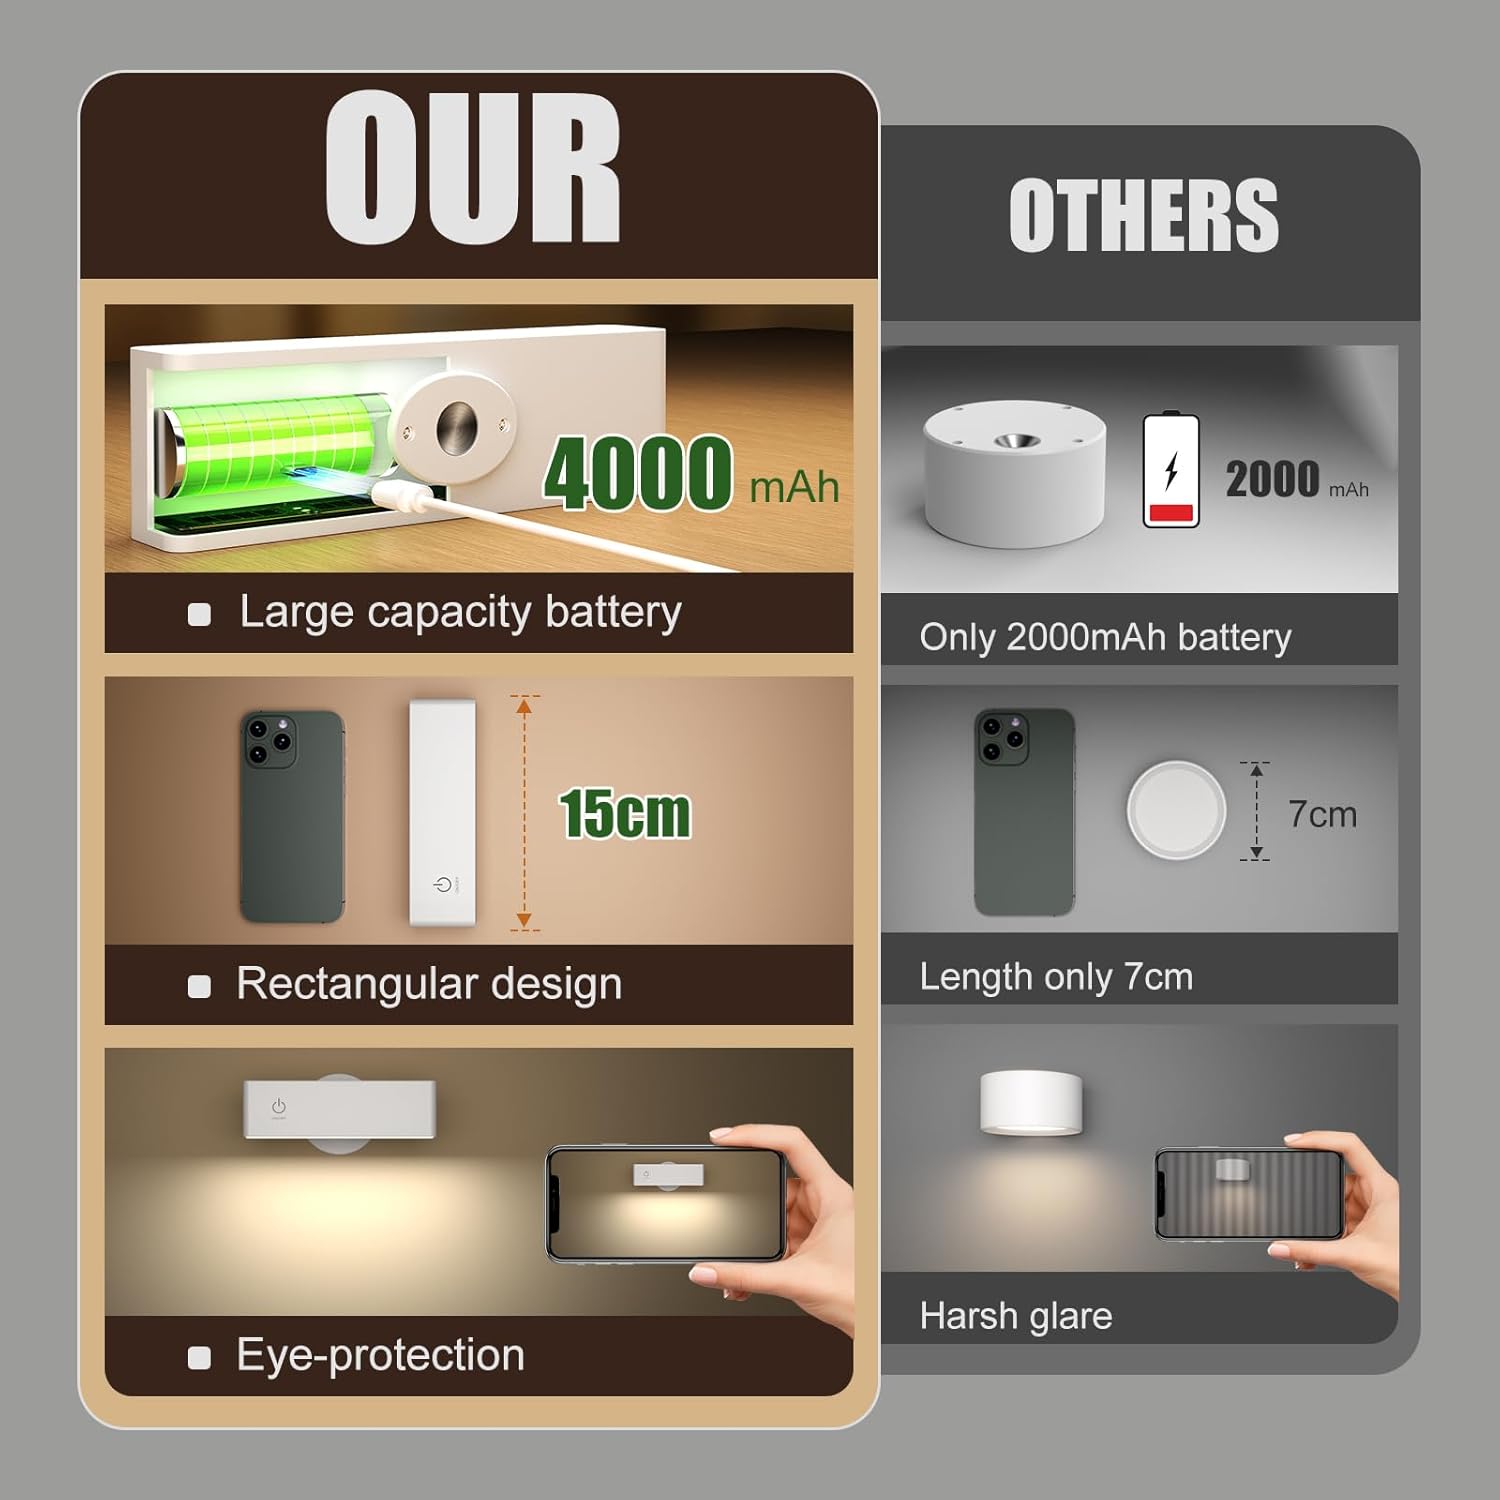
Image: Components of the YiLaie LED Wall Light, showing the main light unit, magnetic mounting base, and a Type-C charging cable.
3. Setup and Installation
The YiLaie LED Wall Light offers flexible installation options. Choose the method best suited for your wall surface.
3.1 Mounting Options

Image: Illustration of the two mounting methods: adhesive for smooth surfaces and screws for rough surfaces, highlighting the 360° rotation feature.
- For Smooth and Flat Walls (Adhesive Pads):
- Clean the desired wall surface thoroughly to ensure it is dry and free of dust or grease.
- Peel the protective film from one side of the double-sided adhesive pad and attach it firmly to the back of the magnetic swivel head base.
- Peel the protective film from the other side of the adhesive pad and press the magnetic base firmly onto the cleaned wall surface. Hold for at least 30 seconds to ensure strong adhesion.
- Allow the adhesive to set for a few hours (ideally 24 hours) before attaching the lamp.
- For Rough Walls (Expansion Screws):
- Mark the desired installation spot on the wall.
- Drill two holes at the marked positions, matching the screw holes on the magnetic swivel head base.
- Insert the expansion screws into the drilled holes.
- Align the magnetic base with the screws and secure it tightly.
3.2 Attaching the Lamp
Once the magnetic swivel head base is securely mounted, simply place the LED lamp onto the magnetic ball. The strong magnet will hold it in place. You can then adjust the lamp's angle by rotating it 360° to direct the light as needed.
4. Operating Instructions
The YiLaie LED Wall Light features intuitive touch control for power and brightness adjustment.
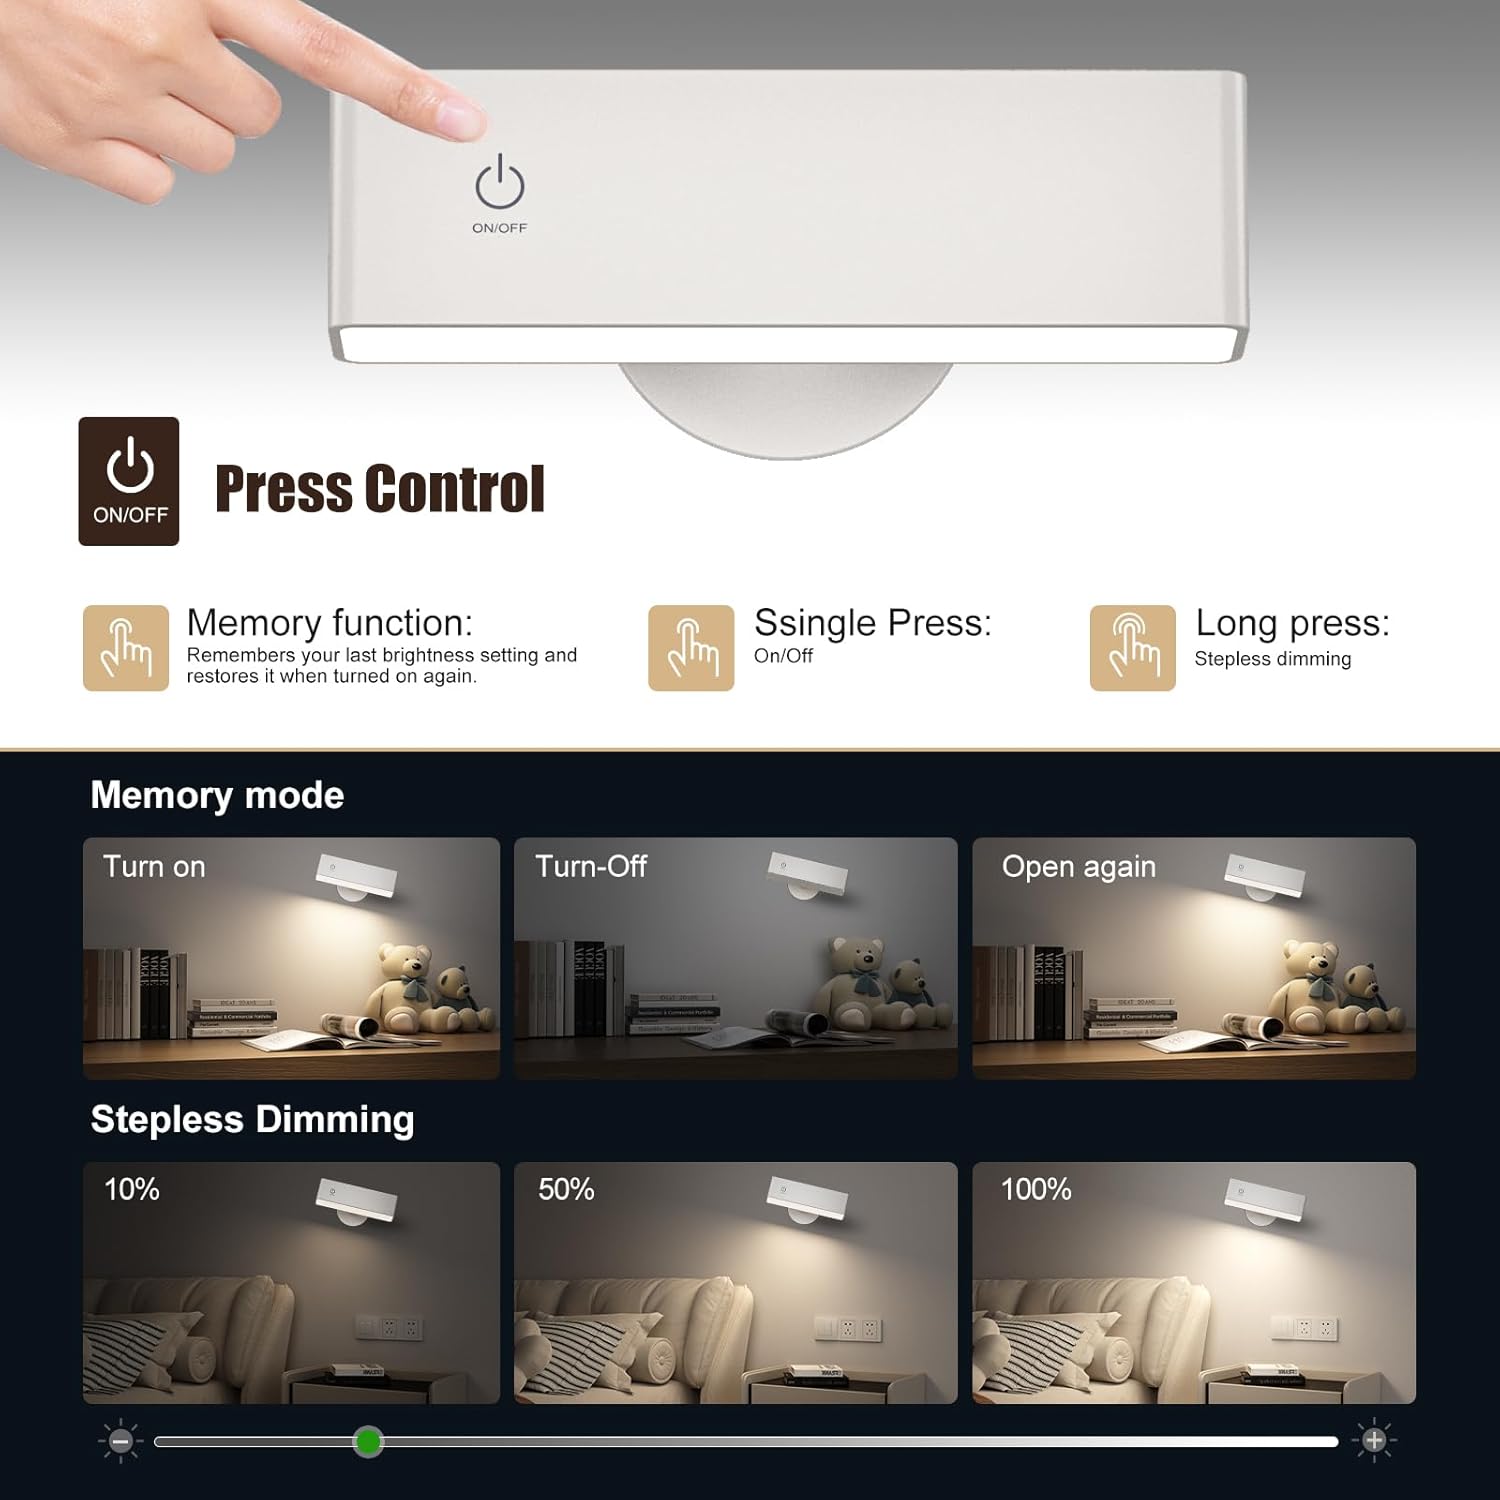
Image: Visual guide to the touch control features, including single press for power and long press for dimming, along with the memory function.
- Power On/Off: Lightly touch the power symbol (On/Off icon) on the lamp surface to turn the light on or off.
- Stepless Dimming: When the light is on, press and hold the power symbol to continuously adjust the brightness from 10% (lowest) to 100% (highest). Release your finger when the desired brightness is reached.
- Memory Function: The lamp will remember its last brightness setting. When you turn the light off and then on again, it will resume the previously set brightness level.
5. Charging the Battery
The YiLaie LED Wall Light is equipped with a built-in 4000 mAh rechargeable battery.
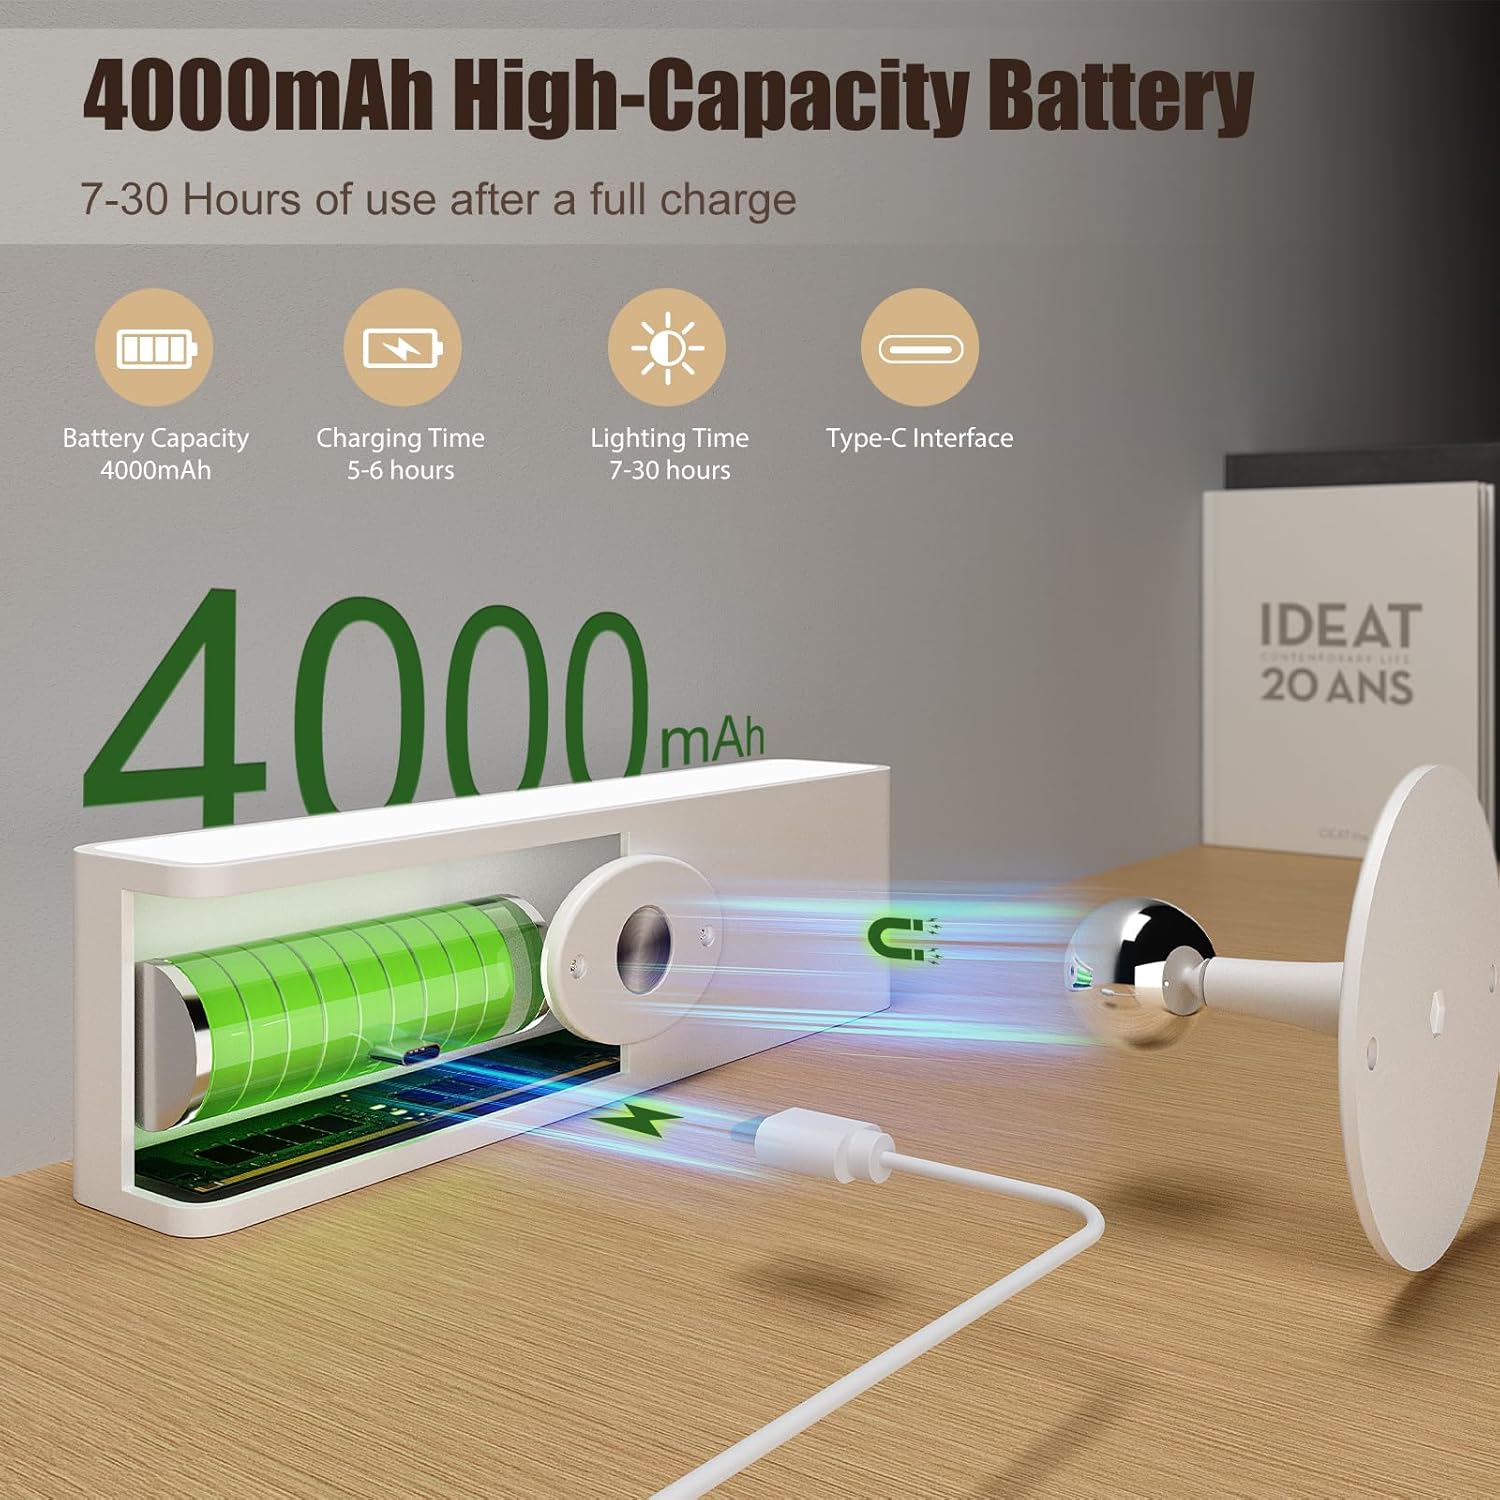
Image: The LED wall light connected to a Type-C charging cable, illustrating its 4000mAh battery and charging interface.
- Charging Port: Locate the Type-C USB charging port on the lamp.
- Connection: Connect the provided Type-C charging cable to the lamp and plug the other end into a standard USB power adapter (not included) or a computer USB port.
- Charging Indicator: The lamp may have an indicator light to show charging status (refer to product for specific indicator behavior).
- Charging Time: A full charge typically takes approximately 5-6 hours.
- Battery Life: A fully charged battery provides approximately 7 hours of light at the highest brightness setting and up to 30 hours at the lowest brightness setting.
Note: Use a compatible 5V USB power source for charging. Avoid using damaged cables or chargers.
6. Maintenance
To ensure the longevity and optimal performance of your YiLaie LED Wall Light, follow these maintenance guidelines:
- Cleaning: Wipe the lamp surface with a soft, dry cloth. Do not use abrasive cleaners, solvents, or harsh chemicals, as these can damage the finish.
- Battery Care: To prolong battery life, avoid fully discharging the battery frequently. Charge the lamp regularly, even if not in constant use. If storing for an extended period, charge the battery to about 50% every few months.
- Storage: Store the lamp in a cool, dry place away from direct sunlight and extreme temperatures.
- Magnetic Base: Ensure the magnetic base and the lamp's magnetic attachment point are kept clean and free of debris to maintain a strong connection.
7. Troubleshooting
If you encounter any issues with your YiLaie LED Wall Light, please refer to the following troubleshooting steps:
| Problem | Possible Cause | Solution |
|---|---|---|
| Light does not turn on. | Battery is depleted. Touch control not responding. | Charge the lamp fully using the provided Type-C cable. Ensure your finger makes full contact with the touch sensor. |
| Light is dim or flickers. | Low battery. Incorrect brightness setting. | Recharge the lamp. Press and hold the touch sensor to increase brightness. |
| Lamp does not charge. | Faulty cable or adapter. Charging port obstruction. | Try a different Type-C cable and USB power adapter. Check the charging port for any debris and gently clean if necessary. |
| Lamp falls from the wall. | Adhesive not strong enough. Rough wall surface for adhesive. Magnetic base not securely mounted. | Ensure the wall surface is clean and smooth before applying adhesive. For rough surfaces, use the expansion screws for a more secure mount. Re-mount the magnetic base following installation instructions carefully. |
8. Specifications
| Feature | Detail |
|---|---|
| Brand | YiLaie |
| Model Number | EL-FQL-2-1 |
| Material | Polycarbonate |
| Colour | White |
| Power Source | Battery Powered |
| Battery Capacity | 4000 mAh |
| Charging Time | Approx. 5-6 hours (via Type-C USB) |
| Lighting Duration | 7 hours (highest brightness) - 30 hours (lowest brightness) |
| Voltage | 5 Volts |
| Wattage | 2 Watts |
| Luminous Flux | 300 Lumens (Max) |
| Color Temperature | 4000 Kelvin (Warm colours) |
| Control Method | Touch Control |
| Mounting Type | Wall Mount (Magnetic, Adhesive/Screws) |
| Item Dimensions (L x W x H) | 15L x 4.3W x 3.2H centimetres |
| Item Weight | 555 Grams |
9. Customer Support
For any questions, concerns, or assistance with your YiLaie LED Wall Light, please contact our customer service. We are committed to providing support and will respond to your inquiries within 24 hours.
Contact information (e.g., email, website) would typically be provided here by the manufacturer.