1. Introduction
Thank you for choosing the Zapco ST-1000XM III Monoblock Class D Amplifier. This amplifier is designed to deliver high-quality audio performance for your vehicle's sound system. Please read this manual thoroughly before installation and operation to ensure proper use and to maximize the amplifier's potential.
The ST-1000XM III is a single-channel, Class D bass amplifier featuring a new aluminum chassis, variable input gain control, variable electronic crossover, variable subsonic filter, variable bass boost control, variable center frequency for bass boost, and variable phase control. It is also strappable for use with a second amplifier on a single voice coil and includes a dash-mount remote gain control.
2. Safety Information
Always observe the following safety precautions during installation and operation:
- Disconnect the vehicle's battery negative terminal before starting any installation.
- Ensure all wiring is properly routed and secured to prevent damage or short circuits.
- Use appropriate gauge wiring for power, ground, and speaker connections as specified.
- Install the amplifier in a dry, well-ventilated location, away from direct sunlight, heat sources, and moisture.
- Do not operate the amplifier if it is damaged or malfunctioning. Refer servicing to qualified personnel.
- High sound pressure levels can cause permanent hearing loss. Adjust volume levels responsibly.
3. Setup and Installation
Proper installation is crucial for optimal performance and safety. If you are unsure about any part of the installation process, consult a professional installer.
3.1 Mounting the Amplifier
Choose a secure, dry, and well-ventilated location for mounting the amplifier. Ensure there is sufficient airflow around the heatsink. Use the provided mounting hardware to secure the amplifier firmly to a solid surface in your vehicle.
3.2 Wiring Connections
Refer to the diagram below for proper wiring connections.
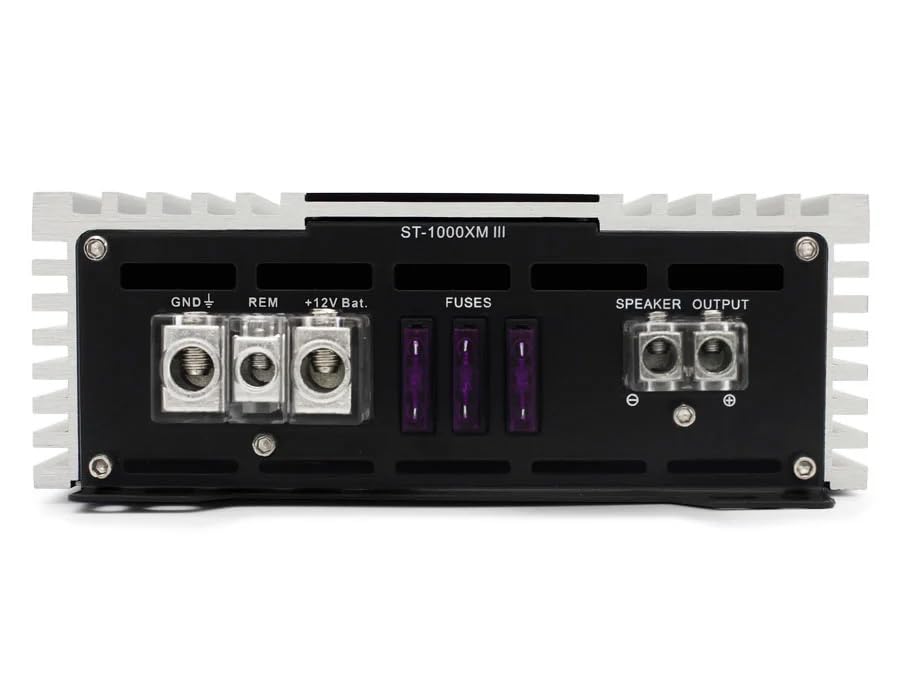
Figure 1: Rear panel connections for power, ground, remote, fuses, and speaker output.
- Power (BATT +12V): Connect a heavy-gauge wire (e.g., 4 AWG or larger, depending on cable length) directly from the vehicle's positive battery terminal to the +12V terminal on the amplifier. Install an appropriate fuse holder (not supplied) within 18 inches (45 cm) of the battery.
- Ground (GND): Connect a heavy-gauge wire of the same size as the power wire from the GND terminal on the amplifier to a clean, unpainted metal surface on the vehicle's chassis. Ensure a good electrical connection.
- Remote (REM): Connect a smaller gauge wire (e.g., 18 AWG) from the REM terminal on the amplifier to the remote turn-on output of your head unit. This wire turns the amplifier on and off with your stereo.
- Fuses: The amplifier is equipped with internal fuses. Ensure these are correctly rated (refer to specifications). Do not replace with higher-rated fuses.
- Speaker Output: Connect your subwoofer(s) to the SPEAKER OUTPUT terminals. Observe correct polarity (+ to + and - to -). This is a monoblock amplifier, designed for a single channel output.
- Input (RCA): Connect RCA cables from your head unit's subwoofer or full-range pre-out to the IN (RCA) terminals on the amplifier.
- Remote Gain Control: Connect the included remote gain control to the 'REMOTE' port on the amplifier's front panel. This allows for convenient bass level adjustment from the driver's seat.
4. Operating Controls and Adjustments
The Zapco ST-1000XM III features several controls to fine-tune your audio system. Refer to the diagram below for control locations.
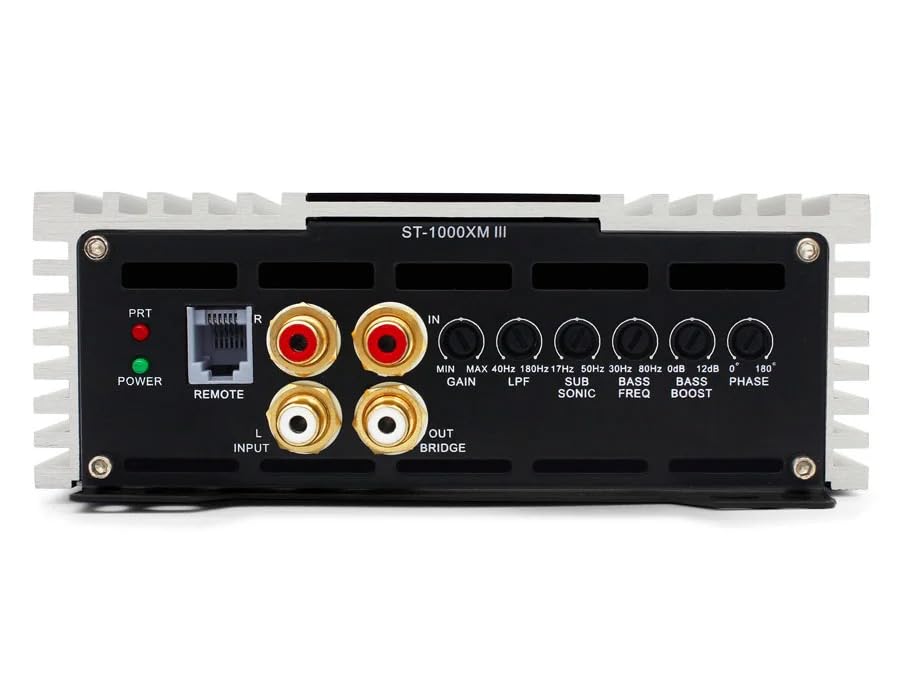
Figure 2: Front panel controls for audio adjustments.
- POWER/PRT Indicators: The POWER LED indicates the amplifier is on. The PRT (Protection) LED illuminates if the amplifier enters protection mode due to overheating, low impedance, or other faults.
- GAIN (Input Sensitivity): Adjusts the amplifier's input sensitivity to match the output voltage of your head unit. Start with the gain at minimum and slowly increase until desired volume is achieved without distortion. Range: 0.25V to 5V.
- LPF (Low Pass Filter): This control sets the upper frequency limit for the amplifier's output. Only frequencies below the set point will pass through. Typically set between 50Hz and 200Hz for subwoofers.
- SUB SONIC (Subsonic Filter): Filters out extremely low frequencies that are inaudible and can damage subwoofers. Typically set below the port tuning frequency of a ported enclosure, or around 20-30Hz for sealed enclosures. Range: 17Hz to 50Hz.
- BASS BOOST: Increases the output level at a specific bass frequency. Use sparingly to avoid distortion. Range: 0dB to 12dB.
- BASS FREQ (Bass Boost Frequency): Selects the center frequency for the bass boost control.
- PHASE: Adjusts the phase of the subwoofer output relative to the main speakers. This helps to ensure all sound waves arrive at the listener's ears in sync, improving bass impact and clarity. Adjustable from 0° to 180°.
5. Maintenance
The Zapco ST-1000XM III amplifier requires minimal maintenance. Follow these guidelines to ensure longevity:
- Keep the amplifier clean and free of dust and debris. Use a soft, dry cloth for cleaning.
- Ensure adequate ventilation around the amplifier at all times. Do not block cooling fins.
- Periodically check all wiring connections for tightness and corrosion.
- Avoid exposing the amplifier to extreme temperatures or moisture.
6. Troubleshooting
If you experience issues with your amplifier, consult the following troubleshooting guide before contacting support.
- No Power:
- Check the in-line fuse near the battery and the fuses on the amplifier.
- Verify all power, ground, and remote turn-on connections are secure and have proper voltage.
- Ensure the head unit is on and sending a remote signal.
- No Sound:
- Check RCA input cables for proper connection and damage.
- Verify speaker wires are correctly connected and not shorted.
- Adjust the GAIN control.
- Check head unit settings (e.g., subwoofer output enabled, volume up).
- Distorted Sound:
- Reduce the GAIN setting.
- Check speaker impedance; ensure it is within the amplifier's rated limits.
- Adjust LPF, Subsonic, and Bass Boost settings.
- Ensure speaker wires are not shorted or damaged.
- Amplifier Goes into Protection Mode (PRT LED on):
- Check for speaker wire shorts or impedance too low.
- Ensure adequate ventilation to prevent overheating.
- Check for proper power and ground connections.
7. Specifications
| Feature | Specification |
|---|---|
| Amplifier Type | Single channel, Class D, Bass Amplifier |
| Power @ 1Ω | 1 x 1050 watts RMS |
| Power @ 2Ω | 1 x 750 watts RMS |
| Power @ 4Ω | 1 x 450 watts RMS |
| THD @ Rated Power | <0.2% |
| Signal to Noise Ratio | > 100dB |
| THD + Noise | <0.1% |
| Efficiency | > 85% |
| Frequency Response | 10Hz to 200Hz ±1dB |
| Input Sensitivity | 0.25V to 5V |
| Dimensions (W x H x L) | 160mm x 58mm x 300mm (Chassis) |
| Overall Dimensions (W x H x L) | 160mm x 58mm x 325mm |
| Item Weight | 8 Pounds |
| Mounting Type | Surface Mount |
| Specification Met | FCC |
8. Warranty and Support
The Zapco ST-1000XM III amplifier comes with a 1-Year Warranty from the date of purchase, covering defects in materials and workmanship under normal use. This warranty does not cover damage caused by improper installation, accident, misuse, abuse, neglect, or unauthorized modification.
For technical support or warranty claims, please contact your authorized Zapco dealer or visit the official Zapco website for contact information. Please have your product model number and proof of purchase ready.


