FECiDA Clip-3Head-27W
FECiDA Clip Grow Lights for Indoor Plants (Model: Clip-3Head-27W)
User Manual
1. Introduction
This manual provides instructions for the safe and efficient use of your FECiDA Clip Grow Lights for Indoor Plants. This LED plant lamp is designed to provide full-spectrum light for various indoor plants, including house plants, bonsai, and potted plants, supporting all growth stages. It features a flexible gooseneck design, a convenient clip-on mounting system, and an integrated timer function.
2. Safety Information
- Ensure the power supply voltage matches the product's requirements (220V AC).
- Do not expose the grow light to water or high humidity environments.
- Avoid looking directly into the LED lights for extended periods to prevent eye strain.
- Keep the device away from children and pets.
- Do not attempt to disassemble or modify the product. Contact customer support for any issues.
- Ensure proper ventilation around the grow light to prevent overheating.
3. Package Contents
Verify that all components are present in the package:
- 1 x FECiDA Clip Grow Light (3-Head, 27W)
- 1 x User Manual (this document)
4. Product Features
The FECiDA Clip Grow Light is equipped with several features designed to optimize plant growth:
4.1 Full Spectrum LED Lighting
This grow light provides a natural sunlight full spectrum, suitable for all plant growth stages from sprout to flowering and fruiting. It includes 5000K White LED, 3000K White LED, and 660nm Red LED to ensure comprehensive light coverage.
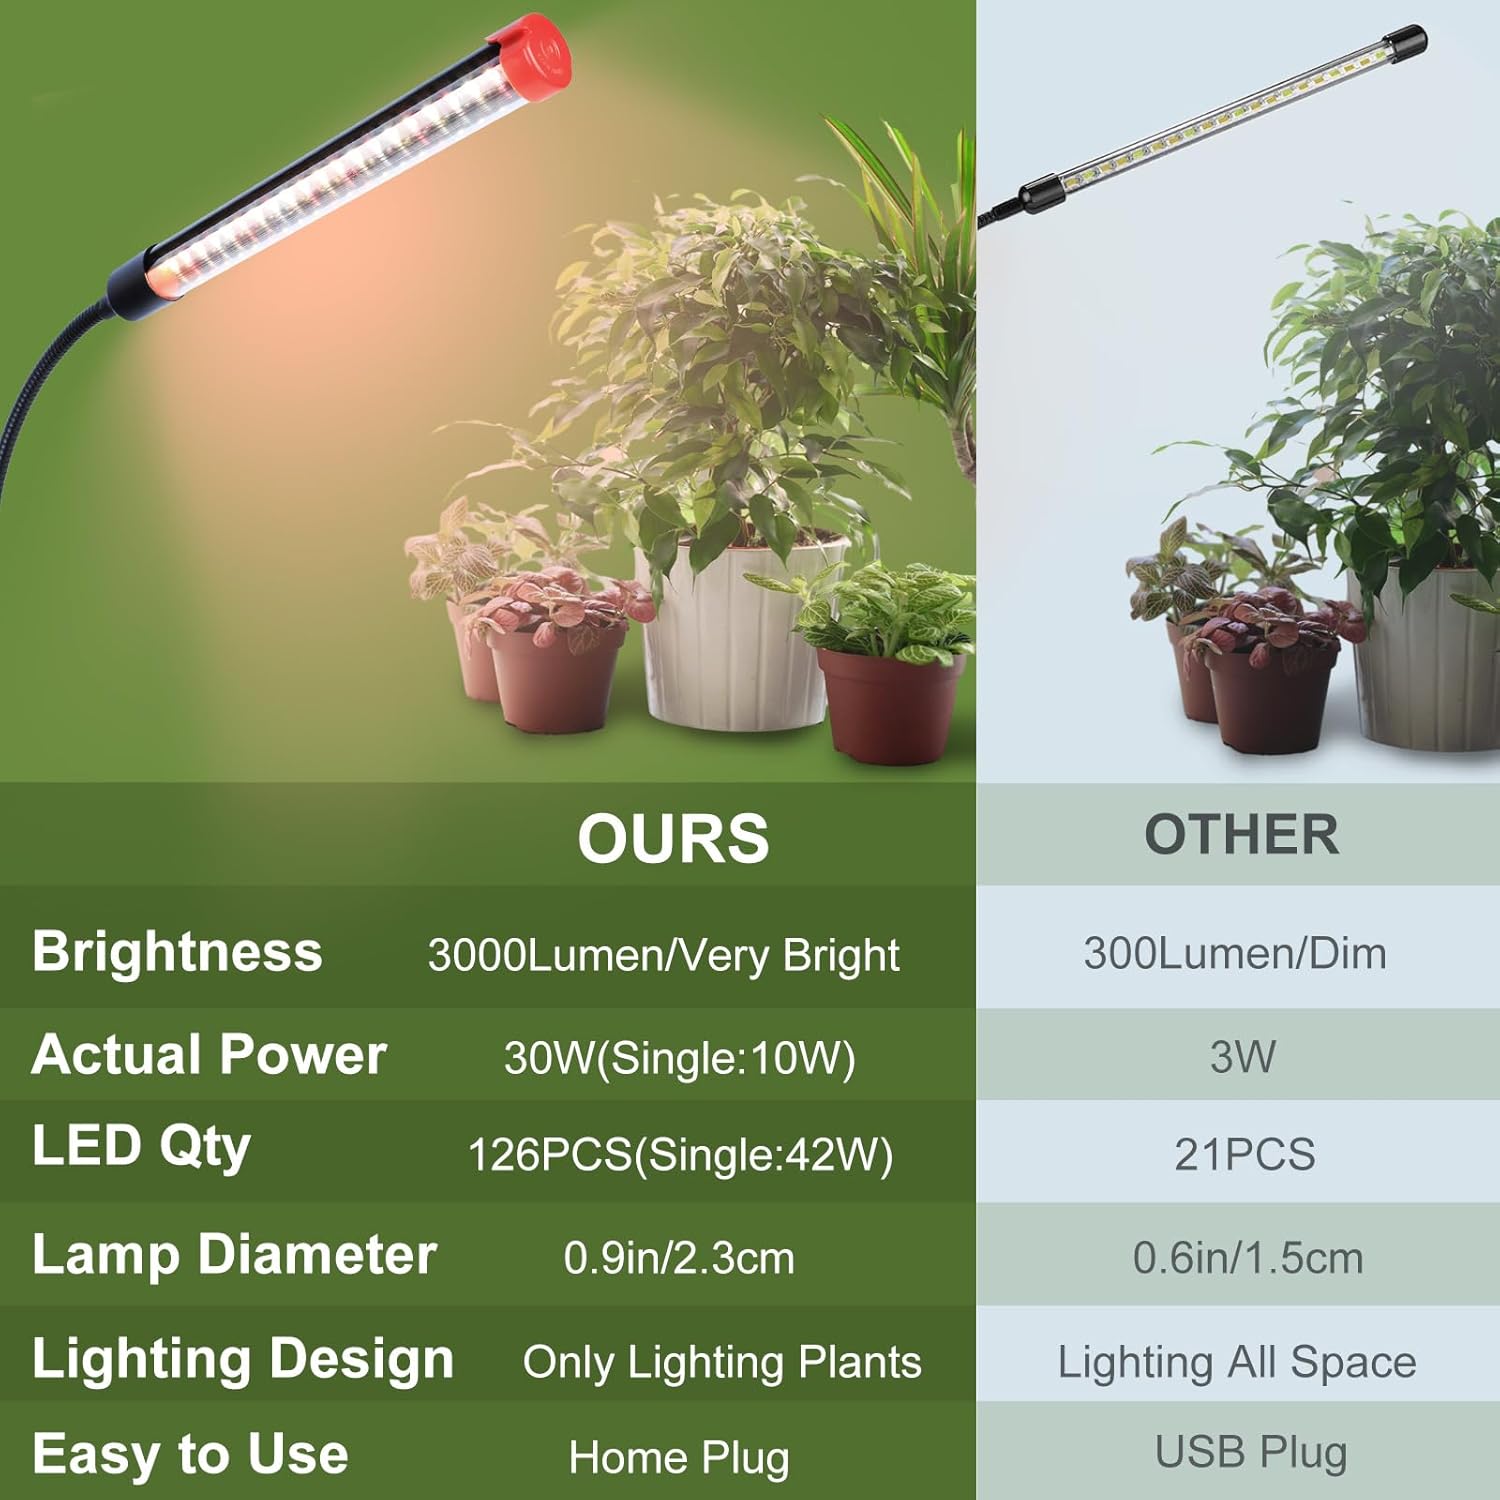
Image: Spectral distribution graph illustrating the full spectrum provided by the LED grow light.
4.2 High Brightness and Efficiency
With 126 high-quality LEDs and 3000 lumens brightness, this lamp delivers powerful illumination for healthy plant development. The design focuses light directly on plants, minimizing light waste.

Image: Comparison of FECiDA grow light specifications with a typical alternative, emphasizing brightness and LED count.
4.3 Adjustable Gooseneck and Clip-On Design
The three light heads are attached to 360-degree adjustable goosenecks, allowing for precise positioning and targeted lighting for individual plants or groups. The sturdy clip-on base enables easy attachment to shelves, tables, or other surfaces up to 1.9 inches thick.

Image: The 3-head grow light clipped onto a shelf, providing light to multiple plants.
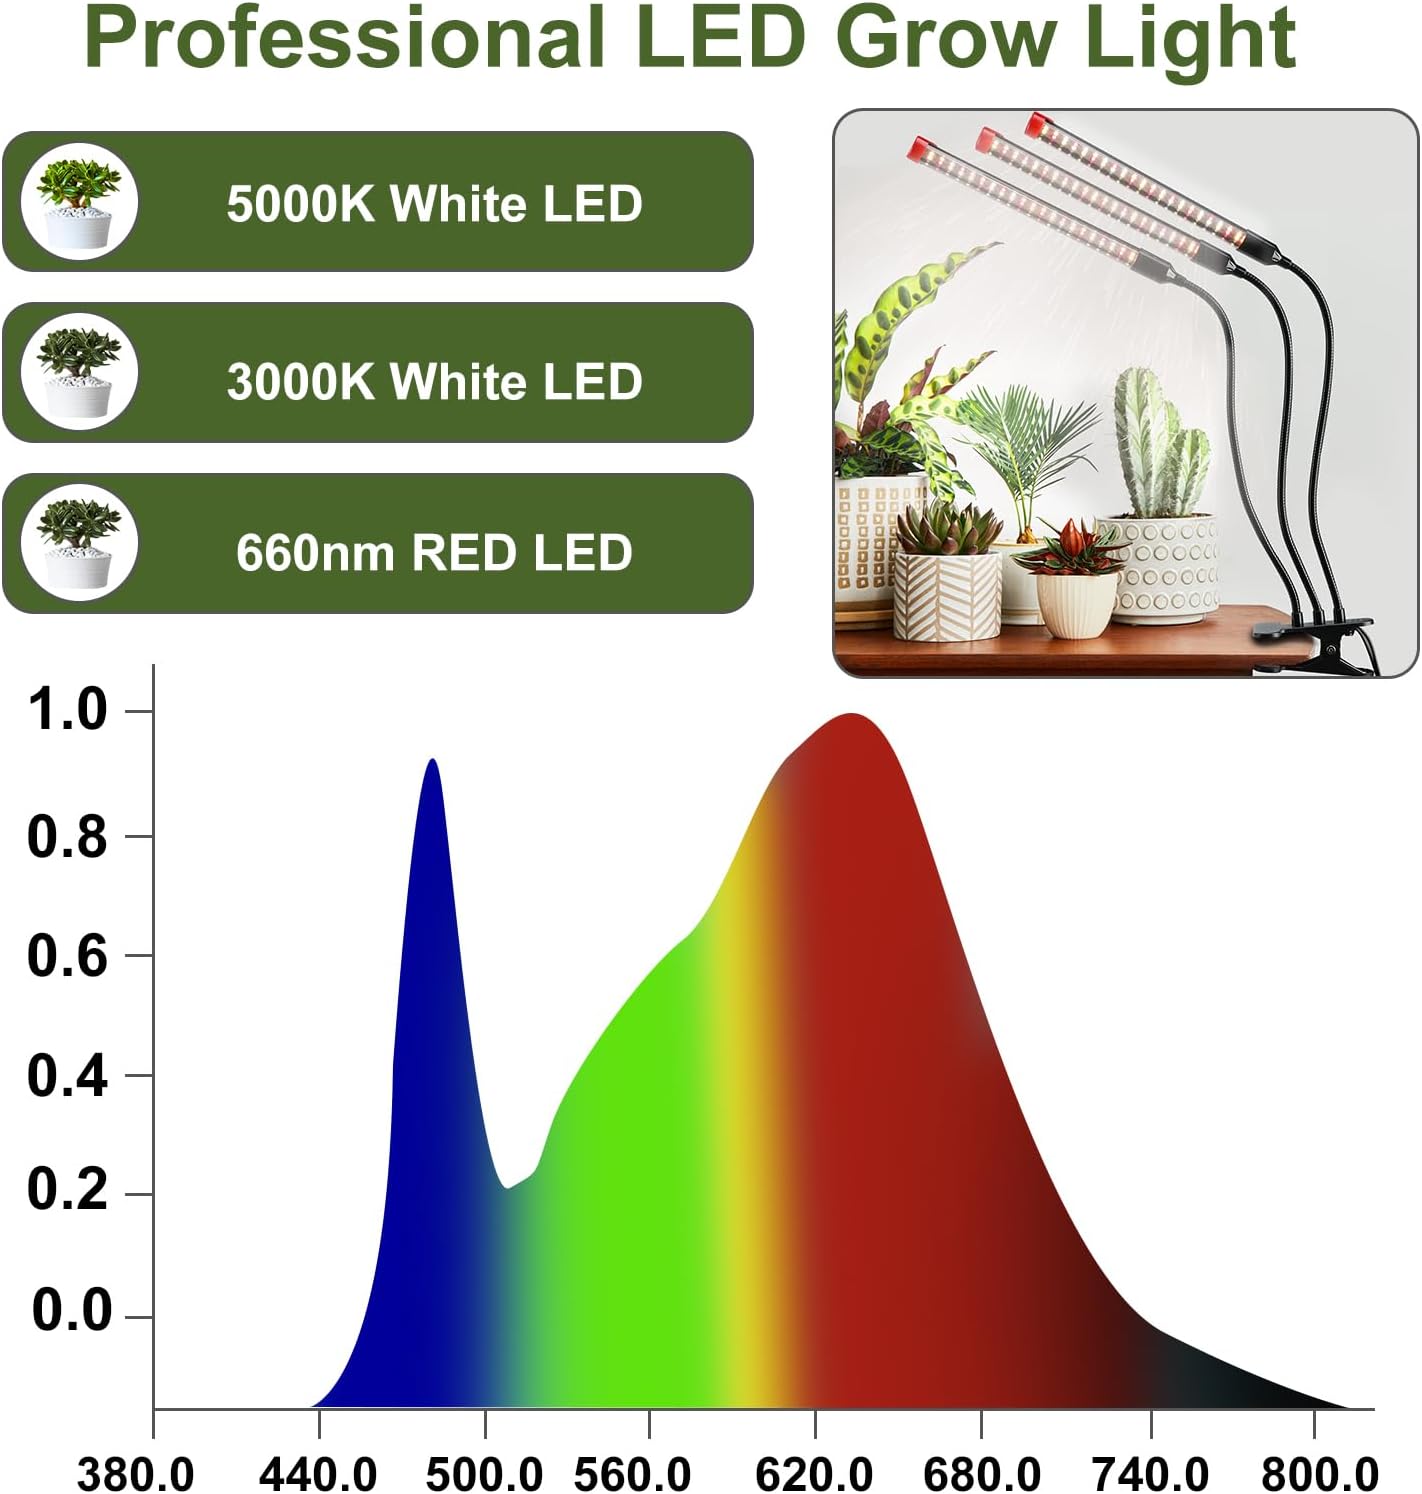
Image: Dimensions of the grow light, showing lamp length, gooseneck length, and clip opening.
5. Setup Instructions
- Unpack: Carefully remove all components from the packaging.
- Mount the Light: Attach the clip base to a stable surface such as a shelf, table edge, or plant stand. Ensure the surface thickness is within the clip's capacity (up to 1.9 inches).
- Position the Lights: Adjust the flexible goosenecks to direct the light heads towards your plants. Ensure adequate distance between the lights and plant foliage to prevent heat stress.
- Connect Power: Plug the power cord into a standard 220V AC electrical outlet.
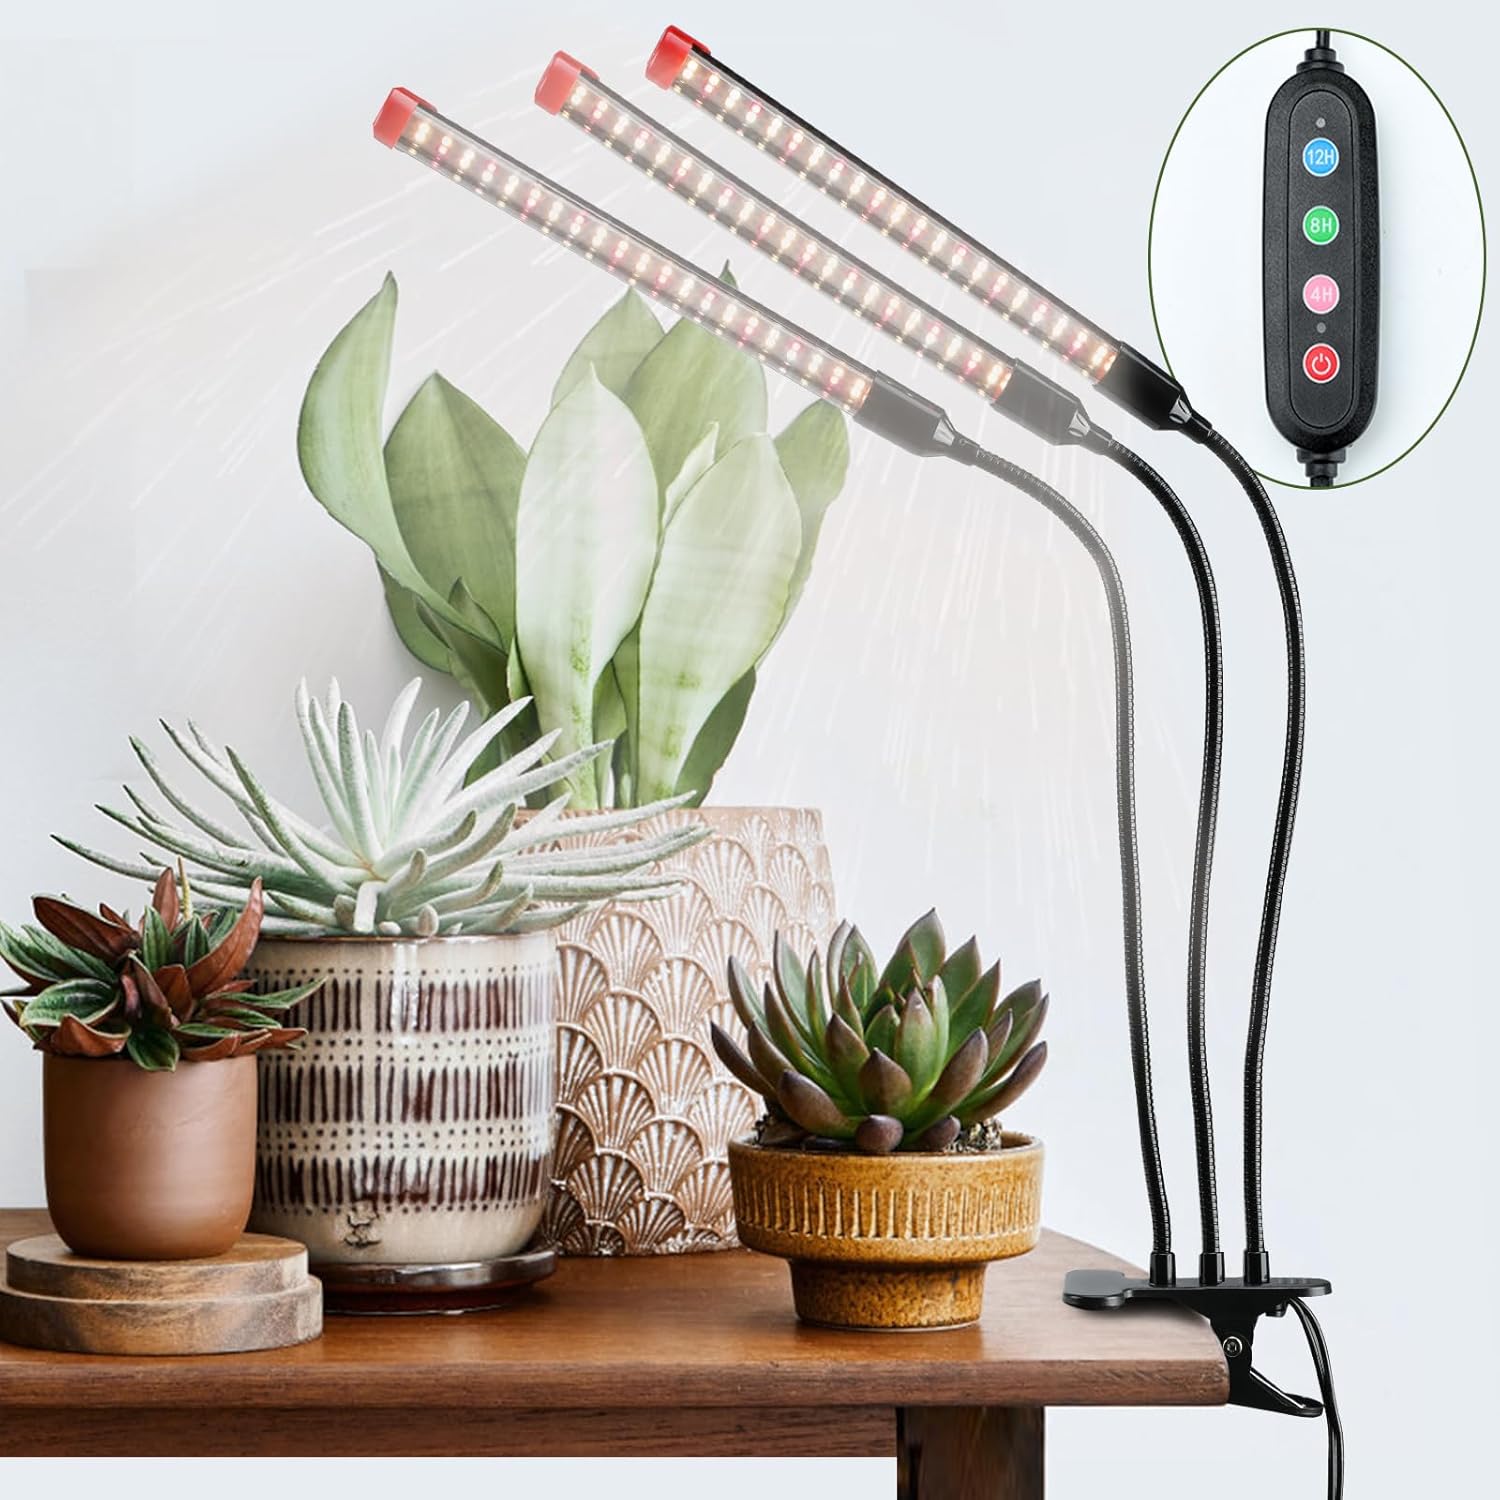
Image: The grow light installed and illuminating indoor plants.
6. Operating Instructions
The grow light features an integrated controller with buttons for power and timer settings.
6.1 Power On/Off
- Press the Power Button once to turn the light on.
- Press the Power Button again to turn the light off.
6.2 Timer Function
The timer function allows the grow light to automatically turn on and off at the same time every day. There are 5 timer modes available:

Image: Detailed view of the controller and its timer settings.
- Set 4-Hour Timer: Press the 4H Button. The light will stay on for 4 hours and then turn off, repeating daily.
- Set 8-Hour Timer: Press the 8H Button. The light will stay on for 8 hours and then turn off, repeating daily.
- Set 12-Hour Timer: Press the 12H Button. The light will stay on for 12 hours and then turn off, repeating daily.
- Set 16-Hour Timer: Press the 12H Button and the 4H Button simultaneously. The light will stay on for 16 hours and then turn off, repeating daily.
- Set 20-Hour Timer: Press the 12H Button and the 8H Button simultaneously. The light will stay on for 20 hours and then turn off, repeating daily.
Once a timer is set, the light will automatically cycle on and off at the set intervals each day. To cancel the timer, press the power button to turn off the light manually.
7. Maintenance
- Cleaning: Disconnect the power before cleaning. Use a soft, dry cloth to wipe the light heads and goosenecks. Do not use abrasive cleaners or immerse any part of the light in water.
- Storage: If not in use for an extended period, store the grow light in a cool, dry place, away from direct sunlight and moisture.
8. Troubleshooting
| Problem | Possible Cause | Solution |
|---|---|---|
| Light does not turn on. | No power, loose connection, faulty outlet. | Check if the power cord is securely plugged in. Test the outlet with another device. Ensure the power button is pressed. |
| Timer function not working as expected. | Incorrect timer setting, power interruption. | Re-set the desired timer mode. If power was interrupted, the timer may need to be reset. |
| Lights are dim or flickering. | Power fluctuation, product malfunction. | Try plugging into a different outlet. If the issue persists, contact customer support. |
9. Specifications
| Model Number | Clip-3Head-27W (ZH_GL_RH) |
| Brand | FECiDA |
| Power Source | Corded Electric |
| Voltage | 220 Volts (AC) |
| Wattage | 27 Watts |
| Light Output | 3000 Lumens |
| Light Source Type | LED (Full Spectrum: 5000K, 3000K, 660nm Red) |
| Number of Light Sources | 126 LEDs |
| Mounting Type | Clip on any plate or rod (max 1.9 inch thickness) |
| Special Features | 4/8/12/16/20 hour timer, 360° adjustable gooseneck |
| Product Dimensions | 10L x 8W x 20H Centimetres (approx. 780g) |
| Material | Plastic |
| Color | Black |
| Certification | CE |
10. Warranty and Support
For warranty information or technical support, please contact FECiDA customer service through the retailer's platform or the official FECiDA website. Please have your product model number (Clip-3Head-27W) and purchase details available when contacting support.
Ask a question about this manual
Ask about setup, troubleshooting, compatibility, parts, safety, or missing instructions. Manuals+ will review the question and use this page’s manual context to help answer it.