1. Setup
1.1 Package Contents
Before you begin, please ensure all items are present in the package:
- 1 x BusoTh Pocket Digital Inclinometer
- 1 x USB Cable
1.2 Initial Charging
The inclinometer is powered by a built-in 3.7V lithium battery (260mAh). For optimal performance, fully charge the device before first use.
- Locate the USB Type-C charging port on the side of the inclinometer.
- Connect the provided USB cable to the inclinometer and a suitable USB power source (e.g., computer, wall adapter).
- The battery indicator on the display will show charging status.
- Once fully charged, disconnect the USB cable.

Figure 1.1: The inclinometer connected to a USB Type-C charging cable.
Video 1.1: Demonstrates charging the inclinometer and initial power-on. This video shows the device being charged and then turned on, displaying an "Err" message which is then cleared.
1.3 Powering On and Screen Protection
To power on the device, press the power button located on the top surface. Remove the protective film from the display screen before use for clear visibility.

Figure 1.2: The inclinometer and its USB charging cable. Note the protective film on the display.
2. Operating Instructions
2.1 Basic Operation
- Power On/Off: Press the power button (usually the left button on top) to turn the device on or off.
- Automatic Shutdown: The inclinometer features an energy-saving function. The backlight automatically turns off after 30 seconds of inactivity, and the device automatically shuts down after 3 minutes without response.

Figure 2.1: The inclinometer's display showing the intelligent power-saving feature.
2.2 Measurement Modes: Absolute and Relative
The inclinometer supports two measurement modes:
- Absolute Measurement: Measures the angle relative to a true horizontal plane. This is the default mode when the device is powered on.
- Relative Measurement: Allows you to set any surface as a temporary "zero" reference. To switch to relative measurement, place the inclinometer on your desired reference surface and press the "ZERO" button (usually the right button on top). The display will show "0.00°" and "REF" to indicate relative mode.

Figure 2.2: Illustration of Absolute and Relative Measurement Modes. The top row shows absolute angles, while the bottom row demonstrates setting a reference point for relative measurement.
2.3 Angle and Slope Conversion
The device can display measurements in both degrees (°) and slope percentage (%). Press the "UNIT" button (often the same as the power button, or a dedicated button) to toggle between these units.

Figure 2.3: The inclinometer displaying measurements in degrees and slope percentage.
2.4 Data Lock Function
To hold a measurement on the display for easier reading, press the "HOLD" button (if available, or a long press on another button might activate it). Press it again to release the data lock.
2.5 Magnetic Adsorption
The base of the inclinometer features strong magnets, allowing it to be securely attached to ferromagnetic surfaces for hands-free measurement. This is particularly useful in woodworking and metalworking applications.

Figure 2.4: The inclinometer's magnetic base for secure attachment.
Video 2.1: This video highlights the magnetic measurement capability, long-lasting battery life, and professional-grade accuracy of the inclinometer.
2.6 Automatic Display Turnover
The display automatically rotates to remain upright when the inclinometer is inverted, ensuring easy readability in various orientations. The measuring range is 4 x 90 degrees.

Figure 2.5: The display automatically inverts for readability.
3. Maintenance
- Cleaning: Use a soft, dry cloth to clean the device. Do not use abrasive cleaners or solvents, as these may damage the display or casing.
- Storage: Store the inclinometer in a dry place, away from direct sunlight and extreme temperatures.
- Battery Care: To prolong battery life, avoid fully discharging the battery frequently. Recharge the device when the battery indicator shows low power.
- Avoid Impact: While durable, avoid dropping the device or subjecting it to strong impacts, which can affect its accuracy.
4. Troubleshooting
| Problem | Possible Cause | Solution |
|---|---|---|
| Device does not power on. | Low or depleted battery. | Charge the device using the provided USB cable. |
| Display shows "Err". | Internal sensor error or unstable measurement. | Turn the device off and on again. Ensure the device is stable and not subjected to excessive vibration during measurement. If the error persists, contact customer support. |
| Inaccurate or fluctuating readings. |
|
|
| Display is dim or unresponsive. | Low battery or device in sleep mode. | Charge the device. Press any button to wake it from sleep mode. |
5. Specifications
| Feature | Detail |
|---|---|
| Item Type | Pocket Digital Inclinometer |
| Material | ABS |
| Measuring Range | 4 x 90° |
| Display Resolution | 0.05° |
| Accuracy | ±0.2° |
| Repeatability | 0.1° |
| Power Supply | 3.7V Lithium Battery, 260mAh |
| Operating Temperature | -10℃ to 50℃ (14°F to 122°F) |
| Product Size | Approx. 36 x 36 x 20mm (1.42 x 1.42 x 0.79in) |
| Package Dimensions | 3.94 x 3.15 x 1.18 inches |
| Model Number | BusoThnkuw0sv7qg |
| Manufacturer | BusoTh |
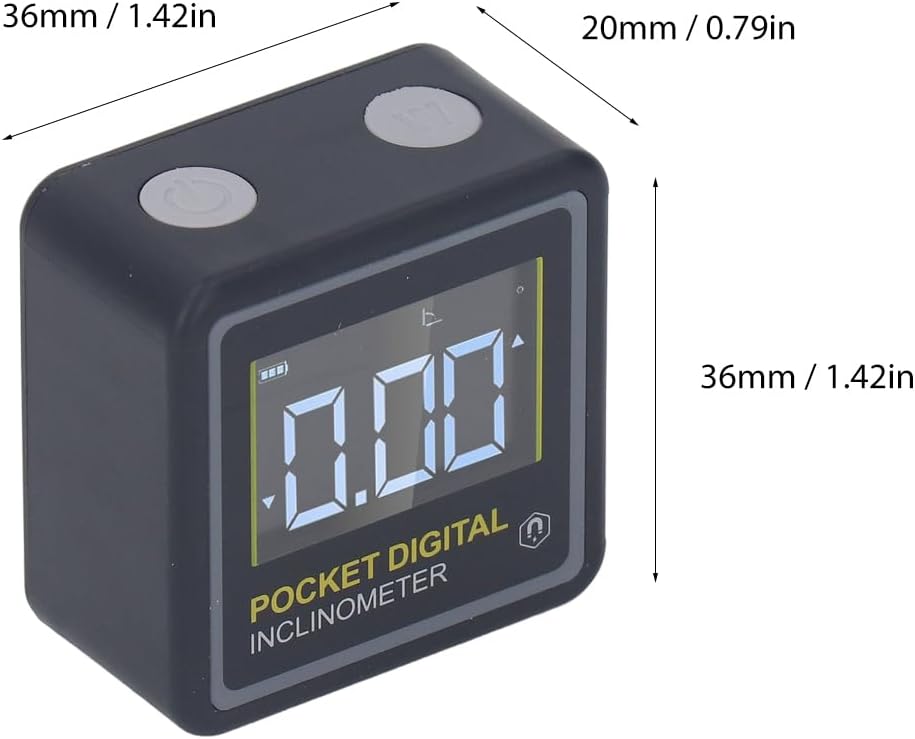
Figure 5.1: Physical dimensions of the BusoTh Pocket Digital Inclinometer.
6. Warranty and Support
Specific warranty information for the BusoTh Pocket Digital Inclinometer is not provided in the product details. For warranty claims, technical support, or service inquiries, please contact the seller or manufacturer directly through your purchase platform.
Manufacturer: BusoTh