1. Introduction
This manual provides essential instructions for the safe and efficient operation, setup, and maintenance of your GZ GUOZHI MIG-125T 100V 3-in-1 Inverter Welder. Please read this manual thoroughly before using the product and retain it for future reference.

Image 1.1: The GZ GUOZHI MIG-125T 3-in-1 Inverter Welder, showcasing its compact design and included accessories.
Key Features:
- 3-in-1 Multi-functional Welding: Supports Arc (MMA), Non-Gas Wire (Flux Core MIG), and Lift TIG welding modes.
- Inverter Control Technology: Ensures stable arc, minimal spatter, and high-quality welds.
- Digital Display: Separate digital displays for current and voltage for precise adjustments.
- Beginner-Friendly: Features like Hot Start and automatic voltage adjustment simplify operation for new users.
- Compact & Lightweight: Weighing approximately 3.9 kg, it is highly portable for various applications.
- Comprehensive Protection: Built-in overheat, overcurrent, and overload protection with a forced air cooling fan.

Image 1.2: Illustration of the MIG-125T's three welding modes: Non-Gas MIG, MMA, and Lift TIG.
2. Safety Instructions
Always prioritize safety when operating welding equipment. Failure to follow safety guidelines can result in serious injury or damage to property.
- Wear appropriate personal protective equipment (PPE), including a welding helmet with proper shade, welding gloves, protective clothing, and safety shoes.
- Ensure the work area is well-ventilated to avoid inhaling welding fumes.
- Keep flammable materials away from the welding area.
- Ensure the welding machine is properly grounded.
- Do not touch live electrical parts or electrodes with bare hands or wet gloves.
- Disconnect power before performing any maintenance or changing accessories.
- Never operate the welder in wet conditions or near water.
- Be aware of the risk of electric shock, arc rays, fumes, and fire.

Image 2.1: The MIG-125T features multiple safety protections including overheat, overcurrent, overload, overvoltage, and short-circuit protection.
3. Included Components
Verify that all components are present and undamaged upon unpacking.
- MIG-125T Welder Unit
- Electrode Holder Cable
- Earth Clamp Cable
- MIG Torch Cable
- Torch Tips (2x)
- Japanese Instruction Manual

Image 3.1: Visual representation of the included components: 1. MIG-125T Welder Unit, 2. Electrode Holder Cable, 3. Earth Clamp, 4. Torch Tips, 5. MIG Torch Cable, and the instruction manual.
4. Setup
4.1 Connecting Cables:
- Connect the electrode holder cable to the positive (+) terminal and the earth clamp cable to the negative (-) terminal for MMA welding.
- For MIG welding, connect the MIG torch cable to the positive (+) terminal and the earth clamp cable to the negative (-) terminal.
- For Lift TIG welding, connect the TIG torch (sold separately) to the negative (-) terminal and the earth clamp cable to the positive (+) terminal.
4.2 Wire Installation (for MIG/Flux Core Welding):
Follow these steps to install the flux core wire for non-gas MIG welding.

Image 4.1: Detailed steps for installing the welding wire into the MIG-125T welder.
- Remove the retaining nut from the wire reel shaft.
- Place the wire reel onto the shaft. The retaining nut should be tightened just enough to prevent the reel from spinning freely due to its own inertia.
- Open the roller clamp, insert the wire into the guide tube, and push it forward.
- Close the roller clamp and tighten the knob clockwise.
- Connect the MIG torch cable and the polarity conversion cable.
- Turn on the power. Straighten the torch cable and press the trigger until the wire emerges from the torch nozzle.
Note: To ensure proper wire feeding, you must first switch to Flux/0.8 (MIG mode) after installation.

Image 4.2: Diagram showing the assembly of the MIG torch nozzle and contact tip.
5. Operating Instructions
5.1 Control Panel Overview:
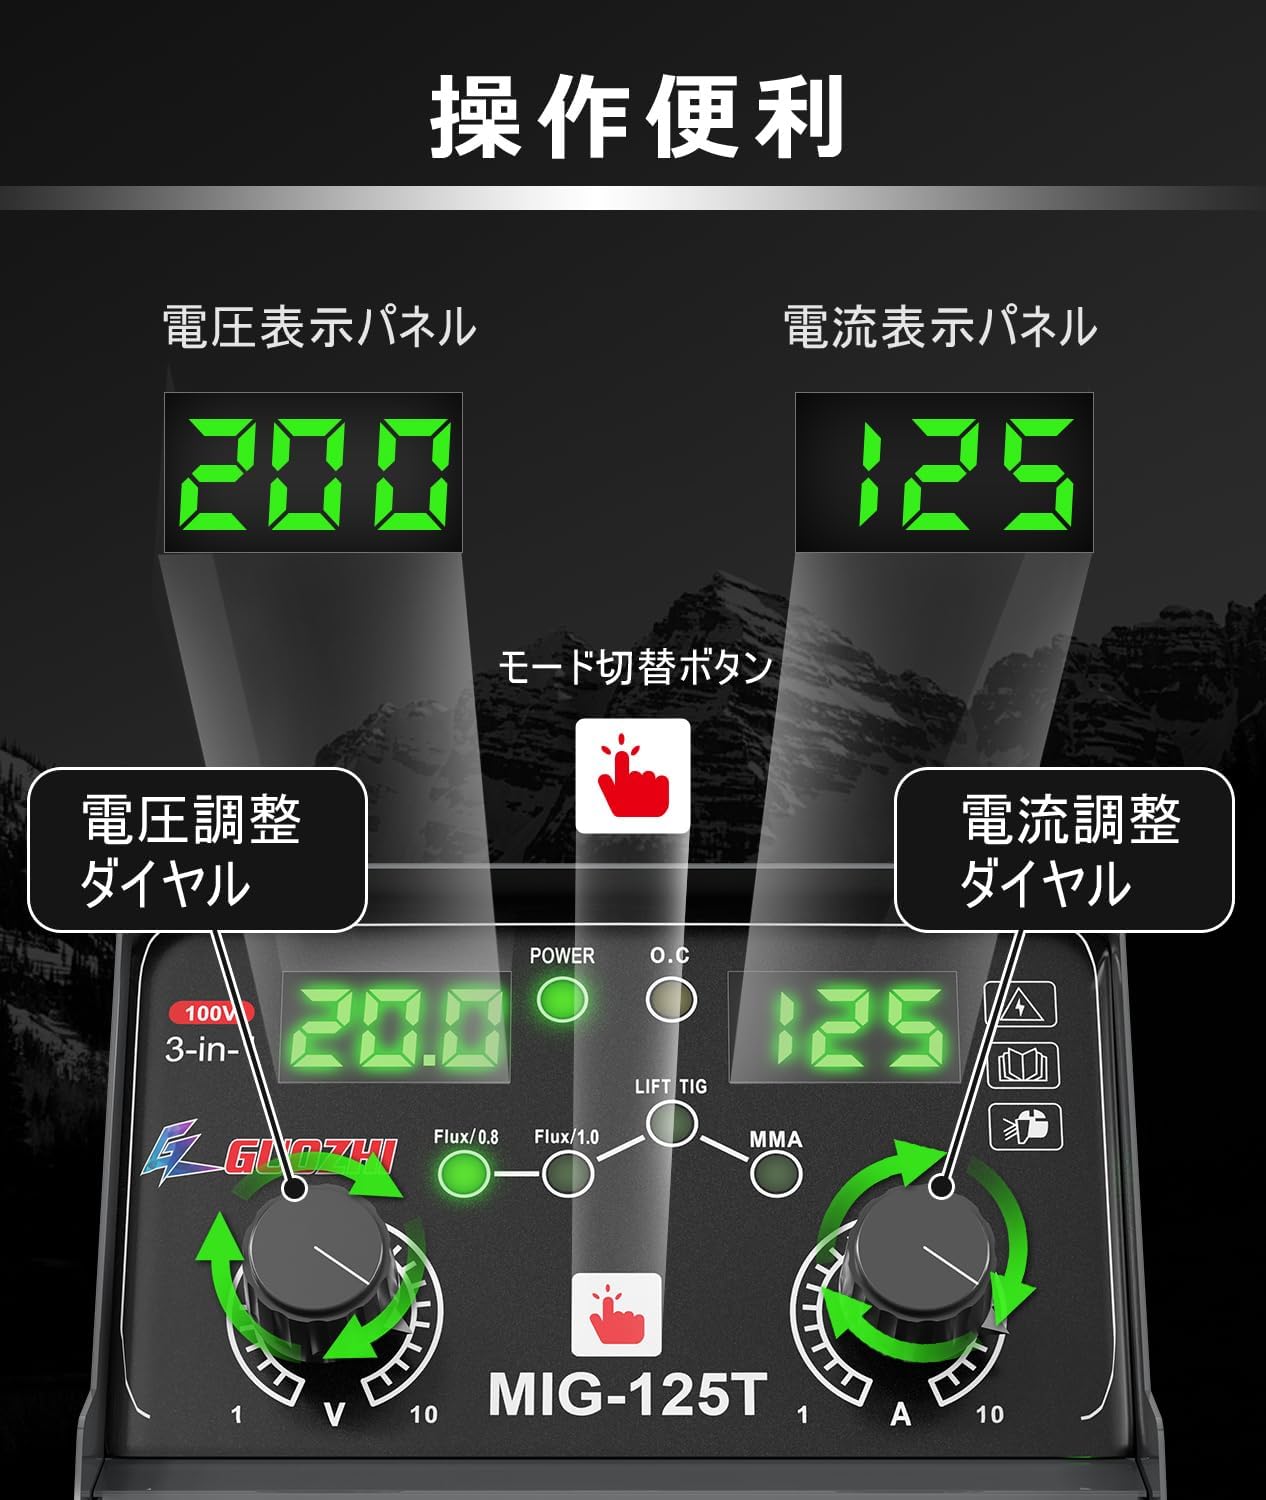
Image 5.1: The control panel of the MIG-125T, showing the voltage display, current display, mode selection button, voltage adjustment dial, and current adjustment dial.
- Voltage Display Panel: Shows the set or actual welding voltage.
- Current Display Panel: Shows the set or actual welding current.
- Mode Selection Button: Press to cycle through welding modes (Flux/0.8, Flux/1.0, LIFT TIG, MMA).
- Voltage Adjustment Dial: Adjusts the welding voltage.
- Current Adjustment Dial: Adjusts the welding current.
5.2 Welding Modes:
The MIG-125T supports three primary welding processes:
- Non-Gas Wire (Flux Core MIG): Ideal for outdoor use and welding without external shielding gas. Uses flux-cored wire (0.8mm or 1.0mm). The machine automatically adjusts voltage based on power settings.
- MMA (Manual Metal Arc) Welding: Also known as Stick Welding. Suitable for various materials and conditions. Uses welding rods (1.6mm-3.2mm).
- Lift TIG Welding: Provides precise, high-quality welds. Requires a separate TIG torch.
5.3 General Operation:
- Connect the machine to a 100V power supply.
- Turn on the power switch.
- Select the desired welding mode using the mode selection button.
- Adjust the current and voltage using the respective dials according to the material thickness and welding process.
- For MIG welding, hold the torch trigger and bring the torch close to the workpiece. The arc will ignite when the wire touches the workpiece while the trigger is held.
- For MMA welding, strike the electrode against the workpiece to initiate the arc.
- For Lift TIG welding, gently touch the tungsten electrode to the workpiece and then lift it slightly to initiate the arc.
Important Note for MIG Welding: When performing MIG welding, you must hold the torch trigger while bringing the torch to the welding point on the workpiece. The arc will not spark if the torch trigger is not held when making contact with the workpiece.
6. Maintenance
Regular maintenance ensures the longevity and optimal performance of your welding machine.
- Cleaning: Periodically clean the machine's exterior with a dry cloth. Use compressed air to blow out dust from the ventilation openings. Ensure the machine is unplugged before cleaning.
- Cable Inspection: Regularly inspect all cables (power, electrode holder, earth clamp, torch) for cuts, fraying, or damage. Replace damaged cables immediately.
- Torch Maintenance: For MIG welding, regularly check and clean the contact tip and nozzle. Replace worn-out contact tips.
- Storage: Store the welder in a dry, clean environment, away from direct sunlight and extreme temperatures.

Image 6.1: The MIG-125T features a 360° forced air cooling fan to prevent overheating and ensure stable operation.
7. Troubleshooting
This section lists common error codes and their solutions.

Image 7.1: A list of common error codes displayed on the MIG-125T and their corresponding solutions.
| Error Code | Description | Solution |
|---|---|---|
| -E2 | Machine overheating protection activated. | Allow the machine to cool down; it will recover automatically. Ensure proper ventilation. |
| -E4 | Wire feeder malfunction or wire jammed. | Check for jammed wire and clear it. If the issue persists, the wire feeder may need replacement. Restart the machine. |
| -E9 | Wire feeder power supply issue or main/sub control board abnormality. | Check if the wire feeder line is disconnected. Verify the connection between the main and sub control boards. Restart the machine. |
| -E5 | System input voltage abnormality. | Check if the machine's power supply is normal and within the specified voltage range (100V ±15%). |
8. Specifications

Image 8.1: A table detailing the technical specifications of the MIG-125T welder.
| Parameter | Value |
|---|---|
| Model | MIG-125T |
| Rated Input Power | 4.3 kVA |
| Input Voltage | 100V ±15% |
| Rated Frequency | 50/60 Hz |
| Power Factor | 0.73 |
| Efficiency | 85% |
| MMA Current Range | 40-120 A |
| MIG Current Range | 40-130 A |
| TIG Current Range | 20-120 A |
| Rated Duty Cycle | 60% |
| Applicable Wire Diameter | Φ0.8 mm / Φ1.0 mm |
| Applicable Welding Rod | Φ1.6 mm - Φ3.2 mm |
| Applicable Plate Thickness | 0.8 mm - 5 mm |
| Dimensions (L×W×H) | 27.5 x 14.3 x 18.2 cm |
| Body Weight | Approx. 3.9 kg |

Image 8.2: The compact dimensions (27.5 x 14.3 x 18.2 cm) and lightweight design (3.9 kg) of the MIG-125T, shown next to a water bottle for scale.
9. Warranty and Support
Your GZ GUOZHI MIG-125T welder comes with a 2-year warranty from the date of purchase. If you have any questions, concerns, or encounter any issues with the product, please do not hesitate to contact our customer support. A Japanese instruction manual is included with the product for detailed guidance.
For support, please refer to the contact information provided in your purchase documentation or on the official GZ GUOZHI website.