Introduction
Thank you for choosing the Urackify Stainless Steel Dish Drying Rack. This manual provides essential information for the proper assembly, operation, and maintenance of your new dish drying rack. Please read these instructions carefully before use to ensure optimal performance and longevity of the product.
Safety Information
- Ensure all components are securely assembled before placing dishes on the rack.
- Do not overload the rack beyond its capacity to prevent tipping or damage.
- Keep out of reach of children to prevent accidents.
- Place the rack on a stable, flat surface near a sink for proper drainage.
Package Contents
Please verify that all the following components are included in your package:
- 1 x Stainless Steel Rack Frame
- 1 x Drain Board with Adjustable Spout
- 1 x Utensil Holder (3 compartments)
- 4 x Non-slip Feet (pre-attached or to be attached)
- 1 x Detachable Cup Shelf (optional, if included)

Image: Fully assembled Urackify Stainless Steel Dish Drying Rack, showcasing the main rack, drain board, utensil holder, and cup shelf.
Setup Instructions
Follow these steps for quick and easy assembly:
- Attach the Drain Board: Place the main stainless steel rack frame onto the drain board. Ensure the frame slots securely into the designated grooves on the drain board.
- Install the Utensil Holder: Hook the utensil holder onto the side of the stainless steel rack frame. Ensure it is firmly attached.
- Adjust the Drain Spout: The drain spout on the drain board can be adjusted to direct water into your sink. Simply rotate the spout to the desired direction (left or right) to align with your sink.
- Position the Cup Shelf (if applicable): If your model includes a detachable cup shelf, hook it onto the side of the rack where cups can hang and drain directly into the main drain board.
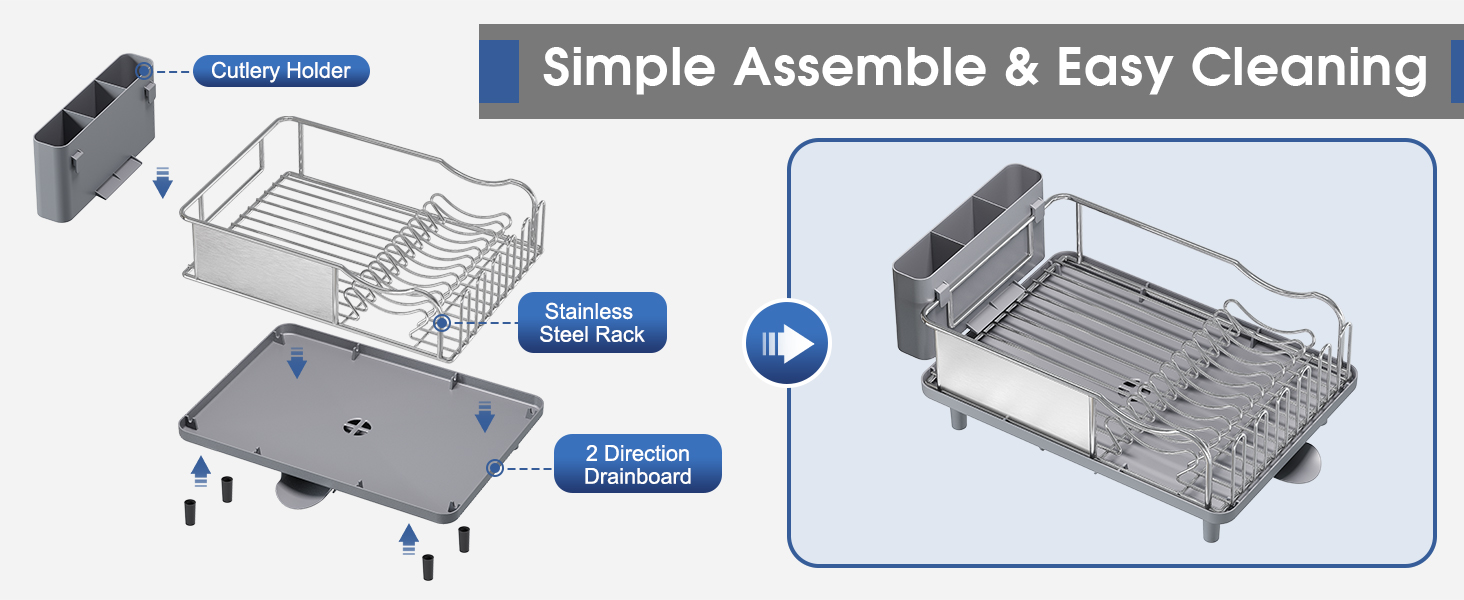
Image: Visual guide illustrating the tool-free assembly process, showing how the stainless steel rack, drain board, and cutlery holder connect.
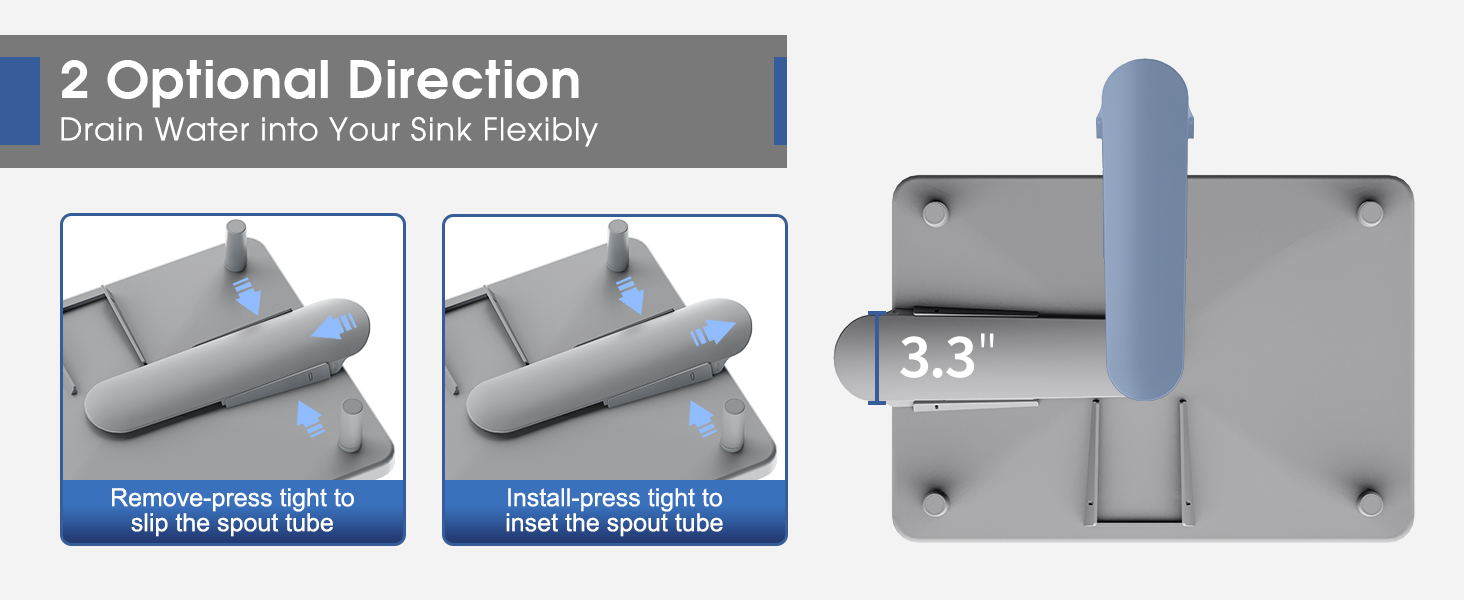
Image: Illustration demonstrating the two-directional adjustable drain spout, highlighting how to remove and install it for flexible water drainage.
Operating Instructions
To effectively use your Urackify Dish Drying Rack:
- Dish Placement: Arrange plates vertically in the main rack slots. Bowls, pots, and pans can be placed on the flat sections.
- Utensil Organization: Use the three-compartment utensil holder to separate forks, knives, and spoons for efficient drying.
- Cup Drying: Place cups and glasses on the designated cup shelf or inverted on the flat rack surface.
- Automatic Drainage: Ensure the adjustable drain spout is positioned over your sink opening. Water will automatically drain from the board, preventing accumulation on your countertop.

Image: A fully loaded dish drying rack demonstrating its large capacity for plates, bowls, a cutting board, utensils, and cups.

Image: Detailed view of the three-compartment cutlery holder, showing how forks, spoons, and knives can be organized.
Maintenance
To maintain the quality and appearance of your dish drying rack:
- Regular Cleaning: Wipe down the stainless steel rack and plastic drain board regularly with a soft cloth and mild soap.
- Prevent Water Spots: For best results, dry the stainless steel components immediately after cleaning to prevent water spots.
- Deep Cleaning: Periodically disassemble the rack and clean all parts thoroughly, especially the drain board and spout, to prevent mineral buildup and ensure efficient drainage.
- Avoid Harsh Chemicals: Do not use abrasive cleaners, steel wool, or harsh chemicals, as these can damage the stainless steel finish and plastic components.

Image: Close-up view emphasizing the 304 stainless steel construction of the rack and frame, designed for rust and corrosion prevention.
Troubleshooting
| Problem | Possible Cause | Solution |
|---|---|---|
| Water pooling on countertop | Drain spout not positioned correctly over sink. | Adjust the drain spout to ensure it extends into the sink. |
| Water pooling on drain board | Drain spout or drain holes are clogged. | Clean the drain spout and drain holes to remove any debris or mineral buildup. |
| Rack feels unstable | Components not fully assembled or placed on an uneven surface. | Ensure all parts are securely connected and the rack is on a flat, stable countertop. |
Specifications
| Feature | Detail |
|---|---|
| Material | 304 Stainless Steel (Rack Frame), Durable Plastic (Drain Board, Utensil Holder) |
| Product Dimensions | 17.24"D x 12.99"W x 5.7"H |
| Color | Gray |
| Item Weight | 4.18 pounds |
| Special Feature | Rust Resistant, Adjustable Drain Spout |
| Mounting Type | Countertop Mount |
| Model Number | Ur-dr304 |
| UPC | 791684278419 |

Image: Dimensional drawing of the Urackify dish drying rack, indicating length, width, height, and utensil holder dimensions.
Warranty and Support
Urackify stands behind the quality of its products. For any issues or support needs, please contact Urackify customer service. While specific warranty details are not provided in this manual, please refer to the product packaging or the official Urackify Brand Store for the most current warranty information and contact options.


