1. Introduction
Thank you for choosing the DURAGS Smart Fingerprint Door Lock. This manual provides detailed instructions for installation, operation, and maintenance to ensure optimal performance and security. Please read this manual carefully before installation and use.
2. Product Overview
The DURAGS Smart Fingerprint Door Lock offers multiple convenient and secure ways to access your property. Designed for ease of use and installation, it integrates advanced biometric technology with traditional locking mechanisms.

Image: The smart fingerprint door lock, showing both the exterior keypad and fingerprint sensor, and the interior unit.
Key Features:
- Multiple Unlock Methods: Fingerprint, Password, IC Card, Smartphone (via app), and Traditional Key.
- Advanced Biometric Recognition: Equipped with an upgraded 508 DPI fingerprint sensor (120x120 pixel effective resolution) for over 98% recognition rate in 0.3 seconds.
- User Management: Stores up to 50 fingerprints (first fingerprint is administrative) and 200 password sets.
- Flexible Locking Modes: Features automatic locking after unlock and an always-open mode for convenience.
- Low Power Consumption: Operates on 4 AAA batteries for approximately one year. Includes low battery alerts and an emergency Micro USB power option.
- Easy DIY Installation: Designed for quick installation with a screwdriver, no additional drilling required for most standard American single-cylinder doors.
- Adjustable Latch: Fits door thicknesses between 35-40mm with an adjustable latch (60mm or 70mm).

Image: Visual representation of the five different ways to unlock the smart door lock: fingerprint, password, smartphone app, physical key, and IC card.
3. Package Contents
Please verify that all components are present in your package:
- 1 x Front Handle Assembly
- 1 x Rear Handle Assembly
- 1 x User Manual (this document)
- 1 x Screw Bag (for door thickness 35-55mm)
- 1 x Adjustable Latch (60mm/70mm)
4. Specifications
| Feature | Detail |
|---|---|
| Model | WF-M4 |
| Color | Black/Coffee Gold |
| Material | Zinc Alloy |
| Power Supply | 4 x AAA Batteries (not included) |
| Unlock Methods | Fingerprint, Password, IC Card, Key, Smartphone App |
| Fingerprint Capacity | 50 (First is administrative) |
| Password Capacity | 200 sets |
| Unlock Speed | <0.3 seconds |
| Operating Temperature | -20°C ~ 60°C (-4°F ~ 140°F) |
| Operating Humidity | 0-90% RH |
| Compatible Door Thickness | 35-40mm (1.38-1.57 inches) |
| Adjustable Latch | 60mm (2-3/8 inches) or 70mm (2-3/4 inches) |
5. Setup (Installation)
The DURAGS Smart Fingerprint Door Lock is designed for easy DIY installation, typically taking only minutes with a screwdriver (included). No additional drilling is required for most standard American single-cylinder doors. Please ensure your door's dimensions are compatible before beginning.
Pre-Installation Check:
- Verify your door thickness is between 35-40mm.
- Confirm your door's backset (distance from door edge to center of bore hole) is either 60mm (2-3/8 inches) or 70mm (2-3/4 inches). The latch is adjustable.
Installation Steps:
- Prepare the Door: Ensure the existing deadbolt or knob is removed.
- Install the Latch: Insert the adjustable latch into the door edge. Ensure the latch bolt faces the correct direction for your door swing. Adjust the backset if necessary.
- Install the Exterior Assembly: Feed the cable from the exterior handle through the door hole. Position the exterior handle flush against the door.
- Install the Interior Assembly: Connect the cable from the exterior assembly to the interior assembly. Align the interior assembly with the mounting posts and secure it with the provided screws.
- Insert Batteries: Open the battery cover on the interior assembly and insert 4 AAA alkaline batteries (not included), ensuring correct polarity.
- Test the Lock: After installation, test all unlock methods (key, fingerprint, password) to ensure proper functionality.
Note: For detailed visual instructions, please refer to the product installation video if available (not provided in current data).
6. Operating Instructions
6.1 Initial Setup and Administrator Fingerprint/Password
Upon first use, you will need to set up an administrator fingerprint or password. The first fingerprint registered will automatically be assigned administrative privileges.
- Refer to the specific instructions in the included user manual for programming the first administrator fingerprint/password.
- The administrator can then add or delete other user fingerprints and passwords.

Image: An infographic detailing the lock's core technologies, including user management, remote password capabilities, lock time settings, and operation record queries.
6.2 Unlock Methods
- Fingerprint Unlock: Place your registered finger on the fingerprint sensor. The lock will unlock in less than 0.3 seconds upon successful recognition.

Image: Illustrates the smart chip's sensitive and stable fingerprint recognition, capable of adapting to fingerprint wear and growth.
- Password Unlock: Enter your registered password on the keypad, followed by the '#' key.
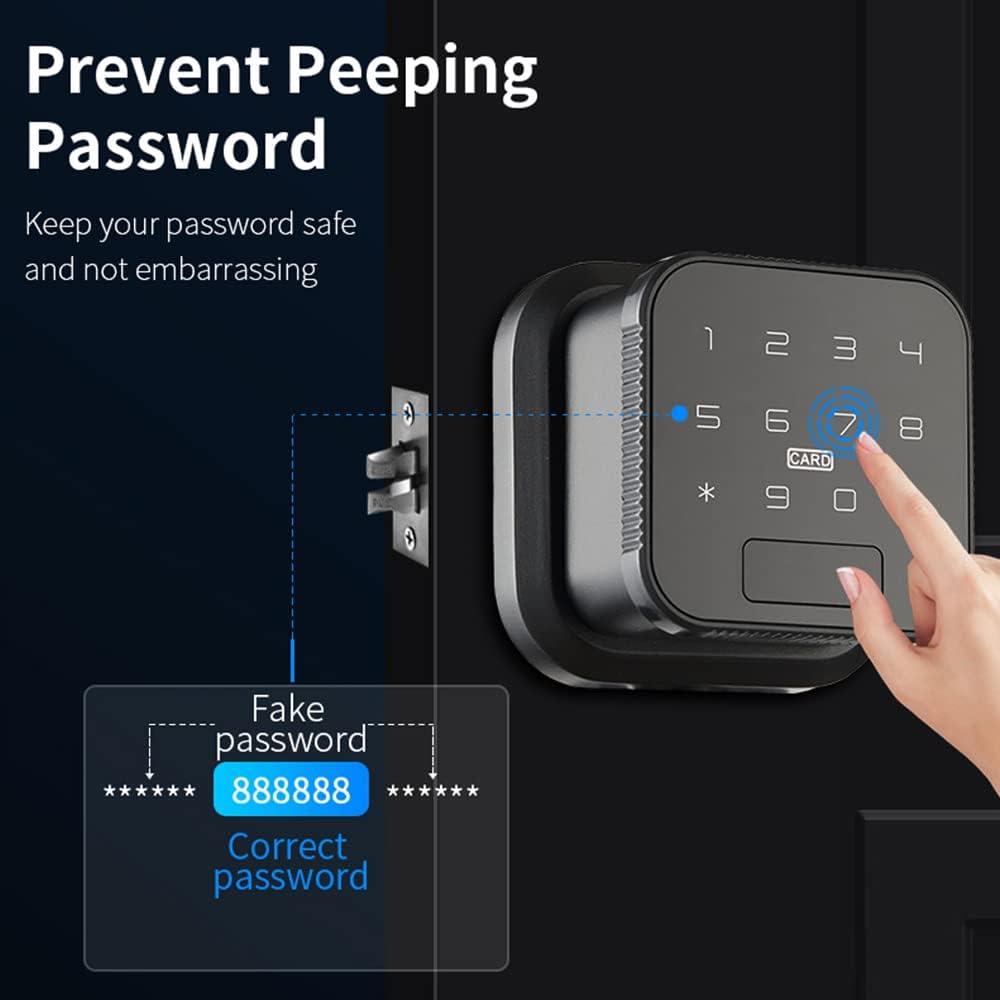
Image: Demonstrates the "Prevent Peeping Password" feature, allowing users to input random numbers before and after their actual password for enhanced security.
- IC Card Unlock: Swipe your registered IC card over the designated card reader area on the lock.

Image: Shows the IC card unlock method, highlighting encrypted recognition and the ability to delete lost cards.
- Smartphone App Unlock: Use the dedicated smartphone application (e.g., Dada Lock app) to remotely unlock the door. Follow the app's instructions for pairing and operation.

Image: Illustrates the APP Management feature, showing the lock's compatibility with the Dada Lock app for various residential and commercial applications.
- Key Unlock: In case of emergency or battery depletion, use the physical key provided to unlock the door.
6.3 Locking Modes
- Automatic Lock: The lock will automatically re-lock after a set period (e.g., 3-10 seconds) once it has been unlocked. This feature ensures your door is always secure.
- Normally Open Mode: This mode allows the door to remain unlocked for extended periods, useful for high-traffic situations. This can typically be set via the lock's settings or the smartphone app.

Image: Compares the "Automatically lock after unlock" feature with the "Normally Open Mode," showing how the lock can be configured for different security and convenience needs.
6.4 Application Scenarios
The lock's versatile features make it suitable for various environments:
- Residential: Bedrooms, apartments, homes.
- Commercial: Offices, store rooms, hotels, short-term rentals.
- Temporary Access: Grant access to visitors, nannies, or for moving purposes with time-limited passwords or access records.

Image: Depicts multiple application scenarios for the smart lock, including managing access for visitors, short-term rentals, nannies, and during moving processes.
7. Maintenance
7.1 Battery Management
- The lock operates on 4 AAA alkaline batteries, which typically last about one year.
- When the batteries are running low, the lock will emit an audible alert to remind you to replace them.
- Emergency Power: If the batteries are completely depleted, you can use a Micro USB cable to provide emergency power to unlock the door. Connect the Micro USB cable to the emergency power port on the lock and a power bank or USB charger.
- Always replace all four batteries at once with new, high-quality alkaline batteries.
7.2 Cleaning
- Clean the lock's exterior with a soft, dry cloth.
- Do not use abrasive cleaners, solvents, or harsh chemicals, as these can damage the finish or electronic components.
- Keep the fingerprint sensor and keypad clean and free of debris for optimal performance.
8. Troubleshooting
If you encounter any issues with your DURAGS Smart Fingerprint Door Lock, please refer to the following common solutions:
- Lock not responding: Check battery levels. Replace batteries if low. Use the emergency Micro USB power or physical key.
- Fingerprint not recognized: Ensure your finger is clean and dry. Try re-registering your fingerprint if the issue persists. Ensure you are using a registered fingerprint.
- Password not working: Double-check the entered password. Ensure you are pressing '#' after the password. Try re-programming the password.
- IC Card not working: Ensure the card is properly swiped over the sensor. Verify the card is registered.
- Lock not auto-locking: Check the auto-lock settings in the lock's menu or smartphone app. Ensure it's enabled and the delay time is set correctly.
If you still have any doubts or issues after following these steps, please do not hesitate to contact our customer service for assistance.
9. Warranty and Support
Your satisfaction is our greatest joy. We are committed to providing high-quality products and excellent customer service.
- 12-Month Warranty: Your DURAGS Smart Fingerprint Door Lock is covered by a 12-month warranty from the date of purchase, covering manufacturing defects.
- Lifetime Technical Support: We offer free lifetime technical support for our product.
If you have any questions, concerns, or require technical assistance, please do not hesitate to contact our customer service team. We are here to help!
Contact information (e.g., email, phone number, website) can typically be found on the product packaging or our official website.