1. Introduction
Thank you for choosing the Dokili GT860 Metal Detector. This device is designed for both adults and kids, offering a sensitive and accurate way to find various metals underground. Featuring an intuitive LCD display, 5 professional detection modes, and a 10-inch waterproof search coil, the GT860 is built for reliable performance in diverse environments. Please read this manual thoroughly before operation to ensure proper use and maintenance.

Figure 1: Dokili GT860 Metal Detector with its 10-inch waterproof search coil, ready for use.
2. Safety Information
- Always obtain permission before searching on private property.
- Avoid searching near underground utility lines, pipes, or electrical cables. If unsure, contact local utility companies.
- Do not operate the detector during electrical storms.
- Exercise caution when digging to avoid injury or damage to property.
- Keep the device away from extreme temperatures and direct sunlight for prolonged periods.
- Remove batteries if the detector will not be used for an extended time to prevent leakage.
- Dispose of batteries responsibly according to local regulations.
3. Package Contents
Upon opening the package, please verify that all the following components are included:
- Dokili GT860 Control Unit with LCD Display
- Adjustable Stem (Upper, Middle, Lower sections)
- 10-inch Waterproof Search Coil
- Armrest
- Connecting Rods and Fasteners
- User Manual (this document)
- (Batteries not included - requires 2x9V alkaline batteries)
4. Product Features and Overview
The Dokili GT860 is equipped with advanced features to enhance your metal detecting experience:
- Intelligent LCD Panel & Backlight Display: Provides clear information on target identification, depth, battery status, and operating mode.
- 5 Professional Modes: ALL METAL, DIS (Discrimination), PINPOINT, MEMORY, and JEWELRY modes for versatile detection.
- 10" Waterproof Search Coil: Allows for effective searching in shallow water and wet environments.
- Adjustable Stem: Length can be adjusted from 22 to 35 inches (approximately 56cm to 89cm) for comfortable use by various users.
- Ergonomic & Lightweight Design: Features a comfortable hand rest and a curved, non-slip handle for extended use.
- Target Metals Discrimination: Identifies 6 kinds of target metals with 0-99 double digits.
- Coin Depth Indication: Estimates depth at 2", 4", 6", 8" and beyond.
- Adjustable Sensitivity: 5 grades of sensitivity control.
- Sound Frequency: 3 kinds of frequency indicating different metals.
- Volume Indication: 3 grades of volume control.
- Signal Strength Indication: 5 grades of signal strength.

Figure 2: Key functional components and design aspects of the Dokili GT860.

Figure 3: Ergonomic design details for comfortable, prolonged use.

Figure 4: The 10-inch waterproof DD search coil, designed for durability and performance in wet conditions.
5. Assembly and Setup
Follow these steps to assemble your Dokili GT860 Metal Detector:
- Attach the Search Coil: Connect the 10-inch search coil to the lower stem using the provided bolt and nut. Ensure it is securely fastened but allows for slight angle adjustment.
- Connect the Stem Sections: Slide the middle stem into the lower stem, and then the upper stem into the middle stem. Adjust the length to your preferred height and secure with the locking collars.
- Mount the Control Unit: Attach the control unit to the top of the upper stem. Ensure the cable from the search coil is wrapped neatly around the stem and plugged into the control unit's port.
- Install the Armrest: Slide the armrest onto the upper stem, positioning it for comfortable support of your forearm.
- Insert Batteries: Open the battery compartment on the control unit (usually at the back or bottom). Insert two 9V alkaline batteries, observing the correct polarity (+/-). Close the compartment securely.

Figure 5: The adjustable stem allows for comfortable use by users of different heights.
6. Operating Instructions
Familiarize yourself with the control unit and its functions before beginning your search.

Figure 6: Intuitive LCD Control Box layout and functions.
6.1 Power On/Off
- Press the Power Key (usually marked with a power symbol) to turn the detector ON or OFF.
6.2 Understanding the LCD Display
The LCD provides crucial information:
- Target ID Cursor: Indicates the probable type of metal detected (e.g., Iron, Foil, 5¢, P-Tab, 1¢, 10¢, 25¢, 50¢, $1, Silver).
- Digital Cursor/P-P Cursor: Provides a numerical target ID (0-99).
- Coin Depth Cursor: Estimates the depth of the target (2", 4", 6", 8", +).
- Signal Strength Cursor: Shows the strength of the detected signal.
- Mode Cursor: Indicates the currently selected operating mode.
- Sens Cursor: Displays the current sensitivity level.
- Vol Cursor: Shows the current volume level.
- Battery Cursor: Indicates remaining battery life.
6.3 Operating Modes
Press the MODE Key to cycle through the 5 professional detection modes:

Figure 7: The five operation modes and their general function.
- ALL METAL Mode: Detects all types of metal. This mode offers the deepest detection depth and is ideal for general searching when you don't want to miss anything.
- DIS (Discrimination) Mode: Allows you to eliminate certain types of metals from detection. Use the SENS and arrow keys to adjust discrimination levels. This is useful for ignoring junk metals like iron.
- PINPOINT Mode (PP): Once a target is detected, press the PP Key to pinpoint its exact location. This mode provides a continuous tone that increases in pitch and volume as you get closer to the target.
- MEMORY Mode: This mode allows the detector to "learn" and remember specific target IDs that you want to find or ignore. Consult the detailed instructions in the manual for setting up memory targets.
- JEWELRY Mode: Optimized for finding small valuable items like rings, earrings, and other jewelry, often by discriminating out iron and other common junk metals.
6.4 Adjusting Sensitivity (SENS)
- Press the SENS Key and use the arrow keys (↑ / ↓) to adjust the sensitivity level (5 grades). Higher sensitivity increases detection depth but may also increase false signals in mineralized ground or areas with electromagnetic interference.
6.5 Adjusting Volume (VOL)
- Press the VOL Key and use the arrow keys (↑ / ↓) to adjust the volume level (3 grades).
6.6 Sweeping Technique
Proper sweeping technique is crucial for effective detection:
- Hold the search coil parallel to the ground, about 1-2 inches above the surface.
- Sweep the coil slowly from side to side in overlapping arcs.
- Keep the coil level with the ground throughout the sweep. Avoid lifting the coil at the ends of the sweep.
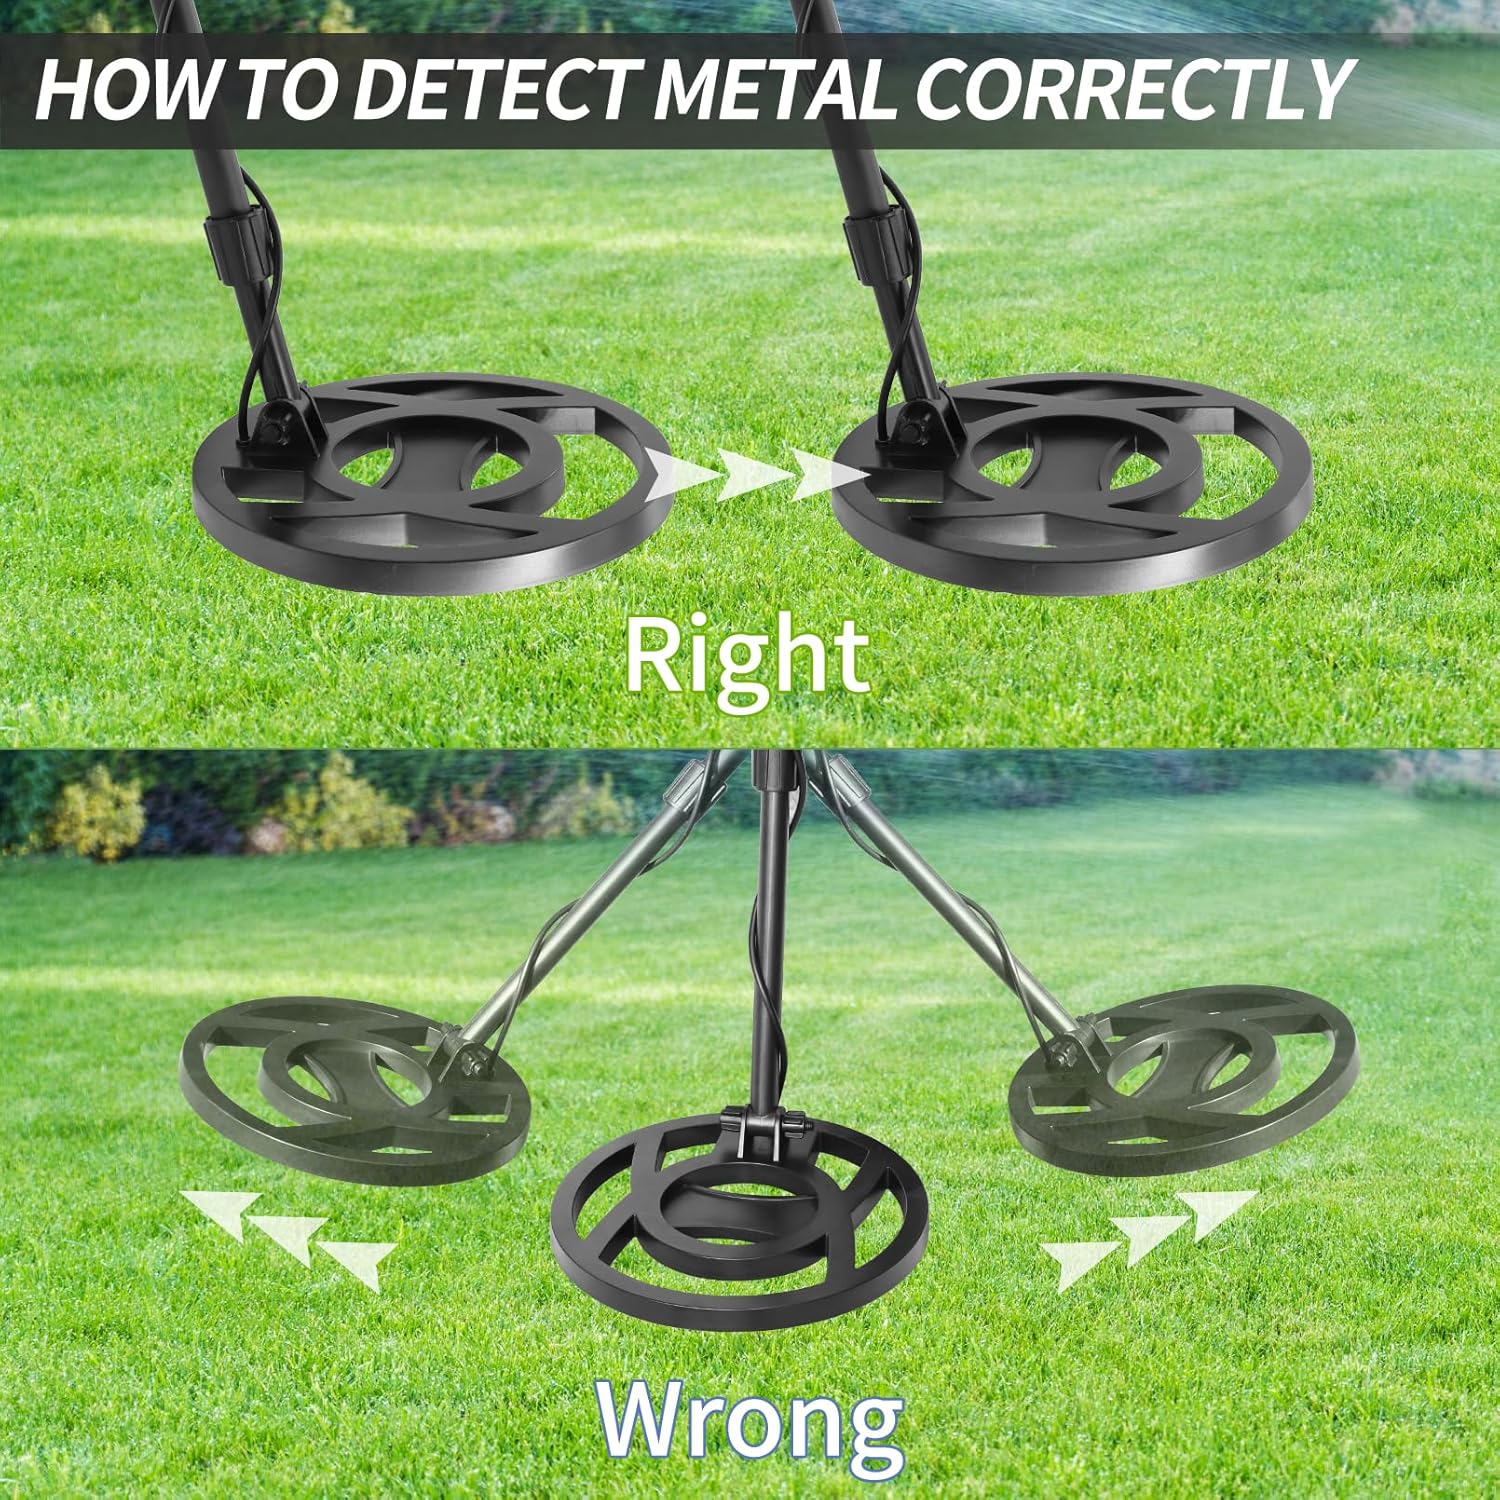
Figure 8: Correct sweeping motion for optimal detection.
7. Maintenance
- Cleaning: Wipe the detector with a damp cloth after each use. Do not use abrasive cleaners or solvents. The search coil can be rinsed with fresh water, but ensure the control unit is kept dry.
- Storage: Store the detector in a cool, dry place when not in use. Remove batteries if storing for extended periods to prevent corrosion.
- Battery Care: Use only high-quality alkaline batteries. Replace batteries when the battery indicator shows low power.
- Coil Protection: Avoid striking the search coil against hard objects.
8. Troubleshooting
| Problem | Possible Cause | Solution |
|---|---|---|
| No power | Dead batteries; Incorrect battery installation; Loose connection. | Replace batteries; Check battery polarity; Ensure all cables are securely connected. |
| False signals / Erratic behavior | High sensitivity; Electromagnetic interference (EMI); Mineralized ground; Loose coil cable. | Reduce sensitivity; Move away from power lines/electronics; Use discrimination mode; Tighten coil cable. |
| Poor detection depth | Low sensitivity; Incorrect sweeping technique; Deeply buried target. | Increase sensitivity; Ensure proper sweeping (Figure 8); Target may be beyond detector's range. |
| No sound | Volume too low; Headphone issue (if used); Speaker malfunction. | Increase volume; Check headphones; Contact support if speaker is faulty. |
9. Specifications
| Feature | Detail |
|---|---|
| Model Number | GT860 |
| Power Source | 2 x 9V Alkaline Batteries (not included) |
| Operating Frequency | 7 KHz |
| Search Coil | 10-inch Waterproof DD Coil |
| Detection Modes | ALL METAL, DIS, PINPOINT, MEMORY, JEWELRY |
| Adjustable Length | Approx. 97cm - 125.5cm (38.2 - 49.4 inches) |
| Product Dimensions | 24.99 x 27 x 109.98 cm (assembled) |
| Item Weight | 2.59 kg |
| Material | Metal |
| International Protection Rating | IP65 (Control unit not fully waterproof, coil is) |
Note: Specifications are subject to change without notice for product improvement.
10. Warranty and Support
Dokili products are manufactured to high-quality standards. For warranty information, technical support, or service inquiries, please refer to the contact information provided with your purchase or visit the official Dokili website. Keep your purchase receipt as proof of purchase.