1. Introduction
Thank you for choosing the PSIDE Parkside Performance PABSP 20 Li C3 Cordless Drill Driver. This manual provides important information regarding the safe operation, setup, maintenance, and troubleshooting of your new tool. Please read this manual thoroughly before first use and keep it for future reference.
1.1 Package Contents
- 1 x PSIDE Parkside Performance PABSP 20 Li C3 Cordless Drill Driver
- 1 x 2 Ah Lithium-ion Battery
- 1 x 2.4 A Battery Charger
- 1 x Plastic Carrying Case
- 1 x Instruction Manual

Image 1.1: The drill driver, battery, and charger neatly stored within the included plastic carrying case.
2. Safety Instructions
Always observe basic safety precautions when using electric tools to reduce the risk of fire, electric shock, and personal injury. Keep this manual handy for quick reference.
2.1 General Power Tool Safety Warnings
- Work Area Safety: Keep your work area clean and well-lit. Cluttered or dark areas invite accidents. Do not operate power tools in explosive atmospheres, such as in the presence of flammable liquids, gases, or dust.
- Electrical Safety: Avoid body contact with earthed or grounded surfaces such as pipes, radiators, ranges, and refrigerators. There is an increased risk of electric shock if your body is earthed or grounded.
- Personal Safety: Always wear eye protection. Use personal protective equipment such as dust masks, non-skid safety shoes, hard hats, or hearing protection when appropriate. Stay alert, watch what you are doing, and use common sense when operating a power tool.
- Power Tool Use and Care: Do not force the power tool. Use the correct power tool for your application. It will do the job better and safer at the rate for which it was designed. Disconnect the plug from the power source and/or remove the battery pack from the power tool before making any adjustments, changing accessories, or storing power tools.
2.2 Battery Tool Use and Care
- Recharge only with the charger specified by the manufacturer. A charger that is suitable for one type of battery pack may create a risk of fire when used with another battery pack.
- Use power tools only with specifically designated battery packs. Use of any other battery packs may create a risk of injury and fire.
- When battery pack is not in use, keep it away from other metal objects, like paper clips, coins, keys, nails, screws or other small metal objects, that can make a connection from one terminal to another. Shorting the battery terminals together may cause burns or a fire.
- Under abusive conditions, liquid may be ejected from the battery; avoid contact. If contact accidentally occurs, flush with water. If liquid contacts eyes, additionally seek medical help. Liquid ejected from the battery may cause irritation or burns.
3. Product Overview
Familiarize yourself with the components of your drill driver before operation.
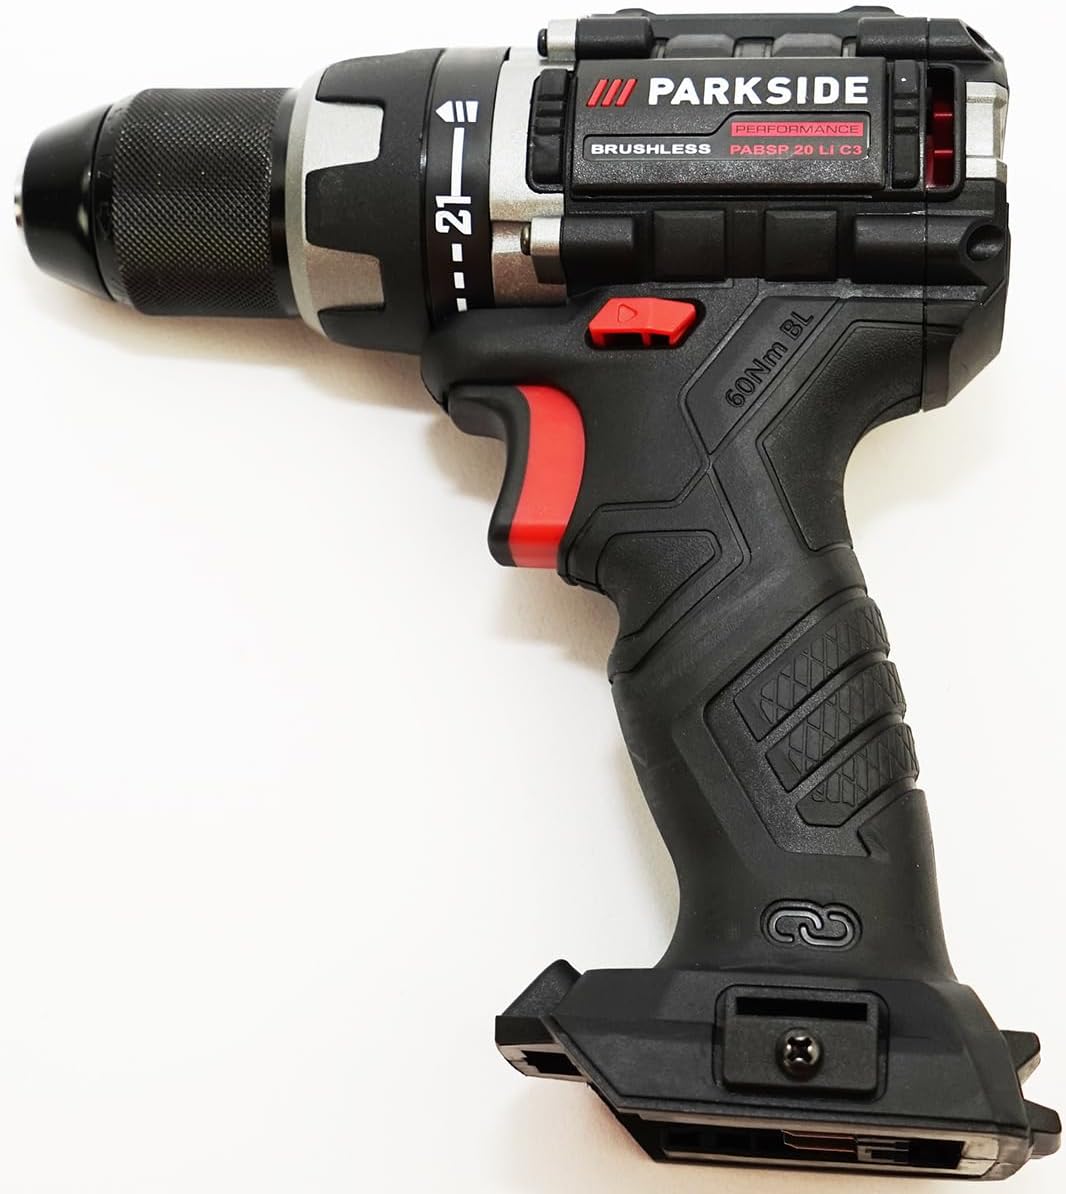
Image 3.1: Front view of the drill driver.

Image 3.2: Side view of the drill driver with key controls visible.
3.1 Key Components
- Röhm Metal Chuck: For holding drill bits and screwdriver bits. Features radial locking.
- Torque Setting Ring: Adjusts the torque for screwing applications (21 levels) and selects drilling mode.
- Speed Selector Switch: For choosing between two speed gears (1st gear for high torque, 2nd gear for high speed).
- Forward/Reverse Switch: Controls the direction of rotation.
- Trigger Switch: Activates the tool and controls variable speed.
- LED Work Light: Illuminates the work area.
- Battery Interface: For connecting the battery pack.
- Belt Clip: For convenient carrying.
- Magnetic Bit Holder: For storing screwdriver bits.
4. Setup
4.1 Charging the Battery
The included 2 Ah battery should be fully charged before first use. Use only the supplied 2.4 A charger.
- Connect the charger to a suitable power outlet. The charger's indicator light will show its status.
- Slide the battery pack onto the charger until it clicks into place.
- Allow the battery to charge until the charger's indicator shows a full charge (refer to charger manual for specific light indications).
- Once charged, disconnect the battery from the charger and unplug the charger from the power outlet.

Image 4.1: The 2 Ah battery and 2.4 A charger.
4.2 Inserting and Removing the Battery
- Inserting: Align the battery pack with the battery interface on the drill driver. Slide it in until it clicks securely into place.
- Removing: Press the battery release buttons (usually on the sides of the battery) and slide the battery pack out of the tool.
4.3 Installing and Removing Drill/Screwdriver Bits
The drill driver features a high-quality Röhm metal chuck with radial locking and automatic spindle lock (SPINDLE LOCK) for quick, tool-free bit changes.
- Ensure the tool is switched off and the battery is removed for safety.
- Rotate the chuck sleeve counter-clockwise to open the chuck jaws.
- Insert the drill bit or screwdriver bit into the chuck as far as it will go.
- Rotate the chuck sleeve clockwise to tighten the jaws firmly around the bit. The radial locking mechanism ensures a secure grip.
- To remove a bit, rotate the chuck sleeve counter-clockwise until the jaws open, then pull the bit out.
5. Operating
5.1 Speed Selection
The drill driver has a 2-speed gearbox:
- Gear 1 (Low Speed): For applications requiring high torque, such as driving large screws or drilling large diameter holes.
- Gear 2 (High Speed): For faster drilling with smaller bits or when less torque is required.
Slide the speed selector switch on top of the tool to choose the desired gear. Ensure the tool is stopped before changing gears to prevent damage.
5.2 Torque Adjustment
The torque setting ring allows you to pre-select 21 torque levels for screwing applications, preventing overtightening or stripping screw heads. There is also a dedicated drilling mode.
- Rotate the torque setting ring to align the desired number with the indicator mark. Lower numbers are for smaller screws or softer materials; higher numbers are for larger screws or harder materials.
- For drilling, rotate the ring to the drill symbol. This provides maximum torque without the clutch engaging.
5.3 Forward/Reverse Rotation
The forward/reverse switch controls the direction of rotation:
- Push the switch to the left for forward rotation (for drilling and driving screws).
- Push the switch to the right for reverse rotation (for removing screws or freeing jammed bits).
- When the switch is in the center position, the trigger is locked, preventing accidental startup.
5.4 Trigger Switch and Quickstop
Press the trigger switch to start the tool. The speed is continuously variable depending on how far the trigger is pressed. The Quickstop function immediately stops the chuck rotation when the trigger is released, enhancing control and safety.
5.5 LED Work Light
The integrated LED work light automatically illuminates the work area when the trigger is pressed, providing better visibility in dimly lit conditions.
5.6 Bluetooth Connectivity (for SMART Batteries)
If using a Parkside X20V PAPS SMART battery, you can connect to the Parkside app via Bluetooth to retrieve device data (total working time, tool discharge current, fault warnings) and configure device parameters for optimal adjustment.
6. Maintenance
Regular maintenance ensures the longevity and optimal performance of your tool.
6.1 Cleaning
- Always remove the battery pack before cleaning.
- Keep the ventilation openings of the tool clean to prevent overheating.
- Wipe the tool housing with a soft, damp cloth. Do not use harsh cleaning agents or solvents.
- Clean the chuck jaws regularly to ensure proper grip on bits.
6.2 Battery Care
- Store batteries in a cool, dry place, away from direct sunlight and extreme temperatures.
- Do not store batteries fully discharged for extended periods. Charge them periodically if not in use.
- Avoid exposing batteries to moisture or impact.
6.3 Storage
When not in use, store the drill driver and its accessories in the provided plastic carrying case in a dry, secure location, out of reach of children.
7. Troubleshooting
This section addresses common issues you might encounter. For problems not listed here, contact customer support.
| Problem | Possible Cause | Solution |
|---|---|---|
| Tool does not start. | Battery not charged or not inserted correctly. Forward/reverse switch in center (locked) position. | Charge battery. Ensure battery is fully inserted. Move forward/reverse switch to forward or reverse position. |
| Reduced power or performance. | Battery charge is low. Incorrect speed or torque setting for the task. | Recharge battery. Adjust speed and torque settings appropriately. |
| Bit slips in chuck. | Chuck not tightened sufficiently. Bit shank is dirty or damaged. | Tighten chuck firmly. Clean or replace bit. |
| Tool overheats. | Overloading the tool. Blocked ventilation openings. | Reduce load. Ensure ventilation openings are clear. Allow tool to cool. |
8. Specifications
Technical data for the PSIDE Parkside Performance PABSP 20 Li C3 Cordless Drill Driver.
| Feature | Value |
|---|---|
| Model Number | PABSP 20 Li C3 |
| Voltage | 20 V |
| Chuck Capacity | 1.5 - 13 mm |
| Max. Torque | 60 Nm |
| No-load Speed (1st Gear) | 0 - 500 rpm |
| No-load Speed (2nd Gear) | 0 - 2000 rpm |
| Torque Levels | 21 + 1 (Drill Mode) |
| Max. Drilling Diameter (Wood) | 38 mm |
| Max. Drilling Diameter (Steel) | 13 mm |
| Max. Screw Diameter | 10 mm (120 mm in pine wood) |
| Material | Plastic |
| Dimensions (L x W x H) | Approx. 19 x 19.5 x 7.6 cm |
| Weight (without battery) | Approx. 1.1 kg |
| Included Battery Capacity | 2 Ah |
| Included Charger Output | 2.4 A |
| Motor Type | Brushless |
9. Warranty and Support
This device is compatible with all batteries from the Parkside X 20 V Team series. For specific warranty information and customer support, please refer to the documentation provided with your purchase or contact the retailer. Information regarding spare parts availability is not provided in the product details.


