1. Introduction and Safety Information
This manual provides essential instructions for the safe and effective operation of your Grimtron VT03 Gun Safe. Please read all instructions carefully before setup and use. Keep this manual for future reference.
Important Safety Precautions:
- Always store firearms unloaded and locked.
- Keep the safe keys and electronic password in a secure location, separate from the safe itself, and away from children.
- Do not store flammable materials or liquids inside the safe.
- Ensure the safe is securely mounted to prevent unauthorized removal.
- This safe is designed to deter theft and restrict access. It is not fireproof or waterproof unless explicitly stated.
2. Package Contents
Verify that all items listed below are included in your package:
- Grimtron VT03 Gun Safe x 1
- Emergency Keys x 2
- Expansion Screws x 4 (for mounting)
- Type-C Cable x 1 (for external power)
- User Manual x 1
- Pistol Rack x 1
- Door Organizer x 1
- Removable Shelf x 1

Image: The Grimtron VT03 Gun Safe shown with its dimensions and all included accessories: emergency keys, gun organizer, gun rack, expansion screws, user manual, USB cable, and removable shelf.
3. Initial Setup
3.1 Battery Installation
The safe requires 4 AA batteries (not included) for the electronic keypad. The battery compartment is located inside the safe door.
- Open the safe using one of the emergency keys (refer to Section 4.2).
- Locate the battery compartment cover on the inside of the door.
- Remove the cover and insert 4 new AA batteries, ensuring correct polarity (+/-).
- Replace the battery compartment cover.

Image: Illustration showing the battery compartment for 4 AA batteries and the program button located inside the safe door.
3.2 Mounting the Safe
For enhanced security, it is recommended to secure the safe to a wall or floor using the provided expansion screws.
- Choose a suitable location (e.g., inside a wardrobe, cabinet, or to a solid wall/floor).
- Mark the desired drilling points through the pre-drilled holes at the back or bottom of the safe.
- Drill pilot holes using an appropriate drill bit for your mounting surface.
- Align the safe with the drilled holes and insert the expansion screws.
- Tighten the screws firmly to secure the safe in place.

Image: A visual guide demonstrating the quick installation process: Step 1 shows drilling pilot holes, Step 2 shows inserting screws, and Step 3 shows the safe securely mounted.
4. Operating Instructions
4.1 Opening with Electronic Keypad
The safe can be opened using a programmable 3 to 8 digit password.
- Enter your 3-8 digit password on the keypad.
- Press the '#' key to confirm.
- If the password is correct, the indicator light will turn green. Within 5 seconds, turn the knob clockwise to open the safe door.
- If the password is incorrect, the indicator light will turn red. Re-enter the correct password.
4.2 Opening with Emergency Key
In case of forgotten password or battery depletion, the safe can be opened with the emergency key.
- Locate the keyhole cover on the keypad panel.
- Remove the cover to expose the keyhole.
- Insert one of the emergency keys into the keyhole and turn it clockwise.
- While holding the key turned, turn the main knob clockwise to open the safe door.
- Remove the key once the safe is open.

Image: A visual representation of the two access methods: using the emergency key and turning the knob, or entering the correct password on the backlit keypad and turning the knob.
4.3 Setting/Changing the Password
You can set or change your personal password (3-8 digits) for the electronic keypad.
- With the safe door open, locate the red program button inside the safe, near the battery compartment.
- Press the program button. The keypad will beep, and the indicator light will flash.
- Enter your new 3-8 digit password on the keypad.
- Press the '#' key to confirm. The safe will beep twice, indicating successful password change.
- Test the new password with the door open before closing it.
4.4 Silent Mode
The safe features a silent mode for discreet operation.
- To activate/deactivate silent mode, press the '*' key on the keypad. The keypad will confirm with a short beep or by changing the light indicator.
4.5 LED Interior Light
The safe is equipped with an LED light that illuminates the interior when the door is opened, providing visibility in low-light conditions.
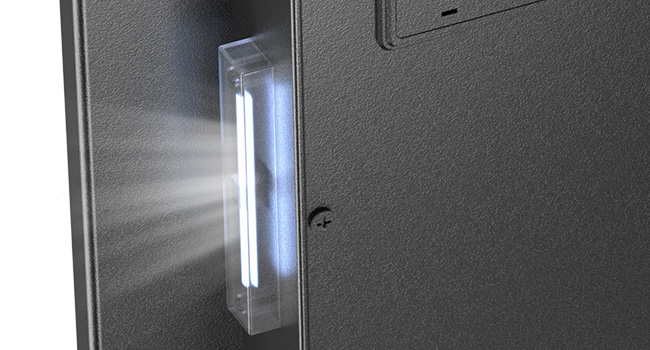
Image: The interior of the Grimtron safe, showing the LED light strip illuminating the contents, including a handgun, camera, and documents.
5. Key Features
5.1 Pistol Rack
The included pistol rack provides organized storage for up to four handguns, keeping them secure and easily accessible.

Image: A dedicated pistol rack designed to hold up to four handguns securely within the safe.
5.2 Door Organizer
The door organizer offers additional storage for smaller items such as magazines, car keys, flashlights, folding knives, and important documents like passports.
- Holds multiple magazines.
- Provides compartments for car keys and small tools.
- Securely stores documents and passports.

Image: A detailed view of the door-mounted organizer, illustrating its capacity for magazines, keys, flashlights, folding knives, and passports.
5.3 Removable Shelf
The safe includes a removable shelf, allowing for flexible space utilization and categorized storage of various items.
6. Care and Maintenance
- Cleaning: Wipe the safe's exterior with a soft, damp cloth. Avoid abrasive cleaners or solvents.
- Battery Replacement: Replace batteries annually or when the low battery indicator appears. Always use new, high-quality AA alkaline batteries.
- Key Storage: Store emergency keys in a secure location outside the safe.
7. Troubleshooting
| Problem | Possible Cause | Solution |
|---|---|---|
| Safe does not open with password. | Incorrect password entered; Low batteries. | Re-enter password carefully. Replace batteries. Use emergency key. |
| Keypad is unresponsive. | Dead batteries; Keypad malfunction. | Replace batteries. Use emergency key. Contact customer support if issue persists. |
| Safe door cannot be closed. | Obstruction in the door frame; Locking bolts not retracted. | Check for any obstructions. Ensure the knob is turned to retract bolts before closing. |
| Emergency key does not work. | Incorrect key; Keyhole obstruction. | Ensure you are using the correct emergency key. Check for debris in the keyhole. |
8. Product Specifications
- Brand: Grimtron
- Model: VT03
- Product Dimensions: 12.99"D x 13.78"W x 16.54"H
- Capacity: 1.72 Cubic Feet
- Lock Type: Electronic Keypad, Key
- Color: Black
- Material: Alloy Steel
- Mounting Type: Freestanding (with option for bolt-down)
- Item Weight: 32.2 Pounds
- Batteries Required: Yes (4 AA batteries, not included)

Image: The Grimtron VT03 Gun Safe with its door open, revealing the interior storage, pistol rack, and door organizer, alongside the electronic keypad.
9. Warranty and Customer Support
9.1 Warranty Information
This Grimtron VT03 Gun Safe comes with a 1-Year Limited Warranty from the date of purchase. This warranty covers manufacturing defects in materials and workmanship under normal use. It does not cover damage resulting from misuse, unauthorized modification, accident, or improper installation.
9.2 Customer Support
For technical assistance, warranty claims, or any questions regarding your Grimtron VT03 Gun Safe, please contact our customer support team. Please have your model number (VT03) and purchase date available when contacting support.
Contact Information:
Email: support@grimtron.com
Website: www.grimtron.com/support