1. Introduction
This manual provides comprehensive instructions for assembling your CUTEROOM Wooden Miniature House Kit, the Romantic Castle model. This DIY kit is designed for individuals aged 14 years and older, offering an engaging and detailed building experience. Upon completion, the miniature house serves as a decorative item.
2. Safety Information
- Small Parts Warning: This kit contains numerous small components. Keep out of reach of children under 3 years of age to prevent choking hazards.
- Sharp Tools: Assembly may require the use of sharp tools such as craft knives and tweezers. Exercise caution to avoid injury. Adult supervision is recommended for younger builders.
- Adhesives: Use glues in a well-ventilated area. Avoid contact with skin and eyes. Follow the manufacturer's safety instructions for any adhesives used.
- Electrical Components: The kit includes LED lights. Ensure proper handling of wires and battery components. Do not short-circuit batteries.
3. Package Contents
Your CUTEROOM Romantic Castle kit includes the following materials:
- Pre-cut wooden pieces for structure and furniture.
- Paper cutouts for decorations and details.
- Fabric pieces for soft furnishings.
- LED light components and wiring.
- Assembly instruction booklet with detailed pictures.
Note: Batteries and glue are not included in the kit due to transportation restrictions. Please prepare these items separately before beginning assembly.
4. Setup and Preparation
4.1 Required Tools (Not Included)
- Precision Tweezers: Essential for handling small parts.
- Craft Knife / Exacto Blade: For precise cutting of paper elements and releasing wooden pieces from their frames.
- Adhesive: Quick-drying craft glue or super glue is recommended.
- Ruler: For accurate measurements.
- Small Scissors: For cutting fabric and paper.
- AA Batteries: For powering the LED lights.
- Cutting Mat: To protect your work surface when using a craft knife.
4.2 Workspace Preparation
Ensure you have a clean, well-lit, and organized workspace. Lay out all components and tools within easy reach. Keep a small container for discarded pieces.
5. Assembly Instructions
Follow the English instruction booklet provided with your kit. The instructions include detailed pictures to guide you through each step. Patience and attention to detail are crucial for a successful build.
5.1 General Assembly Tips
- Review Instructions: Before starting, read through the entire instruction manual to understand the overall process.
- Part Identification: Familiarize yourself with the numbered or labeled parts.
- Gentle Handling: Wooden pieces can be delicate. Use a craft knife to carefully release parts from their frames rather than forcing them.
- Test Fit: Dry-fit pieces before applying glue to ensure correct alignment.
- Glue Application: Apply glue sparingly to avoid excess. Use toothpicks to apply small amounts of glue to tiny components. Allow sufficient drying time for each glued section before proceeding.
5.2 Step-by-Step Assembly Overview
The assembly process typically involves building individual furniture pieces and decorations first, then constructing the room sections, and finally assembling the overall structure of the house. The instruction booklet will guide you through the specific order for the Romantic Castle model.

Image: Interior view of the Romantic Castle miniature house kit, showcasing the detailed furniture and room layout. This image illustrates the intricate design and various elements that will be assembled.
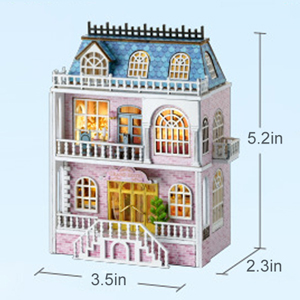
Image: A close-up view of a miniature bed, featuring pink bedding and delicate gold accents. This detail highlights the intricate nature of the furniture components.
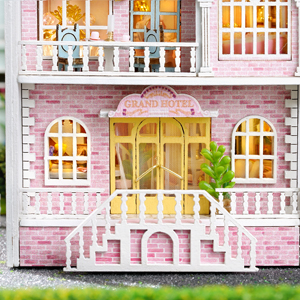
Image: A detailed close-up of a miniature desk area, complete with a small staircase and various decorative items. This shows the level of detail in the kit's accessories.
6. Operating Instructions (LED Lights)
Once the miniature house is fully assembled and the wiring for the LED lights is complete:
- Insert the required AA batteries into the designated battery box (not included).
- Connect the LED light wiring to the battery box as indicated in the assembly instructions.
- Activate the lights using the switch on the battery box.
The LED lights are designed to add a cozy ambiance to your miniature world.
7. Maintenance
- Cleaning: Dust the miniature house gently with a soft, dry brush or cloth. Avoid using water or cleaning solutions, as they may damage the materials.
- Storage: Store the completed model in a dry place away from direct sunlight and extreme temperatures to prevent warping or fading of materials.
- Battery Replacement: If the LED lights dim or stop working, replace the batteries in the battery box.
8. Troubleshooting
- Missing or Damaged Parts: Carefully check all package contents against the parts list in the instruction manual upon receipt. If any parts are missing or damaged, contact CUTEROOM customer support.
- LED Lights Not Working:
- Ensure batteries are correctly inserted and are not depleted.
- Check all wire connections for proper contact.
- Verify that the power switch is in the 'ON' position.
- Difficulty with Small Components: Use precision tweezers for handling tiny pieces. If a piece is too small to manipulate, consider using a toothpick with a tiny dab of glue.
- Pieces Not Fitting: Ensure you are using the correct pieces for each step. Some wooden pieces may require gentle sanding or trimming with a craft knife for a perfect fit.
9. Specifications
| Product Name | Romantic Castle |
| Brand | CUTEROOM |
| Model Number | B0CPXYSK8R |
| Product Dimensions | 3.5 x 3.5 x 4.6 inches |
| Item Weight | 10.4 ounces |
| Materials | Wood, Paper, Cloth |
| Recommended Age | 14 years and up |

Image: Product dimensions diagram. The Romantic Castle measures approximately 3.5 inches wide, 2.3 inches deep, and 5.2 inches high when closed. When opened, its width extends to 6.6 inches.
10. Warranty and Support
For any questions, concerns, or support regarding your CUTEROOM Wooden Miniature House Kit, please refer to the contact information provided with your purchase or visit the official CUTEROOM brand store online. Specific warranty details may vary; please consult your purchase documentation for more information.